
Minecraft can be an intensive application, despite its small graphical style and relatively simplistic gameplay. In the background, there is a lot going on, especially when you play with heavy Redstone builds.
The standard amount of RAM Minecraft will suddenly become too close if you insert mods into the mix. As a result, you will find stuttering, stashes, and other issues that make the game almost unplayable without sufficient RAM.
The great news is that it’s relatively easy to allocate more RAM to Minecraft. The other good news is that it is possible to do it more than one way.
Make Sure You Have RAM To Spare
The 1st step is to find out how much RAM is available for your PC. It’s easy.
- First, Click Start and select the Settings icon (it looks like a gear).
- Then, Click About.
- Next, Under Device Specifications, look for Installed RAM. Here, The number beside that will tell you how much RAM you have to spare.
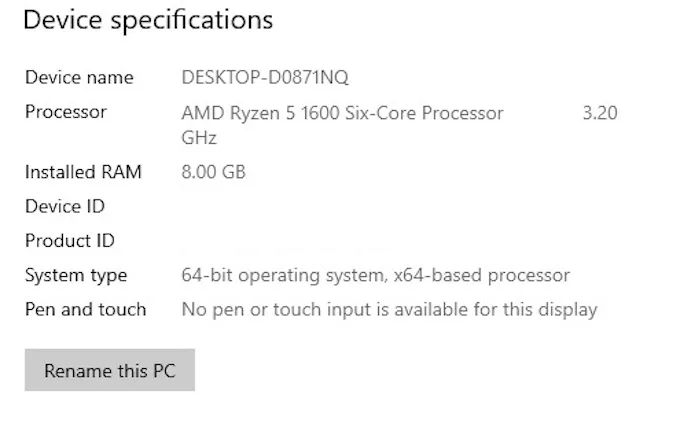
Although the recommended specs require 4 GB, Minecraft calls for a minimum of 2GB of RAM. But, of course, you’re golden if you’ve got more than that. You can now allocate all the RAM Minecraft needs to quench its thirst.
Method 1: Allocate RAM From The ATLauncher
You probably know the ATLauncher for Minecraft if you have downloaded mods or played a lot of Sky Factory. The ATLauncher makes it even easier to make RAM aside from the default launcher, especially as it means you don’t have to work with any code to do so.
- First, Launch the ATLauncher.
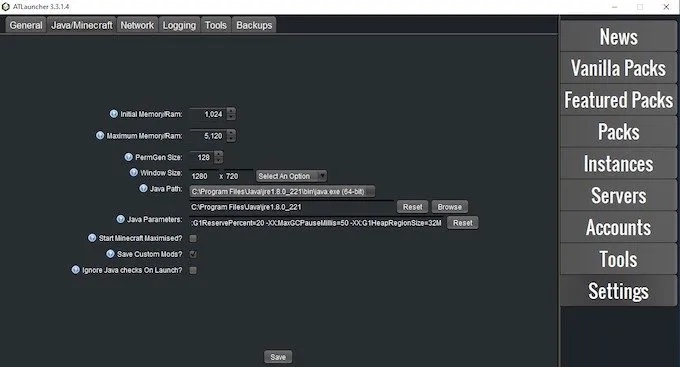
- Next, On the right side of the launcher, is a list of options. Picked Settings and then the Java/Minecraft tab at the top of the screen.
- Here, There are several choices, but what you’re interested in is the second one – Maximum Memory/RAM. Also, here, You can type in the amount you want to allocate, but clicking up and down is the easiest option. Here, This moves the amount of allocated RAM up or down in 0.5 GB increments.
- Once you’ve selected the amount of RAM you wish to use, click Save. Well, If you’re playing a mod-heavy pack like SkyFactory, you’ll have to allocate more RAM, or the title won’t launch. Sky Factory 4 needed at least 4 GB of RAM to perform testing, or it encountered errors on startup.
Method 2: Allocate RAM From The Default Launcher
Well, The original, default Minecraft launcher has changed over the years, but you can still allocate more RAM to what Minecraft uses.
- First, Open the Minecraft Launcher and select the version you want to play (either Bedrock or Java)
- Next, Select Installations from the tabs at the top. You’ll see a list of releases below, but if you haven’t set up any specific versions to play, you might only see the most recent version.
- Then, Hover your cursor over it and click the three white dots on the right side, then click Edit.
- Here, You’ll see a screen with the name of the installation, the version, and a few other settings. Click More Options and scroll-down until you see JVM Arguments. Here, This box will contain a lot of code, but all you have to worry about is the first snippet that looks like this:
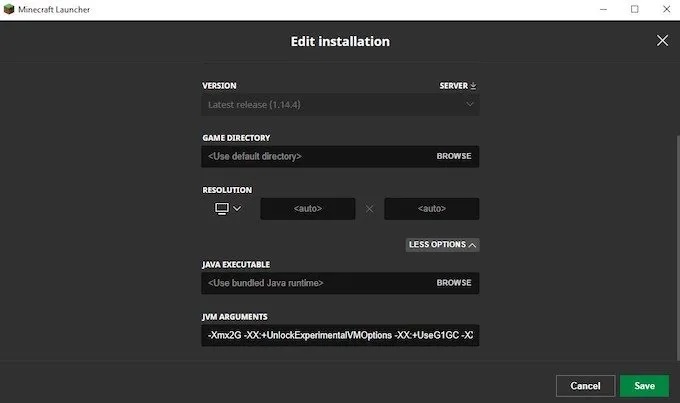
-Xmx2G
- The final number is the amount of RAM used by Minecraft. Change the “2” to however much RAM you want Minecraft to utilize.
It’s possible to use all the RAM you have, but it depends on whether you have anything more open and working in the background to make full use of it.
- Lastly, Once you make the change, click Save and launch the game. You should immediately see a change in performance.
Method 3: Allocate RAM Using The Twitch/Curse Launcher
You can also use the Twitch launcher to play several Minecraft mods (or Minecraft normal). Changing settings in this launcher is just as easy as in the above ATLauncher, but the initial way to get to these settings is slightly different.
- In the top-right corner, click the 3 lines, go to Files, and then click Settings. Also, You can press CTRL + Comma from within the launcher to open the Settings menu.
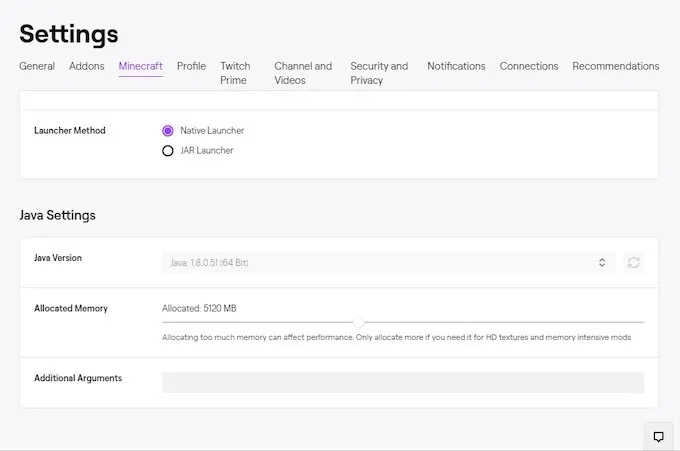
- From there, navigate to Minecraft and scroll-down to the bottom of the screen. You’ll see a section entitled Java Settings. For example, look for Allocated Memory and click the slider.
- Well, By default, it gives 3,228 MB of RAM to Sky Factory 4. Further, You can move the slider to the left or to the right to allocate more or less RAM for the game. Here, The slider increases or decreases the RAM in 0.25 GB increments.
- Once you’ve moved the slider, you’re finished. Navigate back to Mods, choose Minecraft, and launch into your better-performing title. It’s as easy as that.
Allocating more RAM to Minecraft can (and will) make Minecraft work better, but there are situations where overall system performance is reduced by allocating too much RAM.
RAM is also needed in other areas of your PC. While they will not have a great impact if you don’t make it at the same time as a game, at least 1GB of RAM is often a good idea for non-gaming processes.
You can specify other issues with your memory if you modify your RAM settings and still see not how much performance you expect — or if your PC reports incorrect amounts of RAM. So, it’s a good idea to check bad memory from time to time.
The good news is that it’s easy to exchange your RAM even if you have a problem. In fact, it is worth considering buying more RAM for your system if you want to see even better performance, especially as the memory price continues to decline.