
Windows 10 version 20H2 is expected to come sometime during the fall of 2020 with slight improvements and bug fixes. After the original release of Windows 10, this will be the 10th minor update and the 2nd semiannual feature update.
Windows 10 new versions are long known for new bugs and errors that require proper testing in the early days. We hope Windows 10 20H2 set an example being first bringing no new issues on the computer. Still, there are chances as drivers may remain incompatible with the new release.
The new devices at the end of service will come pre-loaded with compatible drivers and other required software. So, if you are looking for ways to prevent Windows 10 20H2 from installing in its early days, read this guide in detail –
Note: In this post, we cover three ways to prevent version 20H2 from installing on Windows 10 Pro, Enterprise using Group Policy. Additionally, we also discuss the same for Windows 10 Home Edition turning on the metered connection.
Block Windows 10 20H2 Using Group Policy
To block Windows 10 20H2 using Group Policy, use these steps –
- Tap on the Start button & then type gpedit.msc.
- Select the top result from the list to launch the Local Group Policy Editor.
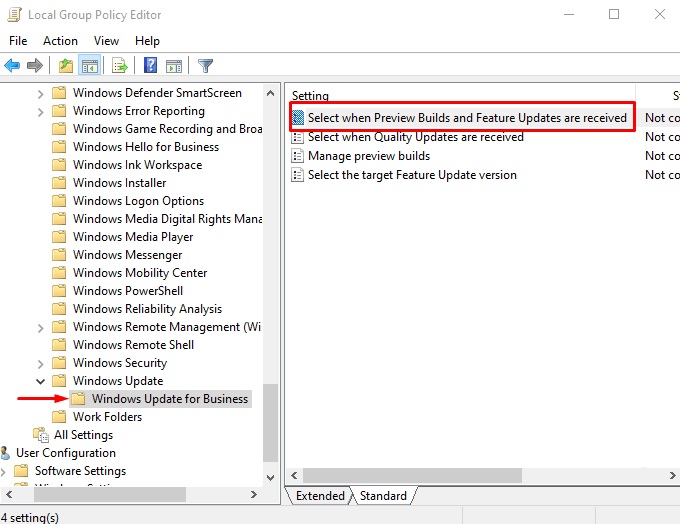
- Once you’re in the Local Group Policy Editor window, navigate to the following path –
Computer Configuration > Administrative Templates > Windows Components > Windows Update > Windows Update for Business
- Go to the right side and then double-click on the policy named Select when Preview Builds and Feature Updates are received.
- In the new window page, select the Enabled option.
- Now go to the Options section and select the Semiannual Channel option using the drop-down menu.
- Enter the number of days (from 1 to 365) you want to suspend the upgrades.
- Click Apply and then the OK button to save the changes.
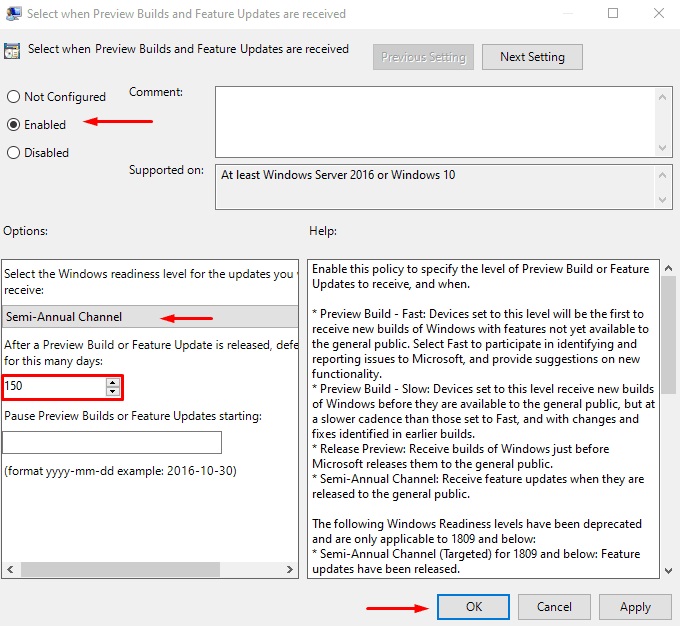
Once you complete the procedure, Windows 10 will block download and install version 20H2 up to the day you entered in the policy.
Prevent Version 20H2 from Installing Through Target Feature Update
Alternatively, you can also prevent the feature update by using the “Select the target Feature Update version” policy. Before you start this, so make sure your PC is running on Win10 version 1803 and later. The procedure to block the feature update is as follows:
Note: This method is only applicable for the device running on Windows 10 Pro or Enterprise edition.
- Right-click on the Start button and select Run.
- Type gpedit.msc and click enter to open the Local Group Policy Editor.
- Navigate to the following path:
Computer Configuration > Administrative Templates > Windows Components > Windows Update > Windows Update for Business
- Double-click on the Select target Feature Update version policy.

- On the next page, check the Enabled option. This will activate the Options section.
- Under the Options section, enter the target version for the feature update you want. For example, 2004 or 20H1 for the Windows 10 May 2020 Update and 2009 or 20H2 for the new feature update coming in 2020.
- Now click Apply and then the OK button to save the changes.
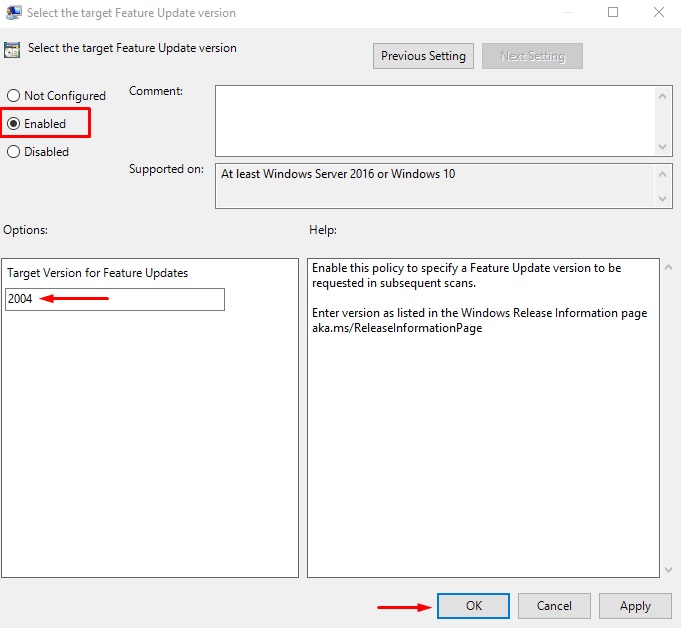
After completing the above procedure, Windows 10 will stay in the current version until the feature update reaches the end of its service. If you specify the next feature update in the Options section, then the new feature update will automatically get installed once it becomes available for your device.
Block Windows 10 20H2 on Home Edition
If you’re running Windows 10 Home, you already know Group Policy Editor does not work in this edition. In this case, you can enable the metered connection to delay Windows 10 feature updates. It regulates access to the internet connection due to which the ability to download and install the feature updates automatically gets blocked.
Turn on Wi-Fi Metered Connection to Delay Version 20H2
The procedure to enable a Wi-Fi connection a metered network is as follows:
- Press Windows+I to launch the Windows Settings.
- Select Network & Internet > Wi-Fi.
- In the right pane, click the connected Wi-Fi network you’re using.
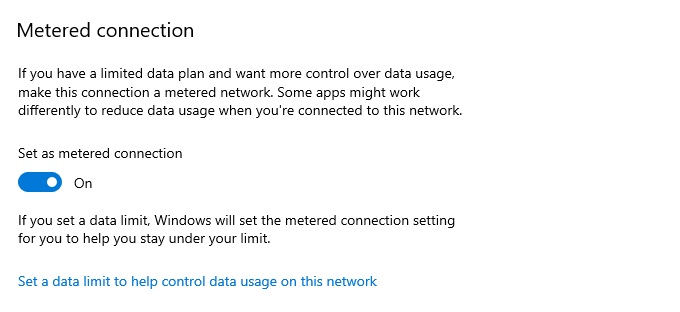
- Under Metered connection, click the toggle switch to turn on and restrict the background data usage.
Turn on Ethernet Metered Connection to Delay Version 20H2
The procedure to enable an Ethernet connection a metered network is as follows:
- Right-click on the Start button & select Settings.
- Click Network & Internet > Ethernet.
- In the right pane and select the Ethernet (wire), you’re connected to.
- Go to the Metered connection section and click on the toggle switch to turn on and restrict the background data usage.
Once you complete the steps, this will block all the kinds of upcoming updates on your device.