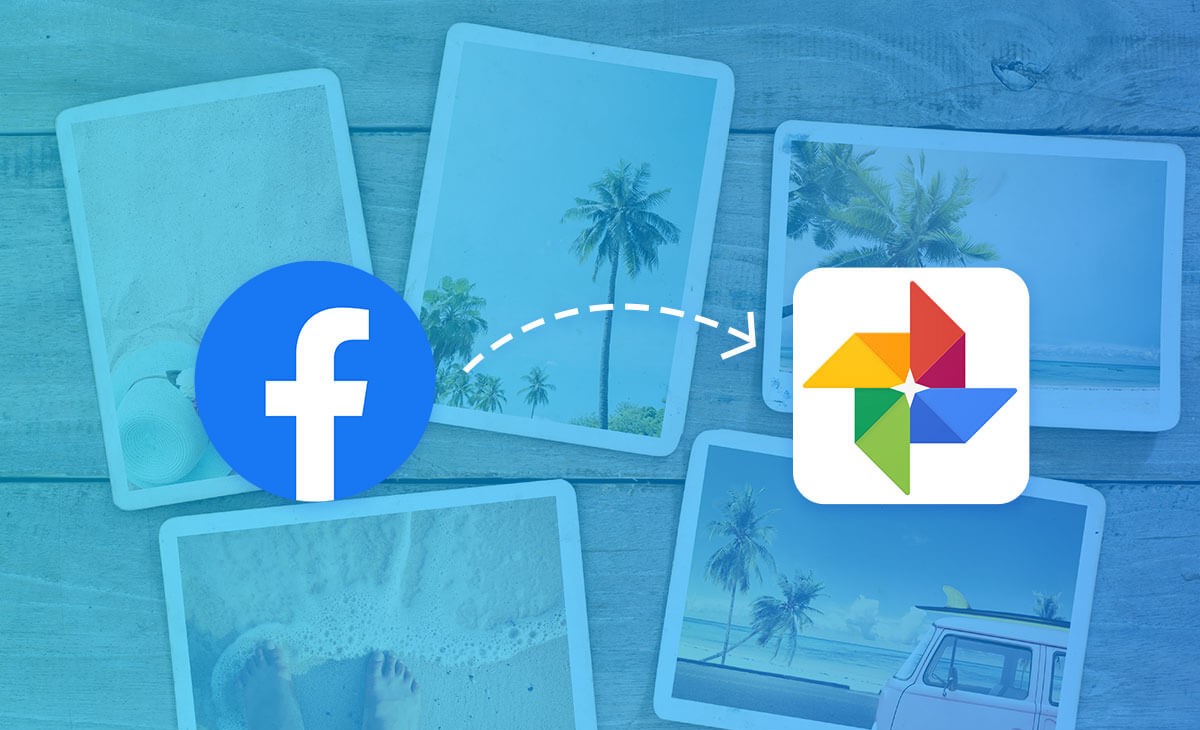
How to Move Facebook Photos to Google Photos
As well, We all have been using Facebook for a long time, even before our smartphones came in. So, Before, we didn’t upload as many videos and photos as we do now. Additionally, if you are using Facebook for a long, like from the beginning, you must be having this whole big set of memories that you often look at. Unfortunately, as of now, Facebook does not provide any cloud photo services. However, the best news is that we can now move Facebook Photos to Google Photos just in a second with easy steps.
Newly, Facebook launched a tool wherein you can transfer your Facebook Photos to Google Photos. The incredible thing about this feature is that it does not remove or delete any of our Facebook collections. This tool is pretty simple and easy to use because it is directly connected from Facebook, so it does not involve any sci-fi hack. Well, Below-mentioned is the easy steps for How to move Facebook Photos to Google Photos.
Steps to Transfer Facebook Photos to Google Photos
1. Log in to your Facebook Account
2. Move the Copy of Your Collection
3. Choose Destination & Move Photos
Log in to your Facebook Account
This newly launched transfer tool is an independent-platform feature that can be easily accessed through your browser, iOS, and Android apps. So, I have used the browser for the demonstration of the steps.
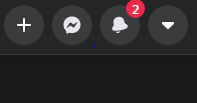
1. Launch or login to the Facebook page and click on the drop-down like icon available on the screen’s top right corner near the notifications icon.
2. So, After clicking on the drop-down icon, click on Settings & Privacy.
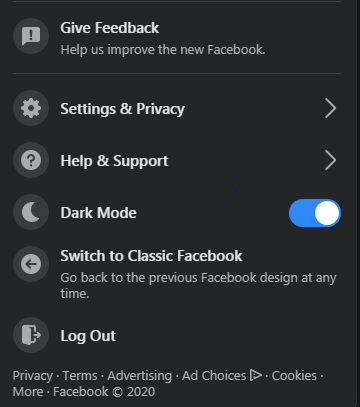
3. Now, here select the Settings
Move the Copy of Your Collection
So, while using Facebook from a browser or an application, it isn’t evident sometimes. Though, glad that photos and videos are easily accessible in the settings section. Now, You don’t have to go through various options and menus.
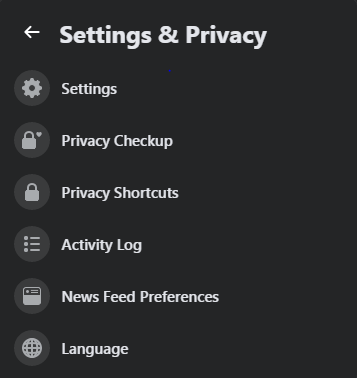
1. Once the settings page loads completely, go to “Your Facebook Information.”

2. Well, After loading, go to “Transfer a copy of your photos or videos.”
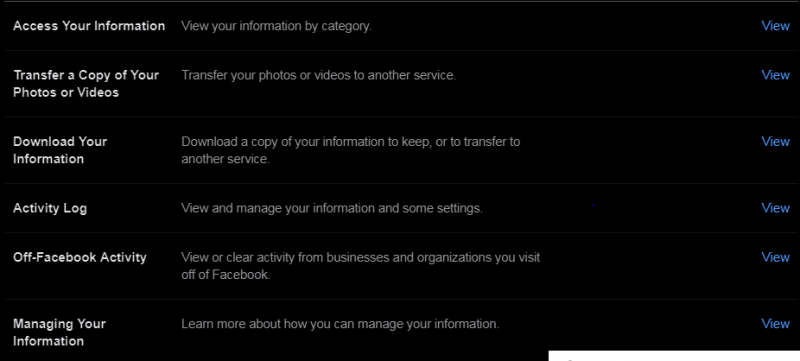
3. Click on View from “Transfer a copy of your photos or videos.”
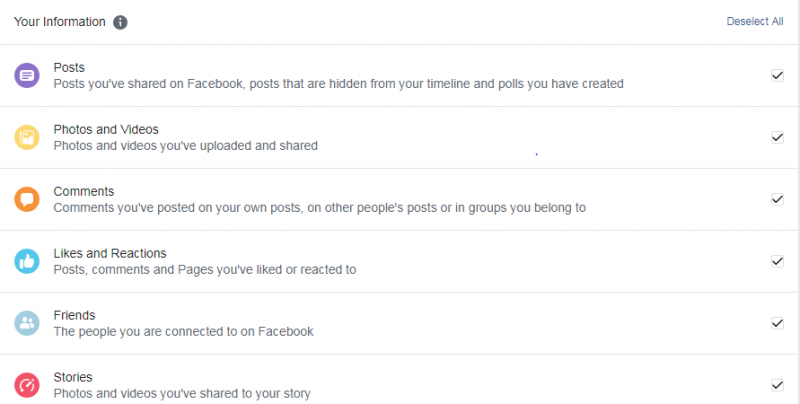
After clicking on View, you will be delivered to a new page wherein you can set date range, format, and media quality to create a new file in your Google Photos.

You can also make selections from your posts, photos and videos, comments, likes, and reactions. Now, You can filter out everything you wish to keep or deselect.
4. Well, After selecting the inputs, go on Create File.
5. After Tapping on Create File, Facebook will start creating a copy of your selections.

6. Now, You can also click on Cancel this process if you wish not to create a copy in Google Photos before the file upload is complete.
7. Along with the steps, you will have to choose a destination for Facebook photos.
Choose Destination & Move Photos
So, As of now, Facebook only allows for copying photos from Facebook to Google. Well, I am optimistic that Facebook is soon going to launch more services in the future. This process will take some time, have some patience, and let the upload complete.
Now, After selecting Google Photos as your Destination, you can easily access your Facebook photos from Google photos.
After upload this, you can view your Facebook photos anytime on Google photos without any hassle. Moreover, once the upload is complete, Facebook will notify you that you can now view your Google Photos file.
Final Words :
I hope you like this blog. Comment down & let us know if you face any issue while sharing photos from Facebook to Google Photos. For more major such tech-related content, follow Tweak Library on all social media platforms.
How to Download All Photos from Google Photos
Google Photos allows you to save every one of your photos, consequently. You can choose later which photographs and videos you need to keep and which ones you needn’t bother with. Even though we quite often take pictures with our cell phones, by associating your telephone with the Google Photos application, you can without much of a stretch download the photographs and videos to your PC.
How to Download All Pictures from Google Photos :
You can download all the photos and videos from your Google Photos display simultaneously. To do as such, you have to figure out how to utilize Google Takeout and calendar your fares.
- Open Google Takeout in a program – type takeout.google.com in the pursuit bar.
- You’ll see a considerable rundown of various document types and Google administrations, for example, Maps, Calendar, and so on, so look to discover Google Photos and choose it.
- Scroll down and click on Next advance.
- Choose how regularly you need to send out your photographs and recordings (on more than one occasion per year), just as the document type for the Download, and its size. You can pick .compress or .tgz documents and the capacity up to 50GB.
- Click on Create Export.
- The procedure will start and you’ll be advised that occasionally it can take hours or days, contingent upon the size of the organizer you’re downloading. You can proceed with the procedure or drop it. You can likewise continue to make another fare.
On the off chance, you need to download every one of your records from an Android or iOS device, and you can follow similar advances.
How to Download Photos One by One :
On the off chance you would prefer not to download everything from your Google Photos service, yet just two or three documents, you can choose the ideal photographs and videos and download them as it were. The procedure is comparable to a wide range of devices. Do the accompanying:
- Open your program and go to Google Photos.
- Open a collection and select the ideal things.
- Click on the three-speck symbol in the upper right corner of the screen.
- Choose Download.
Your photographs and videos will show up in a zipped organizer in your Downloads.
There’s additionally an approach to download your photographs and videos physically on the off chance that you don’t have an excessive number of them in your Google Photos account. You can do this by opening every one of your collections, choosing all your photographs from the selection, and afterward tapping on the three-spot symbol and choosing Download.
Another path is to utilize the easy console route to download a photograph or a video: press Shift + D.
How to Archive Your Photos :
You may likewise wish to move your photographs and videos to file if you would prefer not to erase them, yet rather sort out your Google Photos better. Here’s how to file any pointless things.
- Go to Google Photos in your internet browser.
- Select the photographs and recordings you need to file.
- Click on the three-spot symbol in the upper right corner and pick Archive.
Note that you can likewise utilize the alternate console route: Shift + A.
Also, you can open the Archive by tapping on the burger symbol in the upper left corner and afterward choosing Add photographs in the top right corner to add things to the file.
How to Delete Unnecessary Photos:
In case you’re sure you never again need the photos and videos from your Google Photos, you can likewise evacuate them, briefly or for all time. This is the ticket:
- Open your browser and go to Google Photos.
- Select the photographs or videos you’d prefer to erase.
- Click Trash, and afterward Move to waste in the upper right corner of the screen.
The erased things will remain in your Trash container for 60 days. In case you’re sure you need to dispose of them before this time passes, you can open the Trash, select the things you need to evacuate for all time, and click on the three speck symbols in the upper right corner. From that point, pick Delete Permanently, and click on Delete again to affirm.
Clean Up Your Online Space :
It’s all set through your photographs and compose them now and again. Planned fares are an extraordinary method to ensure everything is protected on your PC before you choose to let loose your online space and prepare for some new recollections.
Conclusion :
Do you keep your Google Photos composed? How regularly do you download photographs and videos into your PC? Tell us in the remarks area beneath!