
Some Windows Operating system relies on services and processes to run appropriately, though sometimes these processes start causing issues. Plus many users reported one of these processes Wmiprvse.exe is causing a problem for them Well, Wmiprvse.exe is a program that consumes the CPU memory around 30%, and therefore it directly affects the speed of your computer.
This generally happens when a user runs any application, and then the system gets slow automatically. You can verify this issue by opening the task manager and click on the “process” tab. So, Here you will see that (WMI Provider Host) wmiprvse.exe CPU usage is high and is more than 30%.
Attempt to reboot the WMI service in the manner to solve this issue, though this is not a permanent solution to fix the wmiprvse.exe high CPU usage issue.
How to Solved Wmiprvse.exe High CPU Windows PC?
In case if you want tofix this problem, then you have to apply the below-given steps carefully. By using these following steps, you can quickly fix This wmiprvse.exe high CPU usage issue.
Method 1: Reboot Windows Management Instrumentation Service
1: Start, Open the run box by pressing Windows Key + R, in the run box you need to type services.MSc and press the Enter key.

2: Now, from the list, you need to search for the Windows Management Instrumentation Service, after finding this right-click on it & choose Restart.
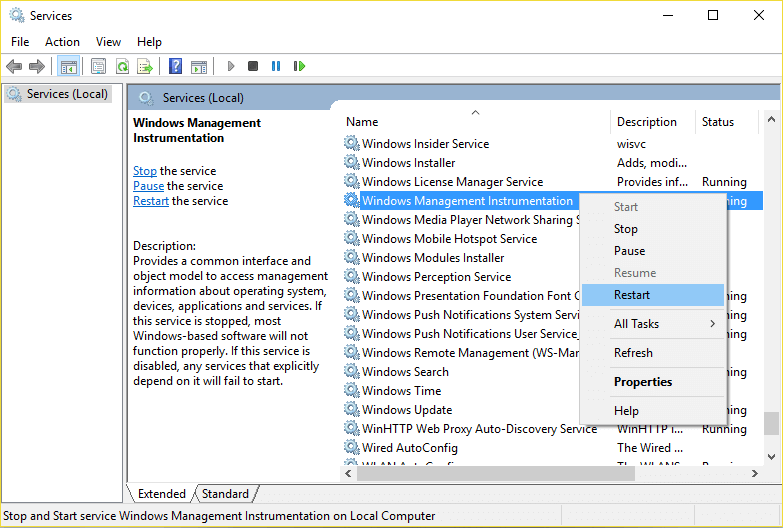
So, This step will reboot all the services related to WMI services, & it is hoped which High CPU Usage by WmiPrvSE.exe now gets fixed.
Method 2: Reboot all Other Services Related to the WMI
1: Firstly, you have to open the command prompt with admin privilege. Here, To do this, you have to press the Windows Key + X then choose Command Prompt (Admin).

2: So, run the below-given commands one by one, to do this, you have to press the Enter key after each of them which mentioned Below:
- -net stop iphlpsvc
- -net stop wscsvc
- -net stop winmgmt
- -net start winmgmt
- -net start wscsvc
- -net start iphlpsvc
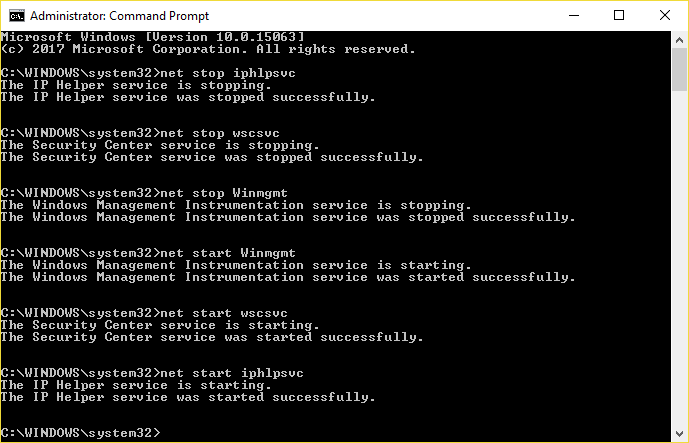
3: Finally, you have to reboot your PC to save all modifications.
Now here check if the wmiprvse.exe issue is resolved or not.
Method 3: Scan and Repair Corrupted System Files
Well, Sometimes due to the corrupted Windows system files, users start encountering wmiprvse.exe high CPU problem. Now, try running the SFC scan to fix this problem.
Follow these steps to do so:
1: First, press the Windows + X, and then select Command Prompt (admin). In case if any UAC appears, then click on the YES.
2: Now, Run the below-given command:
- sfc /scannow
3: Here, After the completion of SFC command, now run the second command given below:
-
- DISM /Online /Cleanup-Image /RestoreHealth
Now, Restart your system and check if the wmiprvse high CPU issue is resolved or not.
Method 4: Run System Maintenance Troubleshooter
1: Start, you have to open the control panel, to do this, press the Windows Key + X and then click on the Control Panel.

2: Here, you have to search for the Troubleshoot and then click on the Troubleshooting.

3: Again, click on the ViewView present in the left pane.
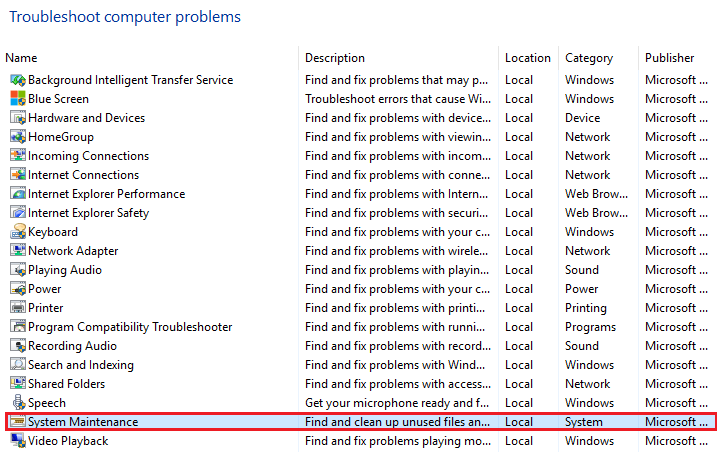
4: Now, Run the Troubleshooter for System Maintenance.
5: This will assist you in getting rid of wmiprvse.exe high CPU Windows 10 issue.
Method 5: Locate the process manually using Event Viewer
1: First, Open the run dialogue box (Press Windows Key + R), in this run box type eventvwr.msc & then press the Enter key to open the Event Viewer.

2: Here, you have to click on the ViewView and then choose Show Analytic and Debug Logs option.

3: Now, From the left pane navigate through Applications and Services Logs > Microsoft > Windows > WMI-Activity
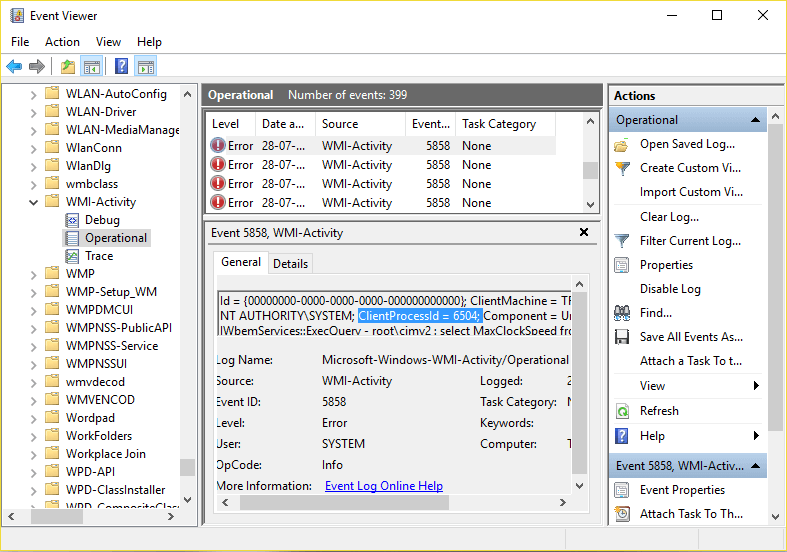
4: So, After opening the WMI-Activity folder (double click on it to expand it) and then select Operationally.

5: As well, At the right window pane choose Error under Operational and in General tab search for the ClientProcessId

6: Now, After getting the Process Id of the particular service that triggering High CPU usage, now we have to disable this specific service to fix this issue.
7: Here, Press the Ctrl + Shift + Esc simultaneously to open the Task Manager.
8: Now, Tab on the Service tab & search for the Process Id which you have noted in the earlier step.
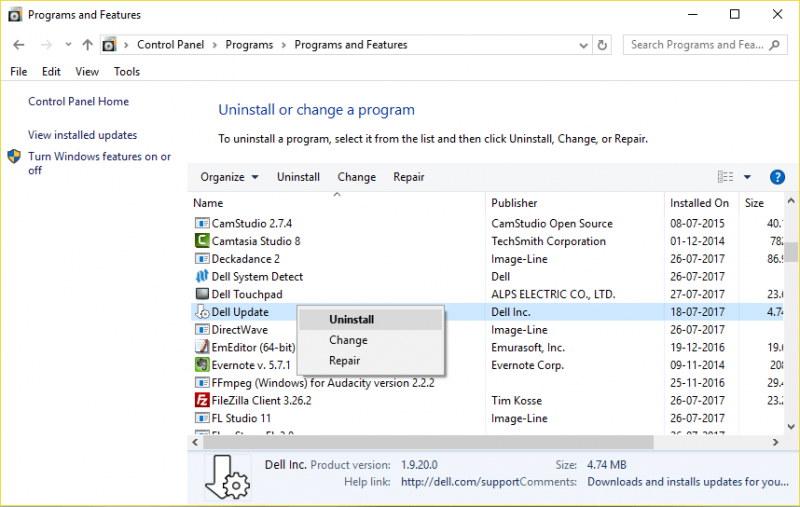
9: Finally, After finding this, go to the Control Panel > Uninstall a Program.
Restart your PC. It is estimated now you can fix wmiprvse.exe issue in Windows 10
Method 6: Stop Certain Services
Most users reported stopping the services related to wmiprvse.exe such as VMWare USB, VMWare USB Arbitration Service, & Hyper-V Virtual Machine Management services fix high CPU usage issue in Windows 10.
Therefore, here follow the steps to disable the services and restart the winmgmt service.
Follow the steps to do so:
- Open the Services window > locate VMWare USB, VMWare USB Arbitration Service, & then Hyper-V Virtual Machine Management services.
- Here, right-click on each of the service > and choose Disable from the menu.
- Well, As all the services are disabled > and restart Windows Management Instrumentation service
Now Here, check if the wmiprvse.exe high CPU Windows 10 issue is fixed or not.
Method 7: Remove Unwanted Applications
Now, Make sure to delete the entire unwanted apps installed on your Computer as this not only eat up the system memory but cause Wmiprvse.exe high CPU usage issue.
These applications like SaveSense, WebSteroids, PremierOpinion and Relevant Knowledge can cause the issue for many users. Thus, make sure to remove these as well as other unwanted applications from your computer.
Plus sometimes manually uninstalling any application won’t remove it altogether some of its traces are left behind. Thus, here it is suggested to use the third party uninstaller to remove application for your PC entirely.
Best And Easy Solution to Fix Wmiprvse.exe High CPU Issue
Hope after following the above-given solution you can fix wmiprvse.exe high CPU, though in case if you are unable to follow the given manual solutions or the problem is not yet fixed, then it’s worth to scan your PC with the Window Repair Tool.
Well, This tool is specially designed to deal with all types of Windows errors and other factors that affect PC performance.
It is also capable of fixing infected registry database, damaged DLL files, corrupt system files, application issues and more.
Conclusion
Well, when all the process consumes CPU memory, then your system performance gets slow. As CPU memory is responsible for running all the activities exist on the Computer
Accordingly, to fix wmiprvse.exe high CPU usage in Windows 10, try the fixes given one by one & check which one works for you. Make sure to follow the fixes given carefully to avoid further issues. It is estimated the article worked for you.