
12 Best Free Computer Software Download Sites
If you have a computer or laptop, then you might search for free Windows Software at different times on the internet. So Free Software Download buttons sometimes expose our computers to malicious malware and put our PC to potential Virus risks. Some of the websites are reliable, but not all.
If you want to download free Windows Software, you have faced many problems like unwanted popups and Ads, etc. Sometimes downloaded files included malicious malware. There are some websites on which we can trust. With a collection of different Windows Software, these websites offer world-class security and scan the downloaded files for the safety of the users.
12 Best Free Computer Software Download Sites
Downloading Windows Software is a very hectic task if you don’t know an excellent downloading website. So here are some great sites where you can download Windows Software for free.
1. Softonic
2. FileHippo
3. Ninite
4. Softpedia
5. Download Crew
6. File Horse
7. FilePuma
8. Donation Coder
9. MajorGeeks
10. Sofware Informer
11. SnapFiles
12. SourceForge
Softonic

Softonic is the site to download free of charge software. Softonic has a pretty good interface. The main thing that changes it from others is it offers tools software for all platforms like Mac, Windows, etc. Even one of the safest and fastest sites to download free Windows Software.
FileHippo
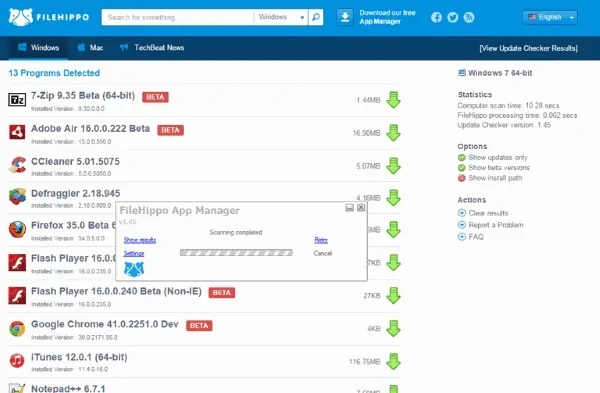
You Wanna download the latest version of the most excellent software? Filehippo is the best website to do so. This is among the excellent website to find the free version of various software. It is one of the fastest websites to download. You can trust this website as it doesn’t popup ads and spyware.
Ninite
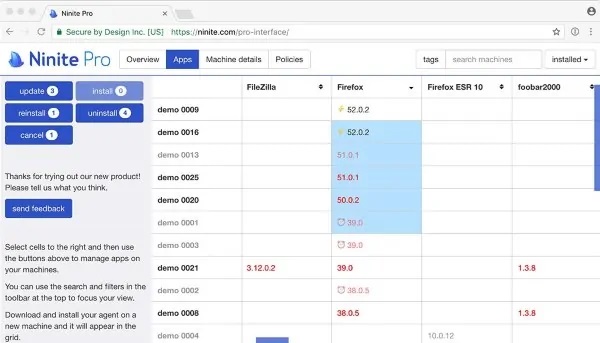
Ninite is one of the most trusted websites to download free Windows Software. It has a massive list of the variety of software from where you can select and download. Also, this website lets you download a custom downloader. This downloader helps you to download the software chosen easily. With a straightforward interface, Ninite is well known for its security features to save your system from malicious malware.
Softpedia
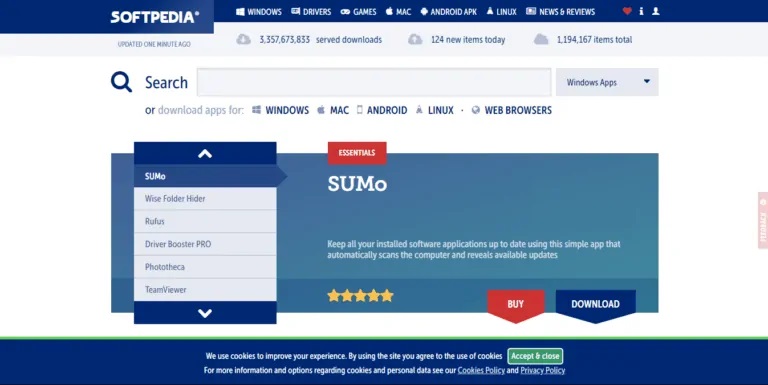
Softpedia is a Romania based site that is well-known for offering free of charge tech-news and software. Searching your wished to download the software, according to your Os, is made easy as it has exclusive sections for everything. You can just enter the software name, select your OS version, and then run easy searches. Further, it comes with three different viewing modes the normal mode, shareware mode, and freeware, which allows you to search for specific software.
Download Crew

Download Crew has a very interactive connect but a little challenging to operate. Finding software on this website is confusing. This site provides information and reviews about the software, which makes it very reliable. Downloading on this website is straightforward. Click on the download button, and then download will start automatically.
File Horse
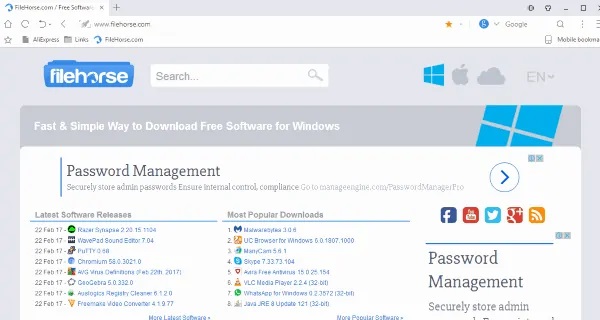
With an excellent interface, you will have a list of the brand new software on its homepage. FileHorse is an effortless way to download free of cost Windows Software. So You will not get every software as it focuses on correctly used software. You will have every popular software used by the programmers.
FilePuma
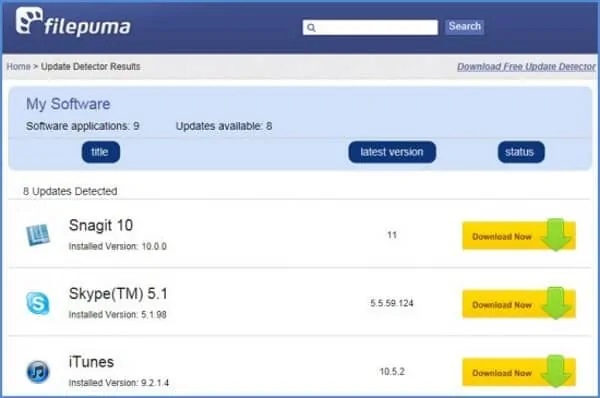
Due to similar UI like FileHippo, this website may look like a clone. According to the accessibility, FilePuma is very easier than FilEHippo. The software on this website is categorized very systematically, which makes it much easier to find. Which makes it for downloading free of cost software, you can trust this site blindly.
Donation Coder
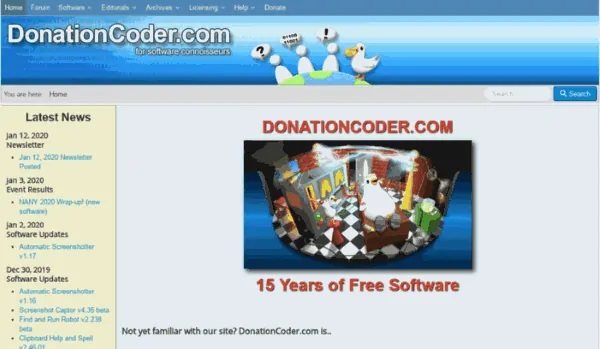
Donation Coder is a website with a unique model. This website makes you download the latest software collection. Even though in exchange, it only asks for a donation. Yes, you can download any software by donating on this web site. With this unique model, its one of the safest websites to download free software.
MajorGeeks
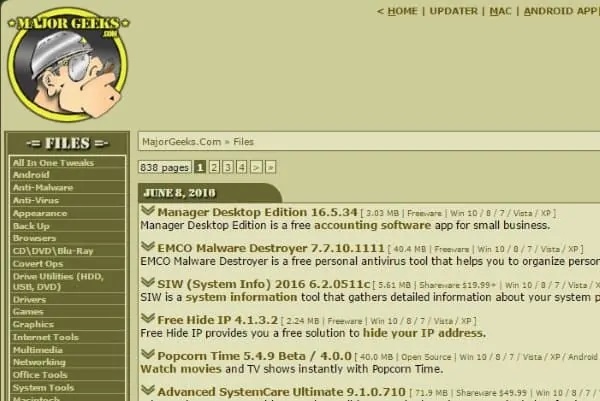
With a traditional interface, this website looks like any other torrent website. MajorGeeks is one of the fastest websites to download free software. In the last 15 years, this website made an outstanding reputation in the field of software downloading. Open the website and select the software you want to download.
Sofware Informer

Software Informer is a relatively new website on this list. With the right amount of listed software, Now you will find almost every software you need to download here. If you trust in quality instead of quantity, this website is very favorable for you.
With a small amount of listed software, Software Informer has some of the quality software. Also, This is one of the safest websites as it runs a scan through the downloaded file to avoid any malicious malware.
SnapFiles
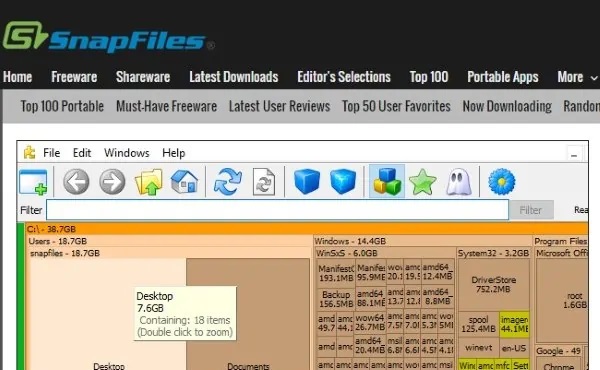
SnapFiles permits you to access hundreds of Windows Software operating systems. This website has a list of quality software. It is one of the safest websites for the software. SnapFiles offers a remarkable feature of the Daily Freeware pick section, which can be very effective. It also provides a list of new updates and releases for its visitors.
SourceForge

SourceForge is a web-based site that offers free, open-source community resources. The popular website, however, had a rough time for giving users with unwanted 3rd party software. But in 2015, Dice decided to terminate this policy, and since then, it has been working fine. It has distributed software to over 36 million users. So, you can now download your software for free of cost from SourceForge. Even if you are a developer, you can cooperate with them to help through their projects as well.
Final Words :
So, next time when you want to download any Windows Software and don’t need to pay for it, then you must consider our list. With the safest free software download websites, this list will help you a lot. Here Are Some Best Screen Mirroring Software for Windows 10.

How to Record Screen on Windows 10 Without Xbox Game Bar
In this Content, you will read how to record screen on Windows 10 if you haven’t Xbox Game Bar. Xbox Game Bar is a personalized gaming overlay built into Windows 10. Xbox Game Bar works with most computer games, giving you instant access to widgets for screen record and sharing, finding new teammates with LFG, and chatting with Xbox friends across Xbox console, mobile, and PC—all without leaving your game. For record screen on Windows 10 Make your own Xbox Game Bar Press Win+G to get started.
Anyway, the downside of the Xbox Game Bar is that it doesn’t support all Computers, and mostly Windows 10 users face a problem when they wish to screen record, and that problem is Computer doesn’t meet the hardware requirements for Game DVR. Moreover, Xbox Game Bar is purely designed to record games, and also it won’t register when you are on Windows 10’s home screen.
For the moment, I have found a solution to record screen on Windows 10 by using a VLC media player as you all know that it Is one of the best media players around and can screen capture or record also.
VLC Media Player
VLC Media Player is most popular, and for a good reason– it’s completely free, supports almost all file formats without the need to download additional codecs, optimizes video and audio playback for your preferred Computer, supports streaming, and can be expanded virtually unlimited with downloadable plugins. Not only do they add additional service to the player, but they also allow integration with other programs and streaming services.
Plus Point
- Highly customizable
- Excellent file format support
- Expandable via plugins
How to Record Screen on Windows 10 without Using Xbox
So, in this article, I will teach you how to record screen on Windows 10 using a VLC media player rather than the Xbox game bar or any other screen recording App.
Step 1. You need to install the VLC media player. You can download it from here.
Step 2. After downloading, install VLC media player on your Windows 10 computer.
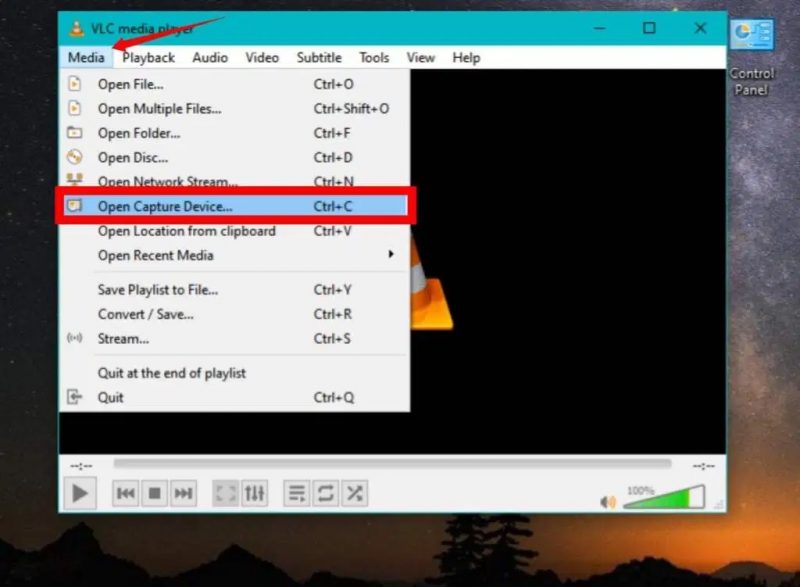
Step 3. After the installation, activate a VLC media player, then click on Media at the left-hand corner and select Open Capture Device.
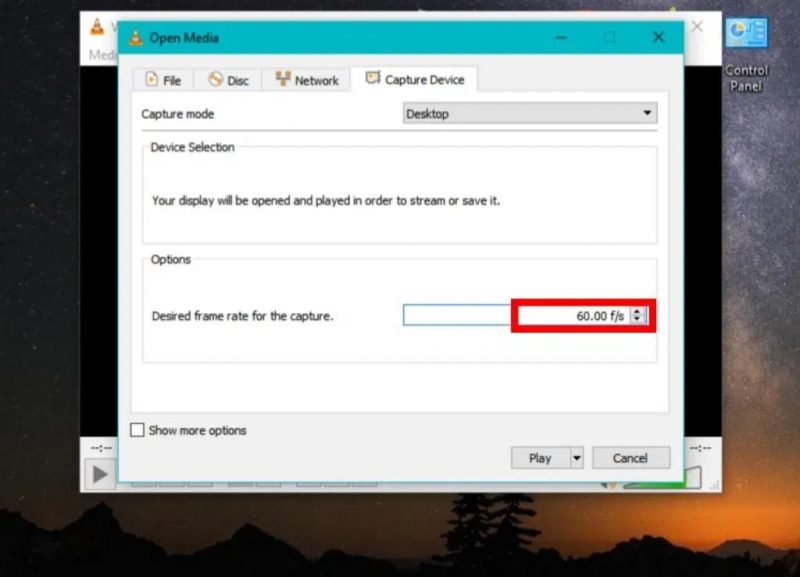
Step 4. Select the Desktop next to the Capture mode option.

Step 5. Set the required rate for capture to 60.00 f/s.
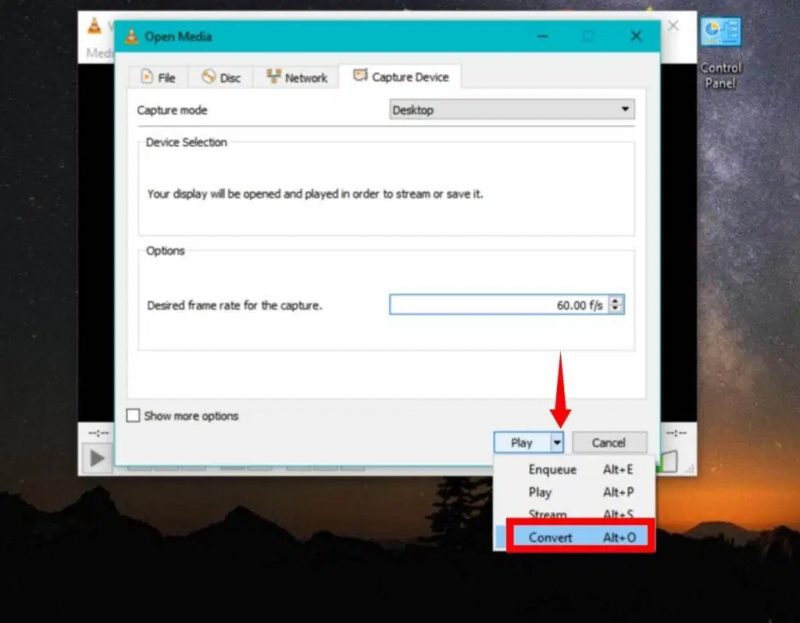
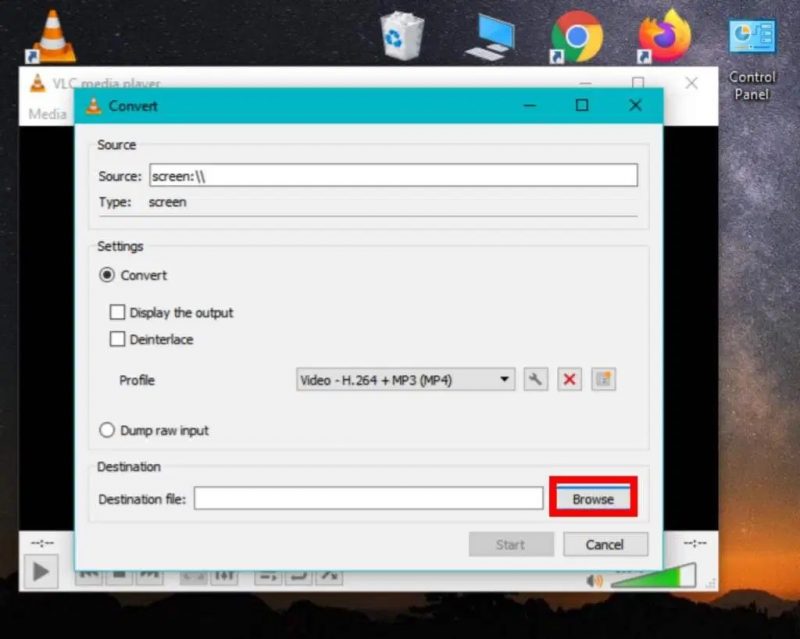
Step 6. Tap the arrow icon then select Convert.
Step 7. Set the Profile to Video – H.264 + MP3 (MP4).
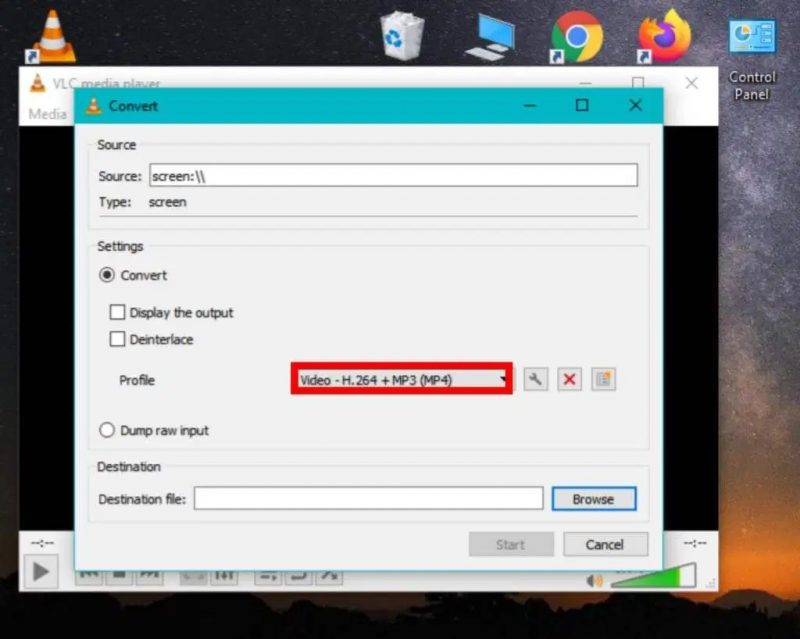
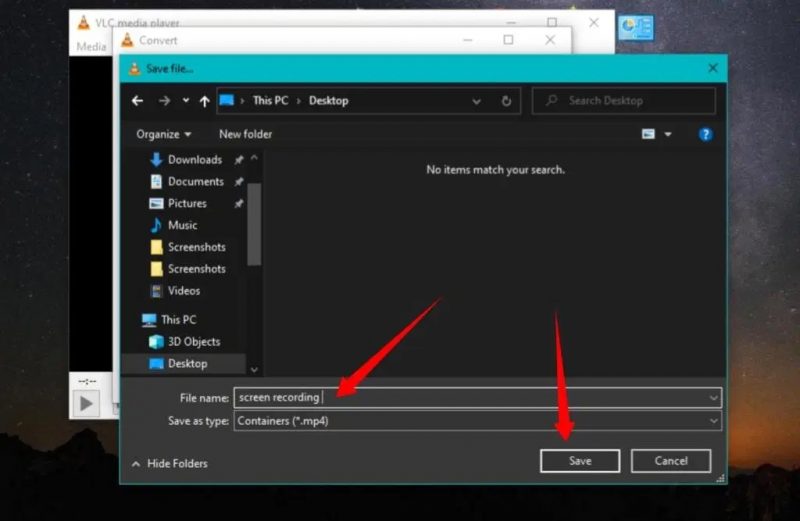
Step 8. Check on Browse to next to the Destination file and select the place where you want to save the file in PC.
Step 9. Give a name to your recording file then click Save.
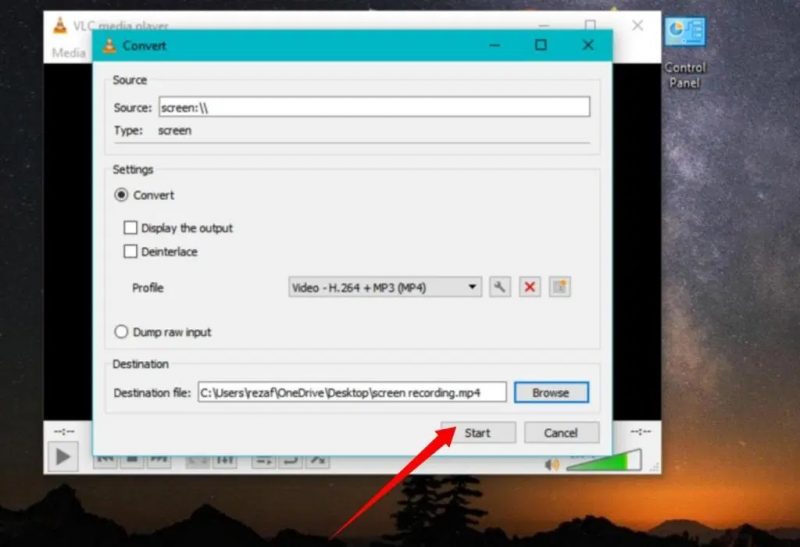
Step 10. Then Click on Start to record your screen on Windows 10.
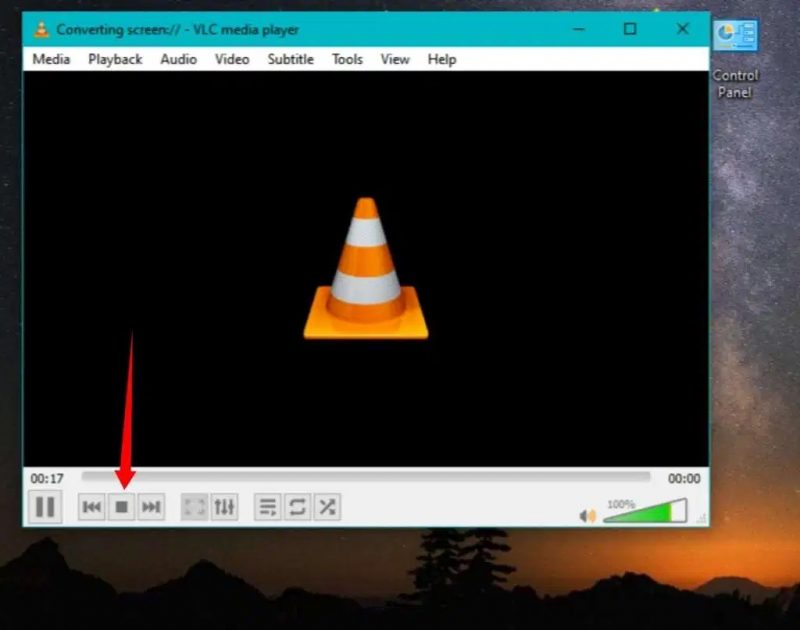
Step 11. When you’re done with screen recording, click the stop button, and now you’re done.
Best 3 Free Screen Recorders For Windows 10
However, if you don’t want to use a VLC media player for record screen on Windows 10, here are three best free screen recorders.
1. Active Presenter
Atomi Systems’ ActivePresenter is an all-in-one video editor and screen recorder. It is most popular among YouTubers, educators, video producers, and trainers searching for video demonstrations, how-to guides, step-by-step tutorials. ActivePresenter has nearly all the effects and features that you might need to record screen and then edit videos.
2. OBS Studio
OBS Studio is an entirely free screen video recording and live-streaming program without a watermark or time limits. Hardcore gamers find it a lot easier to broadcast their live gameplay footage. You can capture the complete monitor or window using OBS Studio, but also from the microphone and webcam. The software lets you choose the desktop apps and audio sources to share while streaming, besides creates layered webcam videos.
3. Flashback Express
Blueberry App Flashback Express is a free screen capture program’s ability to capture an image, sound, and Camera. It does not set the recording time limits nor stamp watermarks on all product images. If you run this application on a multi-monitor device, you can either record multi-monitor screens or limits the capture to a single monitor. Designed of recordings can also be used to start & stop recording at scheduled times and when a specified app is launched.
Conclusion
So How you can record screen on Windows 10 if you haven’t Xbox Game Bar with VLC media player for absolutely free of cost. I have tried these Steps for screen recording, and it’s a fantastic method. However, you can use Windows 10’s built-in Game bar too. Game bar is best when you want to capture game screenshots and clips. This Game bar can be used to record applications only – it cannot register a full screen or a specific area. It makes this sense as it is designed for a gaming capture. Even though the Game bar is available on all Windows 10 computers, to record game screens and clips, your PC’s video cards must meet the hardware requirements.
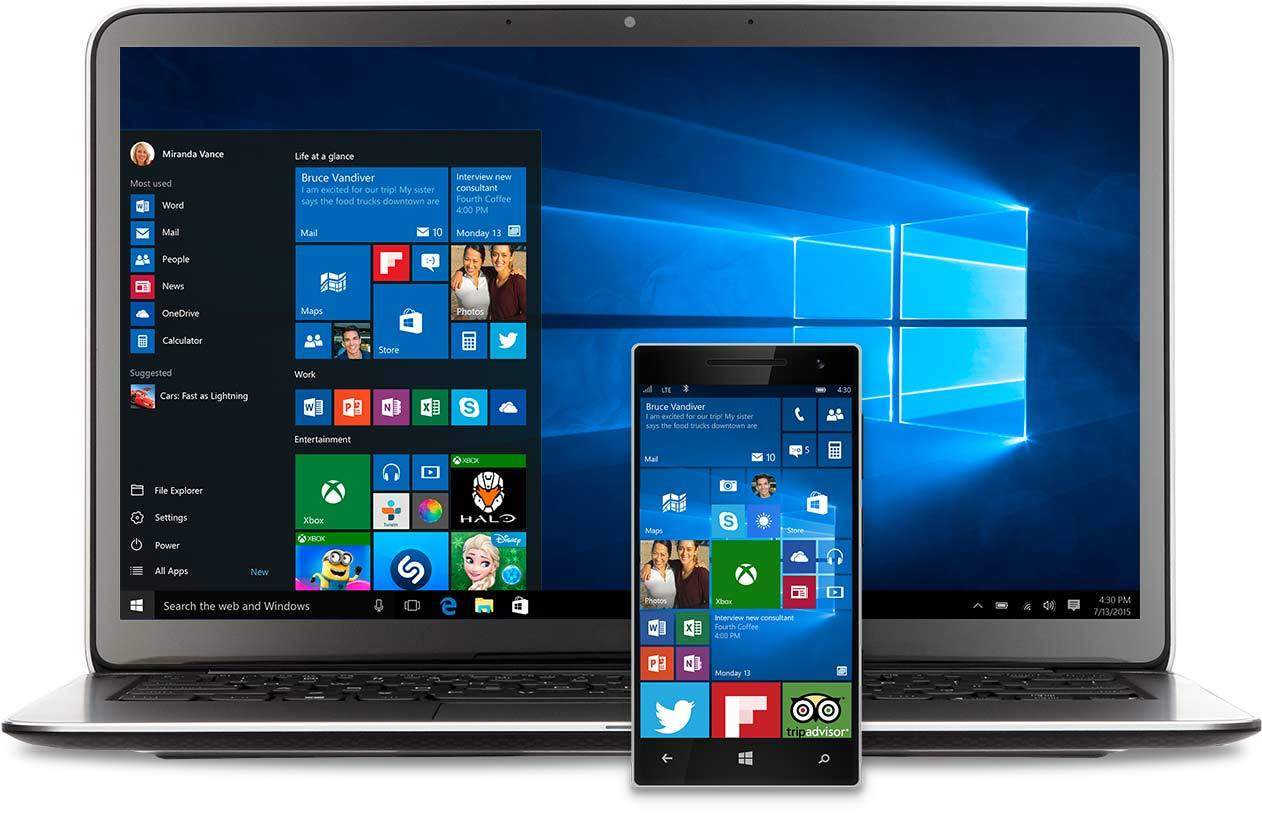
Best Screen Mirroring Software for Windows 10
Screen Mirroring Software Application enables you to the project (mirror) display material. What you could see on your smartphone, tablet, or computer system as well as show it on your TELEVISION display, projector, or outside display without making use of a cord. The TELEVISION or projector will undoubtedly offer you the specific reproduction of your computer or mobile phone in real-time, duplicating any movement.
Unlike our residence mirrors, Screen Mirroring Software will not turn the photo horizontally. A less complicated way to recognize matching is by thinking of copying.
This is a fantastic attribute for sharing and seeing local web content like photos, papers, or video clips and for professional and instructional presentations.
Screen Mirroring Software needs to be working on both the gadget you intend to send out web content from as well as for obtaining hardware.
Screen Mirroring Software for Windows 10 in 2020
In this context, we will check out the most effective options for Screen Mirroring Software. The details presented here will help you make the proper choice to fit your demands.
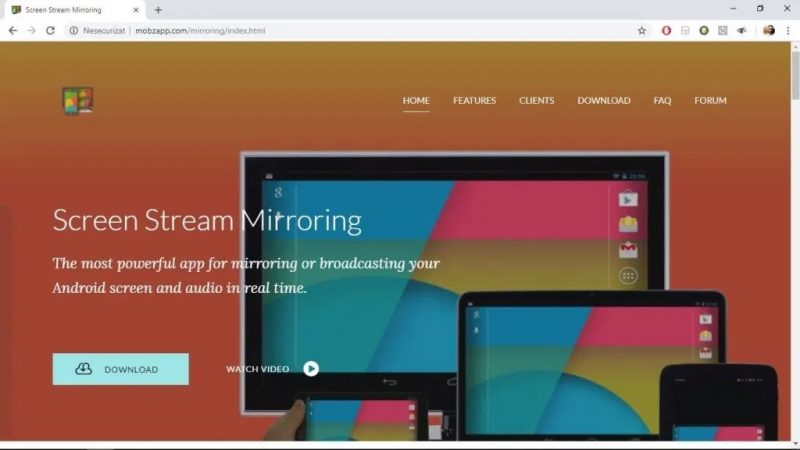
1. Mobizen
2. Chrome Remote Desktop
3. TeamViewer
4. Apowersoft Phone Mirror
5. Screen Stream Matching
6. NCH ScreenStream
Mobizen
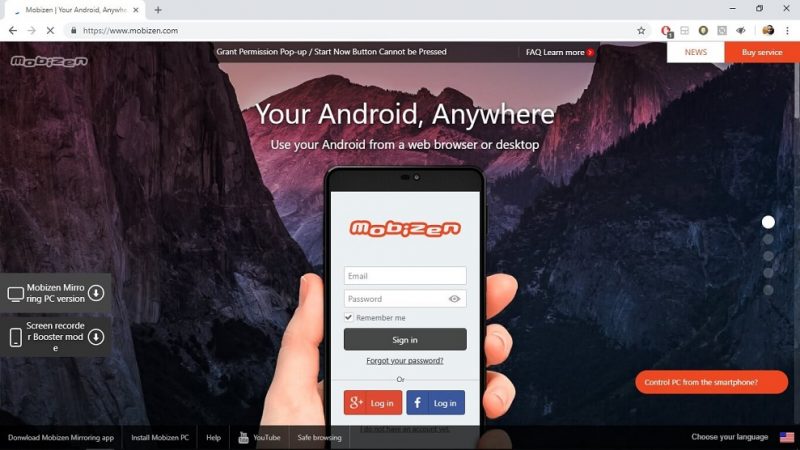
Mobizen is a screen mirroring application designed for PC that allows you to stream Android phone screens to the computer and quickly transfer files between your smartphone and computer.
Mobizen offers you the capability to control your mobile devices freely using a mouse and keyboard and can connect via USB, Wi-Fi, 3G, or LTE. It doesn’t allow the resizing of windows.
Mobizen key Features:
- Real-time mirroring of your mobile device for gaming, instant messaging, etc.
- Screen recording without needing to root your device
- Useful for presentations with tools such as on-screen drawing
- Ability to receive all smartphone notifications on your PC
- Music and video streaming capabilities
- Drag-and-drop file transfer
- Access to call logs from PC
- No need for installation – it can be used directly from your web browser
DOWNLOAD: Mobizen
Chrome Remote Desktop
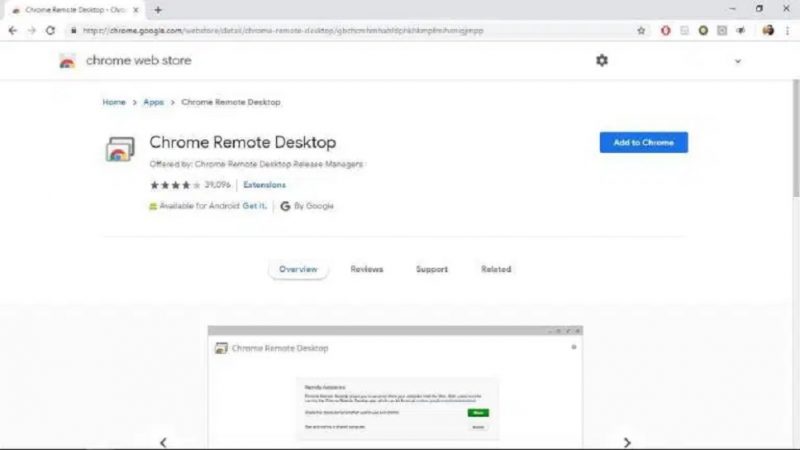
Chrome Remote Desktop is a free Screen Mirroring Software from Google that runs as an expansion paired with the Chrome internet browser. This is just one of the most popular Screen Mirroring Software for Windows 10.
Chrome Remote Desktop computer allows you to take a look at your computer system desktop computer using your mobile phone and also works with any network with Google Chrome web browser assistance.
This app is free without any in-app acquisitions whatsoever.
Chrome Remote Desktop computer crucial Features:
- Quick install.
- Its Supports various displays.
- I worked with different os.
- You can utilize it in the full-screen setting.
- Functions also when the host customer is logged off.
DOWNLOAD: Chrome Remote Desktop
TeamViewer

TeamViewer is one of the famous Screen Mirroring Software used primarily for diagnostic objectives. You can additionally utilize it to mirror desktop computers and also various other smartphones if needed.
TeamViewer Essential Features:
- User-friendly user interface.
- Supports HD video and also sound transmission.
- It supports 256-bit AES encryption.
- It supports documents transfers from both gadgets.
- Free to utilize for a specific use.
- Numerous settlement choices for companies are available.
- It allows links throughout numerous platforms– PC to PC, mobile to COMPUTER, PC to mobile, and also mobile to mobile.
DOWNLOAD: TeamViewer
Apowersoft Phone Mirror
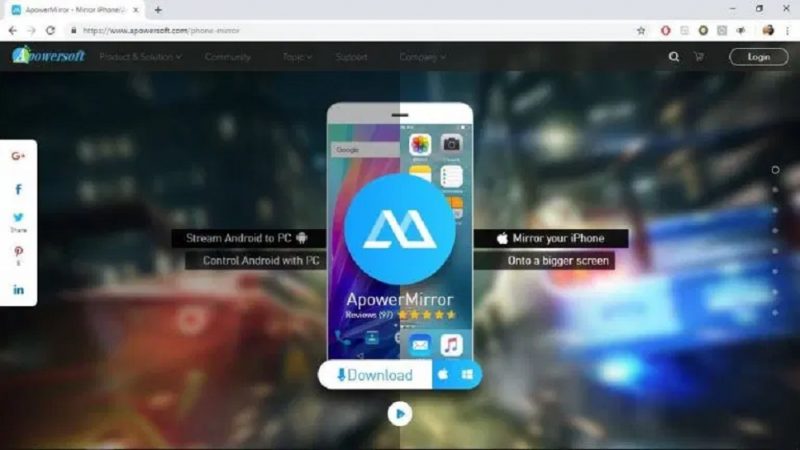
ApowerMirror is a desktop software that can mirror the Screen of your Chromecast suitable Android tool to a COMPUTER in merely a few actions.
Utilizing this device enables you to stream videos, photos as well as any other media from your mobile phone to a larger screen. It even sustains making use of the mouse and keyboard to regulate your Android phone from the computer for a less complicated typing and clicking experience.
It can be made use of to play all type of Android video games (without needing to root your device), stream video, pictures, and also other media documents, send instant messages as well as to handle numerous applications.
Apowersoft Mirror also allows you to receive alerts straight on your Windows 10 COMPUTER consisting of the alternative to pick from both a Full-Screen setting and even Landscape mode for a new tailored experience.
Apowersoft Phone Mirror can attach to your phone through both USB cable television and WiFi. To use it as a cordless screen, you intend to ensure both your PC and also Cells are connected to the same wireless network.
ApowerMirror is a desktop computer program that Screen Mirroring Software of your Chromecast compatible Android tool to a PC in merely a few steps.
This Software can be Valuable in a Selection of Circumstances:
- Workplace– offering data to every participant.
- Class– share web content with the whole course at once.
- Live– show yourself to a broader target market quickly.
- Residence– take pleasure in media with your entire family.
- The complimentary variation of Apowersoft Phone Mirror allows you to manage your Android gadget.
- Your computer mouse and keyboard, take screenshots, and also sync application information.
The Personal Version of the Apowersoft software removes the watermarks from the free variation for a beautiful presentation. The commercial exception has all the capacities of the cost-free as well as personal variety yet is created for commercial use (corporate/companies).
The Apowersoft authorities page provides you the alternative to research study easily an elaborate Faq’s web page and overviews to help you navigate the Screen Mirroring Software conveniently and also tailor the experience specifically to your needs.
You can discover info on exactly how to make use of the ApowerMirror desktop computer program on the tool’s official website in addition to a guide explaining just how to utilize the Android App.
DOWNLOAD: Apowersoft Phone Mirror
Screen Stream Matching
This Screen Mirroring Software for COMPUTER has multiple powerful features, like mirroring or sharing displays with media players like VLC, OBS, and KODI.
In a similar fashion to Reflector 3, Display Stream Mirroring provides you with the option to live-stream your cam video clips to YouTube and also Facebook and aids in creating efficient presentations for education and learning, work, or pc gaming objectives.
Display Stream Mirroring Essential Features:
- Live to relay to Shiver, Youtube, Facebook, Ustream, etc.
- Display showing to media player devices like VLC, OBS, and so on
- Mirroring with UPnP/DLNA gadgets like Smart Televisions.
- Chromecast was suitable.
- Interior sound and also microphone streaming.
- Recording MP4 or MKV video files.
- Suitable with network tethering (WiFi, Bluetooth, USB).
- Secure stream with username + password (RTSP).
- Unlimited variety of links at the same time.
DOWNLOAD: Screen Stream Matching
NCH ScreenStream
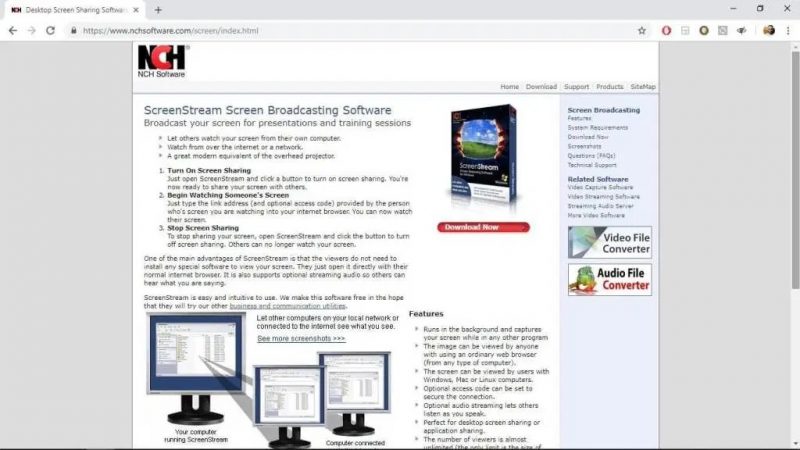
This software application from NCH is just one of the best options the marketplace needs to use when it pertains to Screen Mirroring Software as a result of its intuitive as well as a straightforward user interface.
ScreenStream is the latest equivalent of an overhead projector, permitting others to view your screen from their computer systems over the network or the web, and it’s entirely cost-free.
Sadly, NCH ScreenStream is not directly suitable for Windows 10 operating systems; however, we have a quick fix for you that permits you to install it, yet.
Steps to install NCH ScreenStream on Windows 10.
1. First, you intend to download and install the software program typically after that right-click on the installer as well as choose ‘fix compatibility.’
2. Windows will undoubtedly open the ‘Program Compatibility Troubleshooter’ display, and all you have to do is click ‘Try suggested settings.’ This will certainly establish the compatibility mode to Windows View (Service Pack 2) automatically.
3. You can after that, click ‘Examine the program’ button, and also, the installer will undoubtedly begin.
4. For NCH ScreenStream to automated configure your network, your router needs to support UPnP. If that’s not the situation, you can by hand set up the IP address as well as TCP/IP port.
When you switch on screen sharing, any individual that has the web link (and optional accessibility code) can quickly watch your display directly from their net browser without the need to install any kind of added software application. This makes ScreenStream among the most straightforward options to set up and use.
To stop sharing your display, you can quickly open up ScreenStream as well as click the turn-off button.
ScreenStream vital Functions:
- Straightforward interface.
- Runs in history and catches your screen while in any other program.
- Any individual can see the picture by making use of a regular web internet browser (from any kind of computer).
- We are establishing a secure connection using the optional access code feature.
- It sustains the choice to share audio for others to hear you present/speak.
- The dimension of your transmission capacity just restricts the variety of viewers.
- You can install and also run it in mins.
DOWNLOAD: NCH ScreenStream
Conclusion:
Screen Mirroring Software technology has made lots of types of communication, recording, sharing, and also streaming wirelessly an easy-to-do job as well as it also becomes more accessible with the right tools.
This write-up uses you eight ideal Screen Mirroring Software application alternatives for Windows 10 to fit anyone of your mirroring needs.
If you want to mirror your Android tool screen to PC, Apowersoft is your best choice, appropriating for both instructional functions as well as the company.
NCH ScreenStream, Vysor, and also TeamViewer use you a simple path to mirroring, and Mobizen helps you transfer files quickly between tools by dragging and also dropping files rapidly.
How To Easily Boot Windows 10 In Safe Mode?
Beginning Windows 7 in Safe Mode was only simple. It would be best if you pressed Shift+8 to intrude on the boot procedure. In any case, the system to boot windows 10 in Safe Mode isn’t that clear.
A few clients even imagine that Safe Mode is absurd with Windows 10. However, that is not the situation. There are many techniques to do that. In this way, in case you’re a Windows 10 client who is battling to discover a method for the equivalent, at that point, keep things under control since we’re going to direct you through every last bit of it.
-
What Is Windows Safe Mode?
In Safe Mode, just the applications and highlights that are basic to run the Windows OS are busy working. What’s more, it’s utilized to determine any issue to have the PC. That is the reason individuals additionally allude to Safe Mode as Diagnostic Mode.
At times, a PC consequently runs in Safe Mode at whatever point there is an issue with the windows. What’s more, on the off chance it doesn’t, at that point, you can boot Windows in Safe Mode without anyone else.
-
4 Secure Methods To Boot Windows 10 In Safe Mode1.
1: Start Menu
The ideal first strategy to boot Windows 10 in experimental mode is through the Start menu. Follow the means referenced underneath
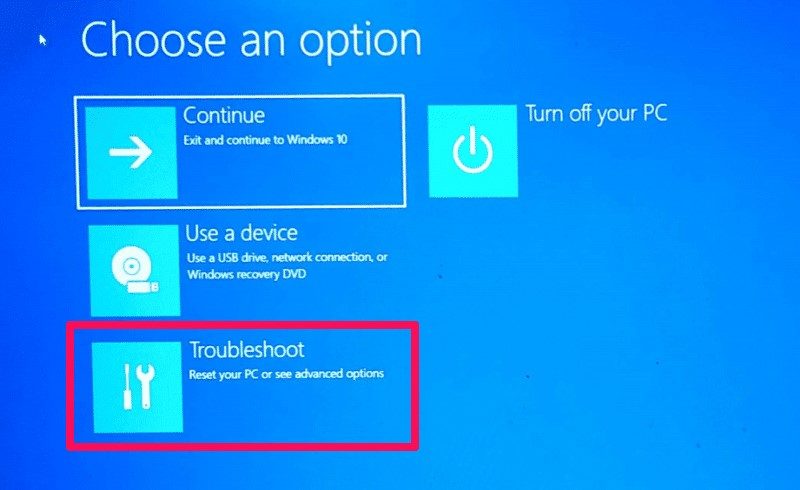
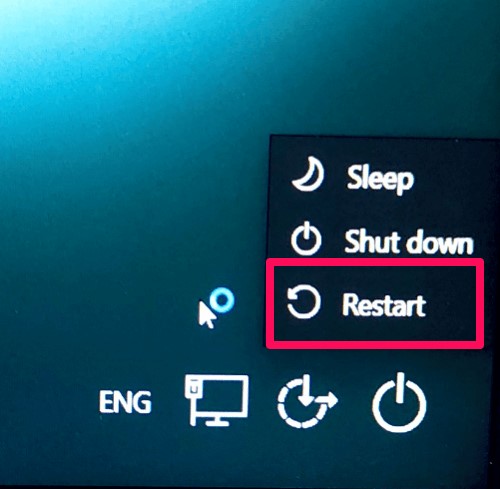
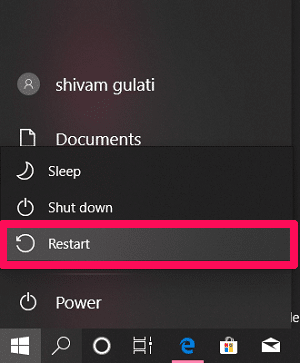
1. Press & hold the SHIFT key on your console and afterward select the Restart alternative in the Start Menu.

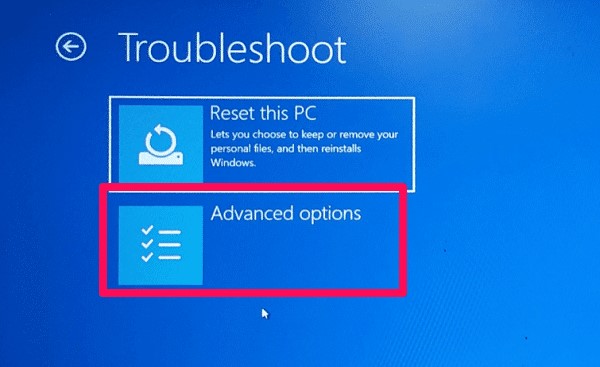
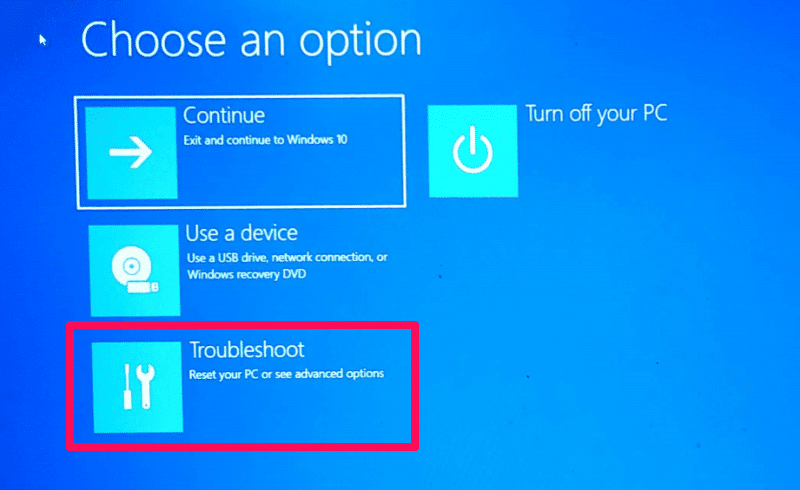
2. Now, select the Troubleshoot choice after the PC restarts.
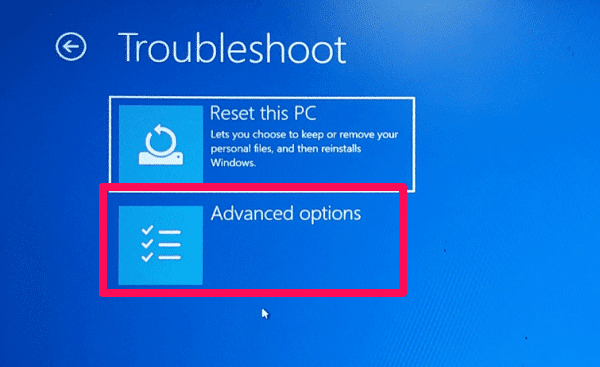
3. After that, you need to Select on the Advanced Options.
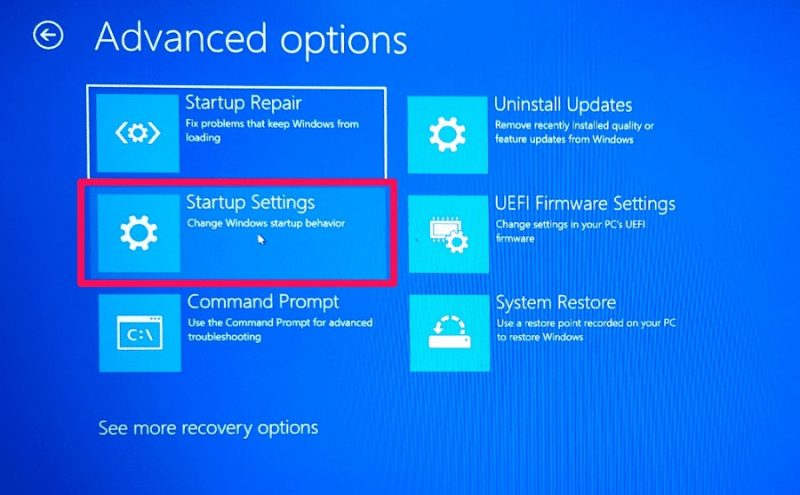
4. Next, Click on Startup Settings. (Note: If you can’t discover the Startup Settings, at that point, you may find it after you click on See more recuperation choices at the base.)
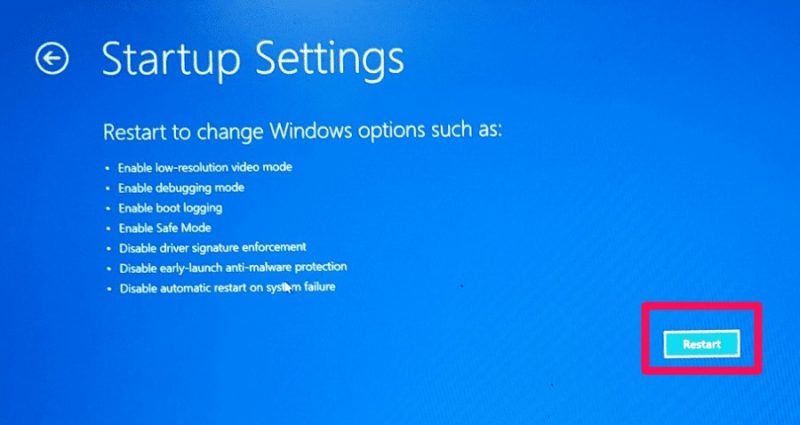
5. Finally, Click on Restart at the base right Side of the screen.
6. Now, Windows 10 will restart, & you’ll see three Safe Mode choices:
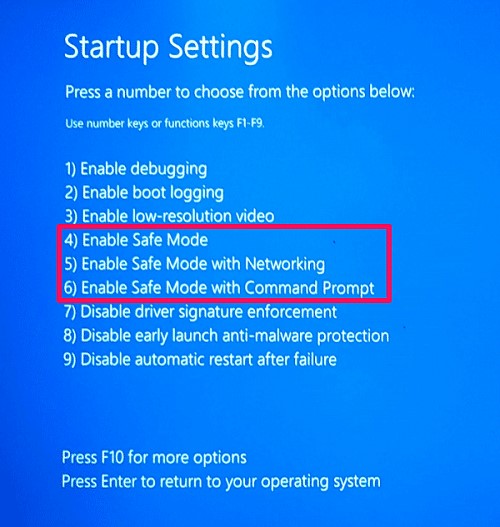
Enable Safe Mode :
This choice is utilized to begin Windows 10 protected mode with a base number of drivers. You can start this mode by squeezing the four or the F4 key on the console.
Enable Safe Mode with Networking :
This choice ought to be picked on the off chance that you need all the system drivers working when the Windows restarts. Press the five or the F5 key on the console to go with this choice.
Enable Safe Mode with Command Prompt :
On the off chance, you have a piece of decent information on PC orders, and at that point, this alternative may work for you. On the off chance not, at that point, avoid this choice since utilizing this, the working framework begins in Text Mode. Utilize the six or F6 key to push ahead with this alternative.
You’ll currently observe that the Windows has restarted in the Safe Mode.
2: Lock Screen
On the off chance that the primary technique didn’t work for you, at that point, you can attempt that equivalent strategy with the lock screen. All means are the equivalent. However, you need to find a workable pace alternative utilizing the lock screen rather than the beginning menu.
1. You can bolt your screen by utilizing the Windows+L essential blend.
2. Now, press and hold the SHIFT key on your console and select the Restart choice utilizing the force button.
3. After that, you need to follow similar advances that you developed in the principal strategy, i.e., Troubleshoot > Advanced Options > Startup Settings > Restart. (Note: ‘See more recuperation choices’ can get you to the Startup Settings on the off chance that you didn’t think that it’s first.)
4. Finally, you can choose the significant Safe Mode alternative for you utilizing the pertinent keys when the framework restarts.
3. System Configuration Tool (msconfig)
Framework Configuration device lets you do many things, and one of them is booting Windows 10 in protected mode.
1. You can dispatch the apparatus by composing “Framework Configuration” in the Start Menu.
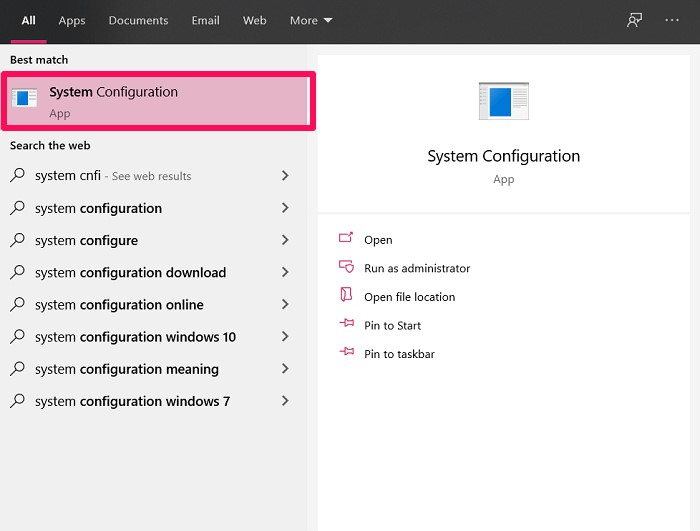
(Note: Also, you can find a good pace through Run order utilizing the Windows+R essential blend. In the Run box, type MSConfig and afterward hit OK. The System Configuration instrument will presently be directly before you.)
2. In the device, you need to open the Boot tab. There, you’ve to checkmark the Safe Boot alternative and Click on OK.
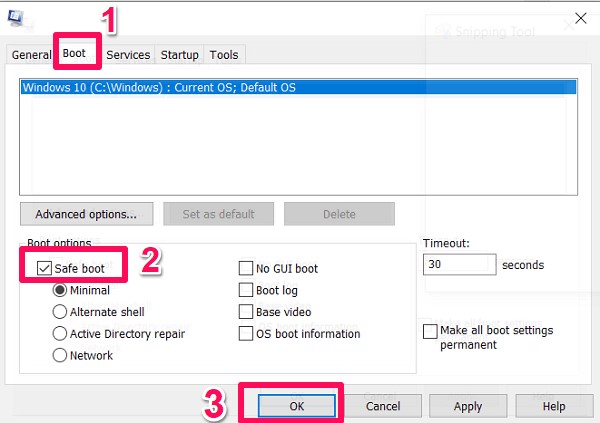
3. You’ll be approached to restart the framework to mirror the changes. You can restart immediately or decide to restart later by choosing the Exit without Restarting choice. (Additionally, make sure to spare any necessary information you’re chipping away at before restarting if you would prefer not to lose it.)
4: Settings App
The last technique we will talk about can be trailed by opening the Windows 10 Settings application.
1. To dispatch the application, look for the ‘Settings’ catchphrase in the pursuit field from the taskbar. Then again, you can utilize the Windows+I key blend to dispatch the Settings application straightaway.
2. Go to the Update and Security segment.
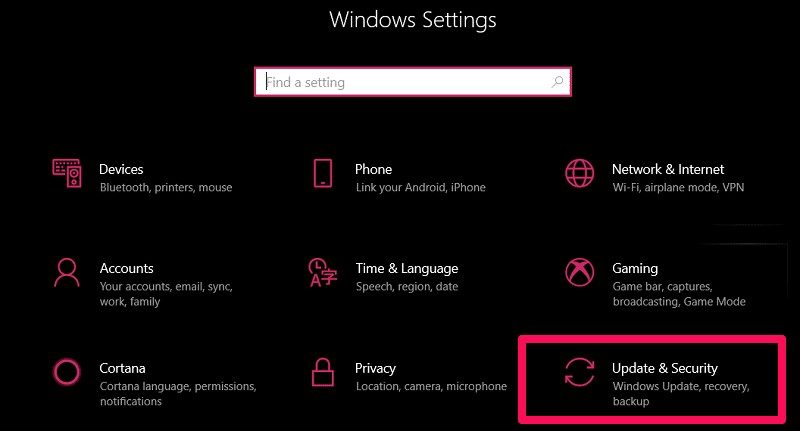
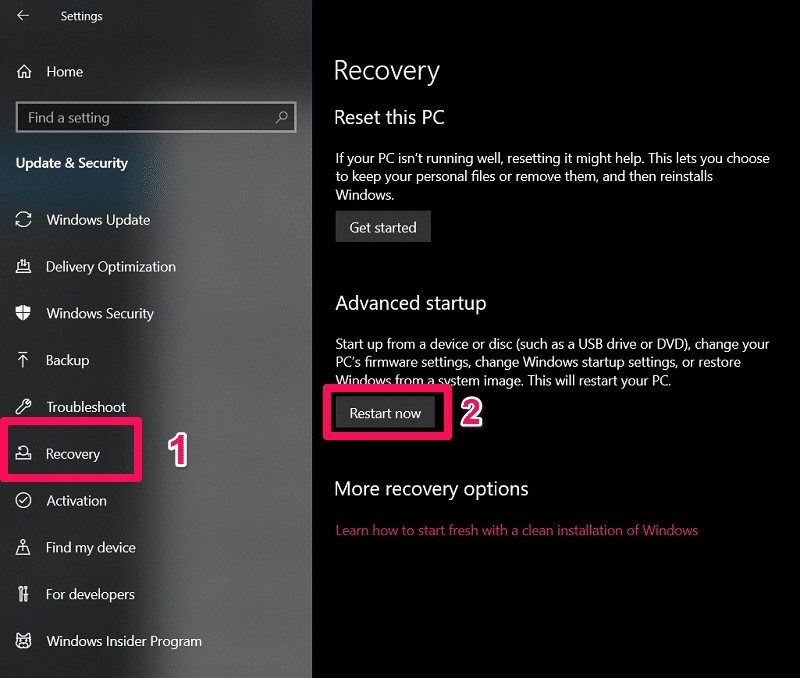
3. Now, on the left half of the application screen, you need to tap on the Recovery alternative. At that point, inside the Advanced startup segment, click on the Restart now a choice.restart utilizing settings application
From hereon, the whole system will be like what it was with the first two techniques.
How Do You Exit the Safe Mode In Windows 10 ?
On the off chance that you are figuring out how to run Safe Mode in Windows 10, at that point, you ought to likewise realize how to leave the mode. In any case, you’d be alleviated to realize that there is nothing to learn. To leave Safe Mode, you should Shut Down or Restart your framework.
Be as that it may, on the off chance you’ve utilized the System Configuration instrument to run experimental mode, at that point, you need to return to the more traditional settings to leave the method.
You need to return to the Boot tab in the System Configuration device and uncheck the Safe Boot choice. The framework will presently run in typical mode whenever you restart it.
You Can Also Check This Article To Improve Windows 10 Performance In 10 Steps .
Conclusion :
So this Feature was about How To Easily Boot Windows 10 In Safe Mode?
With this Method, you can Easily Boot Your Windows 10 version for free and in Safe Mode.

How To Repair Windows 10 Corrupted System Files?
It is very regular for Windows 10 clients to confront the outcomes of degenerate framework files. There are a few purposes behind these framework files to get undermined, and more often than not, it’s practically difficult to fix the defiled documents physically.
Try not to worry since we are here with not one but rather various answers to this issue.
Repair Windows 10 By Fixing Corrupted Files
Lets Discuss how we can fix Corruped Files with this Method that we mentioned below
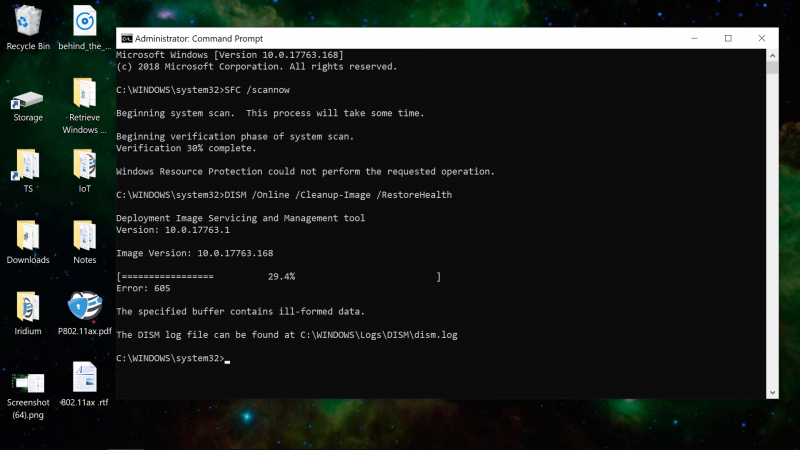
1. DISM
DISM (Deployment Image Servicing and Management) is an apparatus that can fix debased framework documents immediately. You can utilize this instrument through order brief by following the given advances:
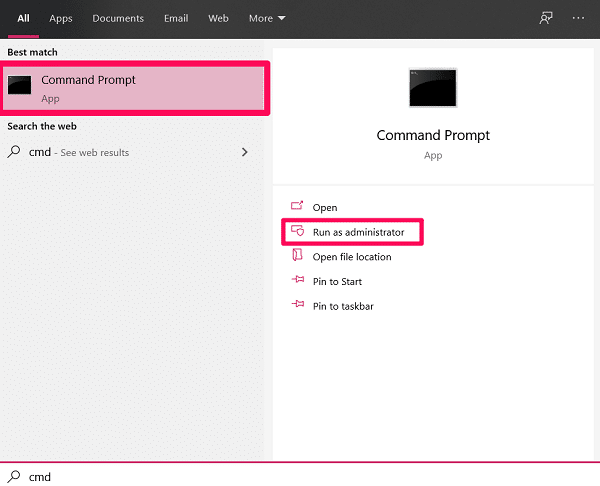
- 1. First, run the Command Prompt as Administrator via looking for it in the Start Menu by the watchword ‘cmd’ or ‘order brief.’
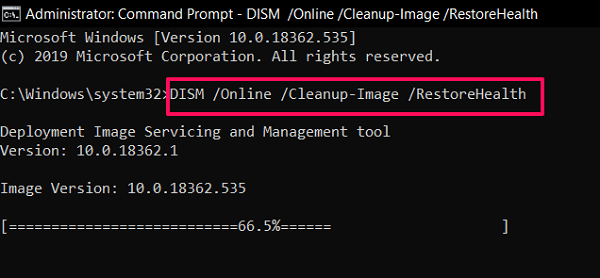
2. Type the DISM/Online/Cleanup-Image/RestoreHealth direction and hit ENTER.
(Note: If it shows a mistake, at that point, ensure you propelled the direction fast as director. Also, in the event that you, despite everything, can’t run the direction, at that point, check on the off chance that you’ve duplicated it accurately.)
3. Now, you need to sit tight for the fix procedure to be at 100%. It might take 10-15 minutes to finish, so show restraint.
Most presumably, your issue will settle when you restart your PC in the wake of running the DISM order. Be as it may, On the off chance the issue is still there, at that point, proceed onward to the subsequent stage.
2. SFC
SFC (System File Checker) is additionally a Windows device, which filters your PC for any adulterated documents and fixes them without anyone else. You can get to this apparatus by following this means:
Important : In Windows 10, it is fundamental that you run the DISM instrument before bouncing on to the SFC device.
1. To utilize the SFC device, dispatch the direction brief on your PC as Administrator.
2. Now, type SFC/scannow direction in the CMD window and press ENTER.
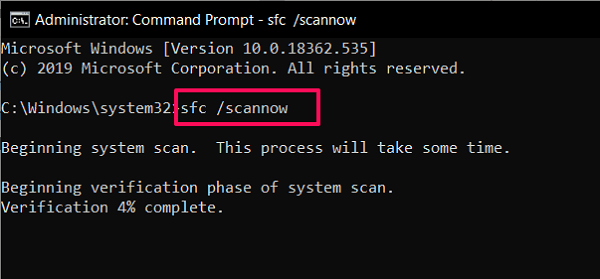
3. The framework sweep will presently start, and it will take a few minutes to finish.
At the point when the sweep finishes, you’ll get one of the accompanying messages.
Windows Resource Protection didn’t discover any honesty infringement.
This message implies the SFC instrument didn’t locate any undermined records in your framework. Along these lines, your Windows 10 OS is in amazing condition.
Windows Resource Protection couldn’t play out the mentioned activity.
On the off chance this is the message that is showing up before you, at that point, you may need to run the SFC examine by booting the Windows 10 in Safe Mode.
Windows Resource Protection discovered degenerate documents and effectively fixed them. Subtleties are remembered for the CBS.Log %WinDir%\Logs\CBS\CBS.log.
This message expresses that whatever issue your Windows PC is confronting, has been settled. Along these lines, restart your PC, and ideally, it will work fine and dandy.
Windows Resource Protection discovered degenerate documents however couldn’t fix some of them. Subtleties are remembered for the CBS.Log %WinDir%\Logs\CBS\CBS.log.
Right now, we must choose the option to supplant the debased records with the new ones physically.
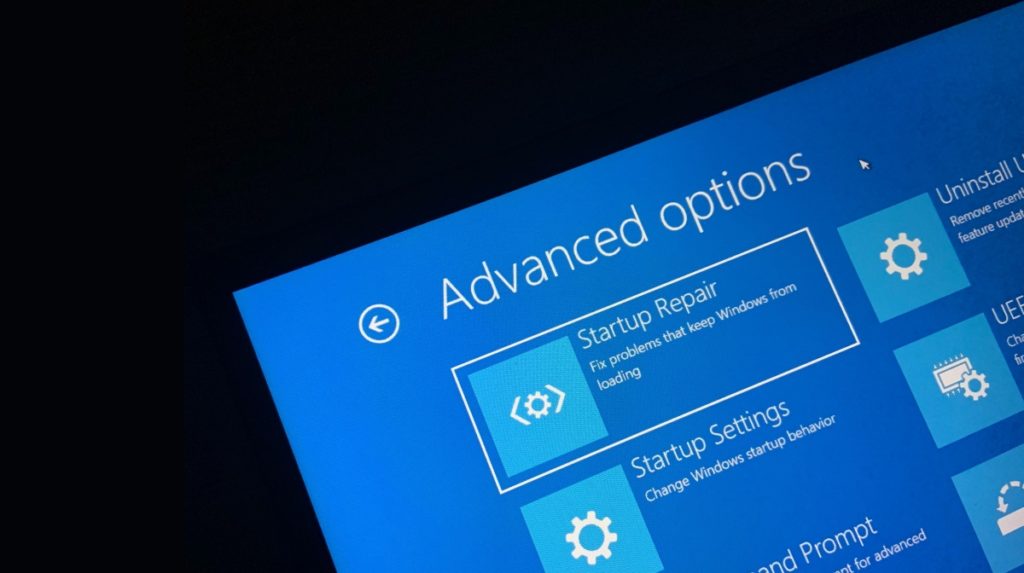
3. Windows Startup Repair :
You can perform Startup Repair in Windows 10 in the event that you think your PC is taking longer than expected to boot up. Be that as it may, finding a good pace accomplishes require some work for your benefit. Try not to stress, follow these means, and you’ll complete it in no time:
1. Press & hold the SHIFT key on your console and snap the Restart button in power choices.
2. Now, on the boot screen, select the Troubleshoot choice.
3. Next, click on Advanced choices.
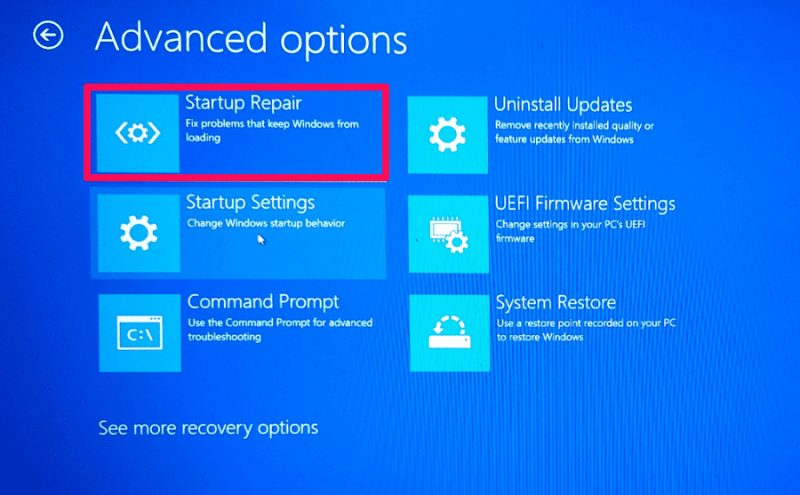
4. Finally, select Startup Repair to start the fix procedure.
It will require some investment for the Windows 10 startup fix to fix your concern, so now, you have no alternative, however, to pause. Additionally, in the event that it says that it couldn’t fix your concern, at that point, there’s a likelihood that there wasn’t anything amiss with the Windows 10 OS on your PC.
4. Windows System Restore :
Utilizing the Windows Restore highlight, you can return the state of your PC to a past point in time. Nonetheless, to utilize this component, it is essential that you’ve empowered System Restore on Windows 10 and made a reestablish point previously. What’s more, in the event that there isn’t any reestablishment point, at that point, sadly, you can’t utilize this element.
In any case, in the event that you’re sufficiently fortunate to have any reestablish point, at that point, you can utilize Windows System Restore to fix Windows 10 on PC. Likewise, it could be conceivable that Windows OS or some application may have made a reestablish point, consequently, which you can utilize.
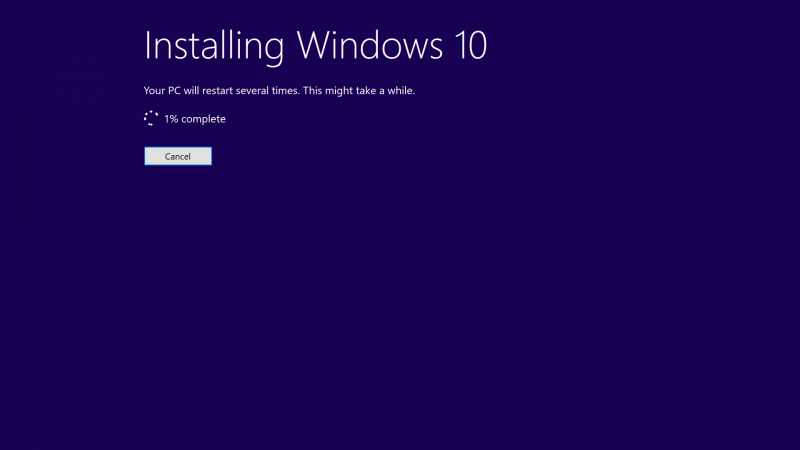
5. Reset Windows 10 :
On the off chance, by any possibility, nothing from what was just mentioned strategies worked for you, at that point, you can reset Windows 10 on your PC. By doing this, you return your PC to its manufacturing plant default state by reinstalling Windows 10. This implies all the applications, aside from ones that came preinstalled with Windows 10, will be expelled.
In any case, you’ll find a workable pace you need to keep your own information or delete every last bit of it. Also, regardless of whether you decide to keep your information, I would look at present propose that you back up each basic record as a precautionary measure.
It is perhaps the ideal approach to dispose of any malware and, accordingly, fix whatever isn’t right with your PC.
Conclusion :
Along these lines, those were all the potential strategies you could select to fix adulterated files on Windows 10. What’s more, on the off chance that none of those strategies accomplished the work for you, at that point, you must choose the option to totally reinstall Windows 10 on your PC.
Get Rid of Windows 10 Ads, Office Offers and Other Annoyances
Microsoft began to sneak commercials into the Windows stage with Windows 8 and they’ve just sneaked up further in Windows 10. You may review, a large number of clients got Windows 10 as a free redesign at dispatch, making the promotions additionally lenient. From supposed proposed applications in the Start menu, to bothering taskbar warnings and lock screen promotions, nothing more will be tolerated.
Fortunately it’s anything but difficult to close down the greater part of these irritations in the event that you realize where to look. We distributed this guide when Windows 10 was recently discharged, we’ve since changed all substance so it’s present with the most recent OS refreshes.
Bypass the Lock Screen, Or Disable Lock Screen Ads
To dispose of lock screen promotions you’ll have to cripple Windows Spotlight, which is the default alternative for the lock screen foundation and showcases various pictures as you sign into the working framework. It additionally recommends Windows 10 highlights you may have not attempted at this point, tossing the infrequent advertisement in the blend.
To kill Windows Spotlight head to Settings > Personalization > Lock Screen and set the foundation to Picture or Slideshow rather than Windows Spotlight.
Directly beneath this you’ll discover an alternative to turn off “Get fun realities, tips, and more on your lock screen” (this choice isn’t given Windows Spotlight chose).
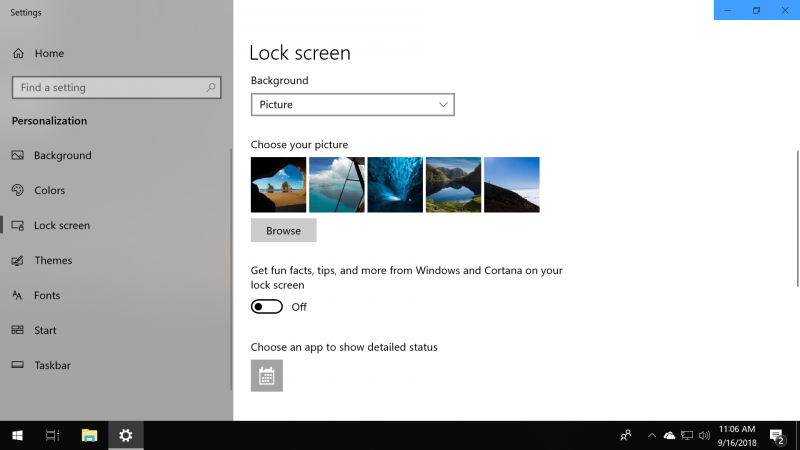
By utilizing the Picture or Slideshow settings, you can in any case have spinning backdrops on your lock screen, and you can even incorporate the lock screen pictures – here’s the ticket.
You can likewise impair the lock screen with the goal that you load directly to the Windows sign in brief as opposed to navigating the lock screen each time you sign into Windows 10. Here are two alternatives:
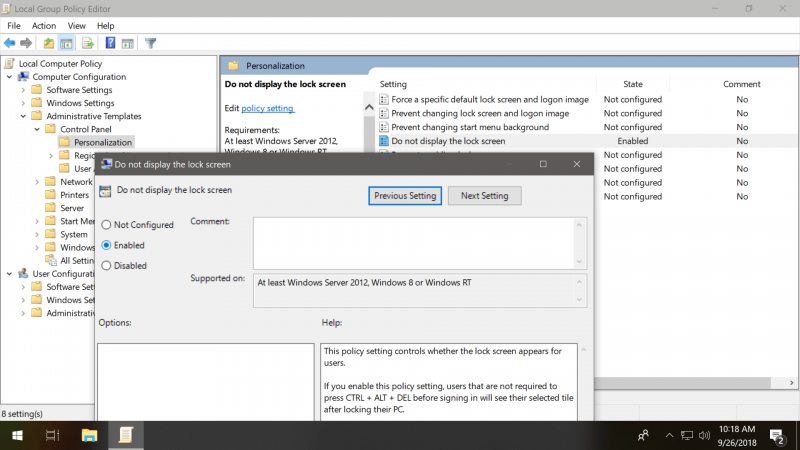
Disable the lock screen via the Group Policy Editor :
- Enter gpedit.msc by means of Start or Run to open the utility
- Explore to Computer Configuration > Administrative Templates > Control Panel > Personalization
- Double tap the strategy “Don’t show the lock screen” and pick “Empowered” on the window that opens and snap Ok
Disable the lock screen via the Windows Registry Editor:
The equivalent can be practiced by adding two passages to your library. Download our reg document bundle and double tap on the separate easy route to apply the change.
Make Cortana Less Prominent or kill it Altogether
Microsoft’s astute individual collaborator can be annoyingly tenacious to stand out enough to be noticed, and will skip or show notices and tips now and again reassuring you to utilize it. The pursuit box on the Windows taskbar occupies a lot of room for something that you can simply do by squeezing the Windows key and begin composing.
Microsoft expelled the alternative to turn off Cortana with the Anniversary Update, yet on the off chance that you would favor your hunt to remain concentrated on nearby documents, settings, and applications, you can in any case control her energy by right-clicking anyplace on the taskbar and floating over “Cortana,” which will exhibit choices to shroud the component or lessen the inquiry bar to a symbol.
Windows 10’s partner can likewise be closed down through the Windows Registry or the Group Policy Editor, which should be possible physically or by essentially downloading and double tapping on these library alternate way documents we’ve made (all the records for this article are in the equivalent download).
Banish Start Menu ‘Suggestions,’ or install a Win7-style Menu
It’s extraordinary that the Start menu is back in Windows 10 after the Metro interface in Windows 8, yet the application launcher despite everything isn’t great. For example, while the tiles UI makes it advantageous to get to your most every now and again utilized applications and projects, it might likewise fill in as prime land for promoters, occupying significant room in your Start menu.
To keep irritating advertisements and recommendations from springing up in your Start menu, head to Settings > Personalization > Start and set “Show proposals once in a while in Start” to Off.

On the off chance that you are not a devotee of Live Tiles (the moving pictures) you can likewise incapacitate those by right tapping on a tile and going to More > Turn Live Tile off, or you can choose “Unfasten from Start” to dispose of the tile totally. By unfastening all tiles on the correct side you can make a solitary segment Start menu and recapture some land also.
Those of you who might lean toward a Windows 7-style Start menu may likewise need to look at these outsider instruments: Start10 or OpenShell.
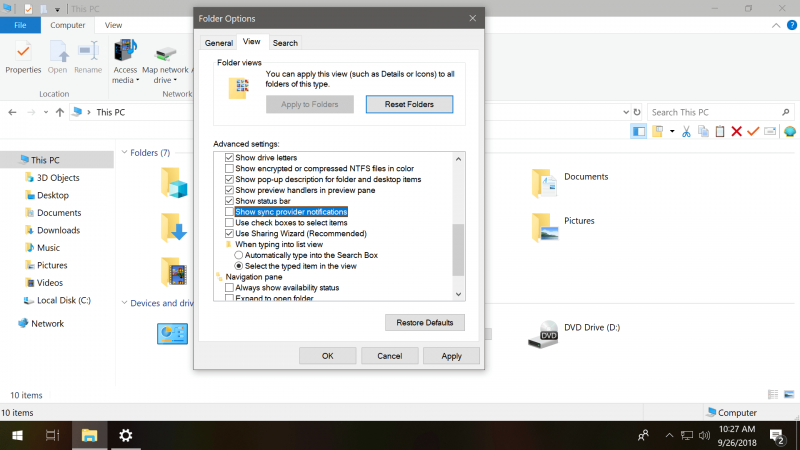
Disable ads in the Windows 10 File Explorer
Alongside advertisements somewhere else around it’s working framework, Microsoft has started stopping administrations, for example, OneDrive and Office 365 legitimately in the Windows File Explorer.
These advertisements can be incapacitated by opening File Explorer and going to File > Change envelope and search alternatives > View, at that point uncheck the container alongside “Show match up supplier warnings” and snap Apply.
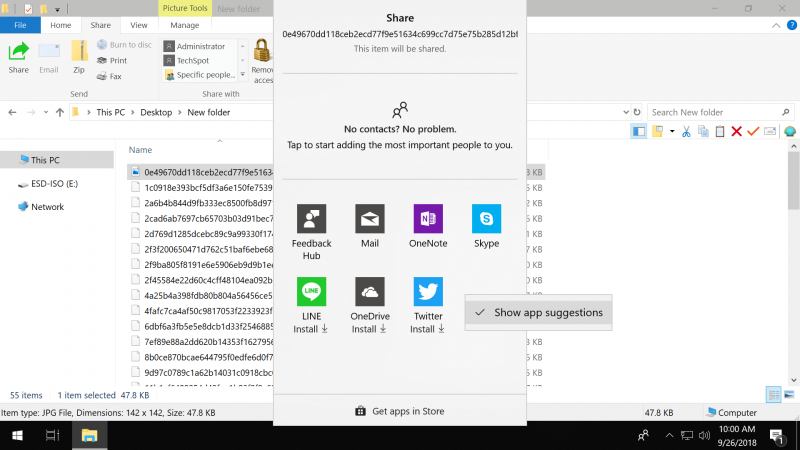
The File Explorer in Windows 10 likewise shows suggested downloads from the Windows Store when you go to share a document. These prescribed applications can be covered up by right tapping on the “Offer” window and unchecking “Show application proposals on the offer screen.”
Disable online Tips that Appear in the Settings App
The upper right corner of Windows 10’s Settings application shows tips and help recovered from Microsoft’s servers. This can be impaired by means of Group Policy or Registry alternatives as of the Fall Creators Update (variant 1709):
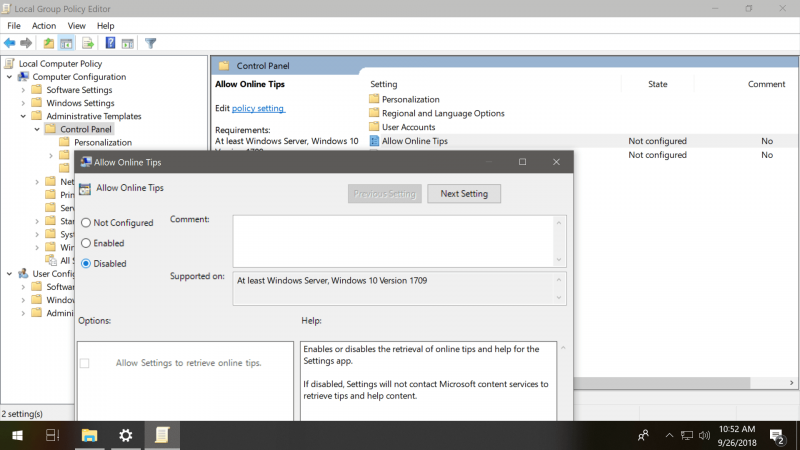
Disable from the Group Policy Editor:
- Enter gpedit.msc through Start or Run to open the Group Policy Editor
- Explore to Computer Configuration > Administrative Templates > Control Panel
- Double tap the approach “Permit Online Tips” and pick “Debilitated” on the window that opens and snap Ok
Disable Taskbar Notifications, Data Collection and More ads…
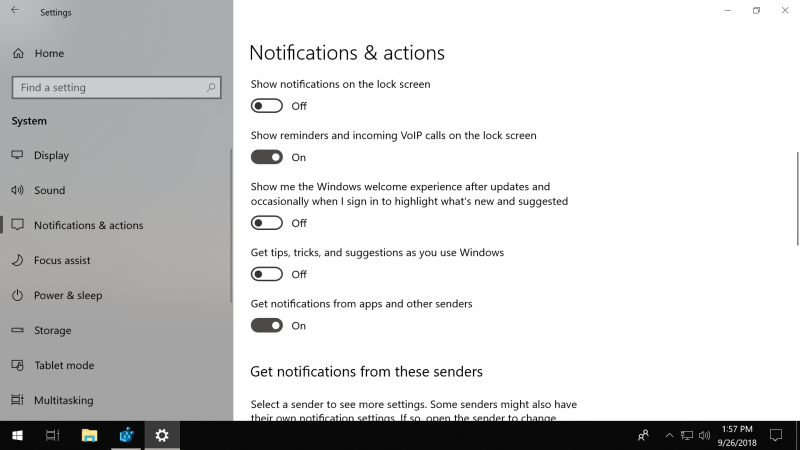
Windows 10 is arranged to show notices that acquaint new highlights furthermore with showing other “tips, stunts, and recommendations” which can incorporate promotions, for example, requesting that you attempt Microsoft’s Edge program rather than the one you’re utilizing. Here’s the means by which to cripple that:
Go to the Settings application > System > Notifications and Action and mood killer “Get tips, stunts, and recommendations as you use Windows”
Similar settings you may want to disable:
- Debilitate promotions from Windows Ink Workspace :
Settings > Devices > Pen and Windows Ink > Uncheck “Show prescribed application recommendations” - Windows invite understanding :
Settings application > System > Notifications and Actions > “Show me the Windows invite understanding after updates and every so often when I sign in to feature what’s going on and proposed” - Cripple Windows 10’s advertisement based information assortment:
Settings > Privacy > General > “Let applications utilize my publicizing ID for encounters across applications”
Prevent Settings from Syncing & Background Apps from Running
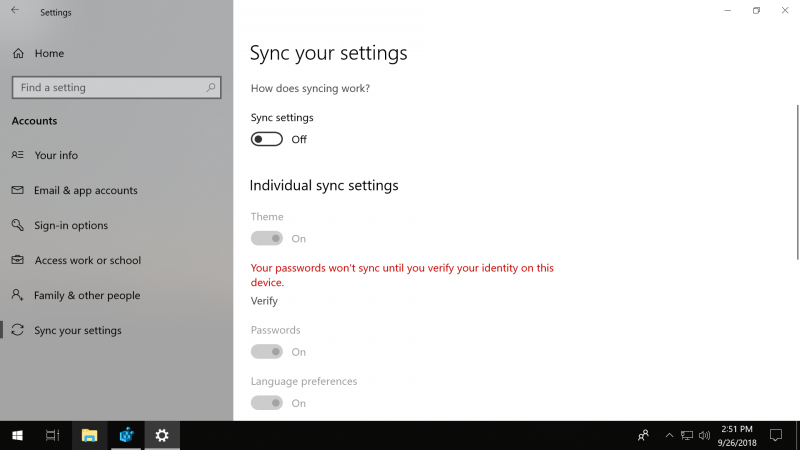
Of course the working framework is arranged to adjust your record settings to Microsoft’s servers when utilizing an online Microsoft account with Windows 10.
The synchronized information incorporates your topic profile, passwords, language inclinations, just as simple entry and different Windows settings, which can be crippled exclusively or totally by heading off to the Settings application > Sync settings > Settings > Accounts > Sync and turning things off.
Certain Windows 10 applications can get data, send notices and be refreshed when they’re not being utilized, including the Microsoft Store App and Skype.
Here’s the place to handicap applications from running out of sight: Settings application > Privacy > Background applications on the left > Toggle off each application separately. You can likewise do this through the Windows vault.
There are likewise different settings that might be of enthusiasm for this menu on the off chance that you look through the left segment of the Privacy area, including choices for Location, Camera, Microphone, Notifications and so forth.
Furthermore, here’s some product that improves the security of Windows 10: Spybot Anti-Beacon | Destroy Windows 10 Spying | O&O ShutUp10
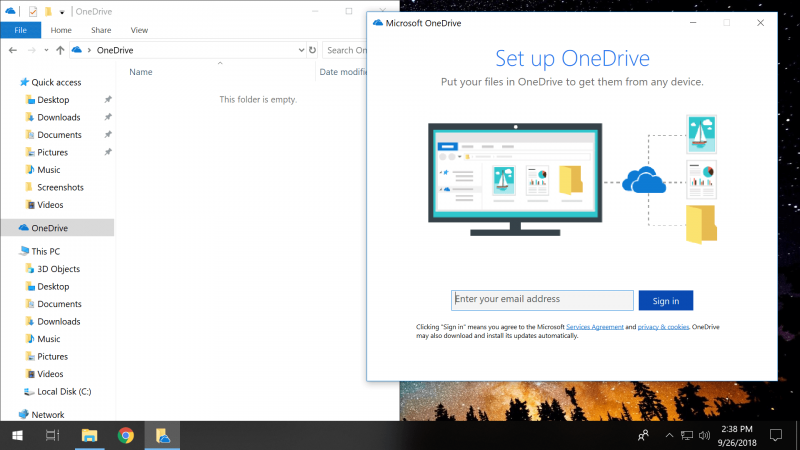
Shut Down OneDrive Completely :
OneDrive is firmly incorporated with Windows 10. It has its own hub in File Explorer, and the OneDrive synchronize customer runs consequently at startup, requesting that you sign in. Obviously, you don’t need to utilize OneDrive on the off chance that you incline toward a cloud administration from another supplier, as Dropbox or Google Drive, yet you can’t uninstall it like an ordinary application.
And keeping in mind that you can change OneDrive settings so that the match up customer doesn’t run consequently at startup, that despite everything leaves the OneDrive symbol in the route sheet of File Explorer. Luckily, there are both vault and Group Policy choices to totally incapacitate OneDrive (additionally observe this different guide on expelling things from the File Explorer).
Disable from the Windows Registry Editor:
- Enter regedit into Start or Run to dispatch the Windows Registry Editor
- Explore to HKEY_LOCAL_MACHINE\Software \Policies\Microsoft\Windows\OneDrive
- In the event that there is no key for OneDrive, you’ll have to right tap the Windows envelope and make another key named OneDrive
- Include another DWORD esteem as DisableFileSyncNGSC and set it to 1
Disable from the Group Policy Editor :
- Enter gpedit.msc by means of Start or Run to open the utility
- Explore to Computer Configuration > Administrative Templates > Windows Components > OneDrive
- Double tap the strategy “Forestall The Usage Of OneDrive For File Storage” and pick Enabled on the window that opens and snap Ok
- And keeping in mind that you can change OneDrive settings so that the synchronize customer doesn’t run consequently at startup, that despite everything leaves the OneDrive symbol in the route sheet of File Explorer. Luckily, there are both library and Group Policy choices to totally incapacitate OneDrive (likewise observe this different guide on expelling things from the File Explorer).
Disable ‘Get Office’ Notifications :
Windows 10 clients who don’t have Microsoft Office introduced are offered to attempt Office 365, the membership based rendition of the omnipresent profitability suite, and appreciate a month-long free preliminary. This is finished by a “Get Office” application that stays there for the sole reason for advancing it.
To stop these notices head to Settings > System > Notifications and Actions and switch off notices for the “Get Office” application.
Be that as it may, returning to the Get Office application, you can likewise uninstall this from the framework by going into the Start Menu, right tapping on the application and afterward choosing Uninstall. To ensure it doesn’t naturally introduce itself again after a restart, look for “Windows PowerShell,” right-click on the symbol and pick “Run as Administrator”. At that point execute the accompanying order:
Disable Windows 10 Telemetry :
Microsoft famously expanded the measure of client information that is gathered by its working framework with Windows 10. You can restrain the measure of data assembled by denying telemetry.
From the Group Policy Editor:
- Enter gpedit.msc by means of Start or Run to open the utility
- Explore to Computer Configuration > Administrative Templates > Windows Components > Data Collection and Preview Builds.
- Double tap Allow Telemetry, pick Disabled and snap Ok.
From the Registry Editor :
- Search regedit by means of Start Windows > right-snap and run as a chairman to dispatch a raised Registry Editor.
- Go to HKEY_LOCAL_MACHINE\SOFTWARE\Microsoft\Windows\CurrentVersion\Policies\DataCollection
- Double tap AllowTelemetry and change its incentive to 0
Conclusion :
No more Start Menu and Lock screen Ads, Office and OneDrive offers, Thanks For Visiting Our Blog.If You have any Issue or asking anything Else feel free to submit the comments in comments section blew.
Reset Windows 10 Without Losing Your Data
We starting late encountered an Establishment of Windows 10 with structure records that were savage to the point that specific portions of the Settings application would thus approach when being opened, among different bugs around the stage. Subsequent to trying ordinary fix decisions, We used a Windows 10 ISO to play out a set up update, reinstalling Windows 10 while keeping our applications what not.
In the event that this sounds typical, we have verified a similar plan using Windows 10’s worked in “Reset this PC” decision, yet that ousts your projects and so to speak holds your records and settings on the as of late presented working system, while again, the set up update to be sure jam the PC program you have presented.
Running a set up update attempted to settle our event of Windows 10 that couldn’t something different be fixed with Command Provoke directions, for example, SFC/scannow and DISM/Online/Cleanup-Image/RestoreHealth – not either of which would wrap up their activity on our establishment.
The Reinstallation can be begun from inside Windows using the setup.exe record on a Windows 10 ISO/USB drive or from the Media Creation device, and the technique took around 30 minutes to wrap up on our work area PC.
Since to be sure your applications are hung on the coming about foundation, in the event that all goes as organized you won’t should do a lot of some time later and it’s absolutely a method for less opposition contrasted with totally reinstalling Windows.
Beginning with a set Up Of Upgrade :
First of all, the set up update isn’t a decision on the off chance that you can’t boot into your foundation. You should be signed in to a Windows account which record must have administrator find a good pace. In the occasion that you’re not an administrator, you might be prompted for certifications when propelling the installer.
To mind the remote possibility that you have an administrator account, look Begin for “Modify Account Sort” or go to Control PanelUser AccountsUser AccountsManage AccountsChange an AccountChange Account Sort where the entirety of the records on your Windows foundation ought to be recorded and those with administrator level find a good pace “Manager.”
Double-click your record and after that press “Adjust the record sort” for the decision to go from a Standard customer to a Director.
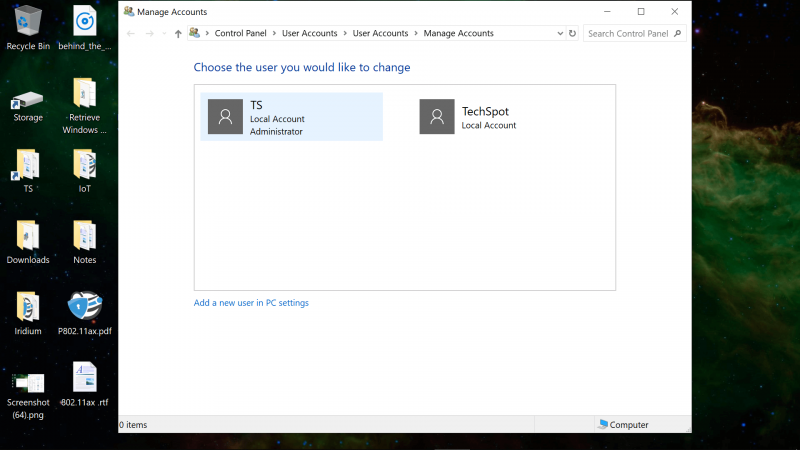
You’ll in addition find this information by looking Begin for Netplwiz.exe. With that application open, select your record and go to Properties by then the Gather Participation tab for the Standard client/Administrator switch.
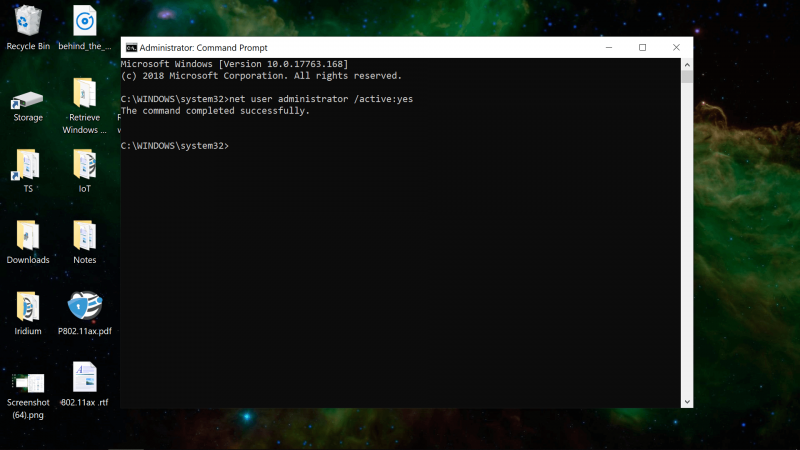
In case you’re unable to make your record an executive, note that the Windows administrator account is injured naturally and can be enabled from a raised Command Provoke.
net user administrator /active:yes | enables administrator account (relog)
net user | lists all Windows accounts including the administrator account
As another need for the set up upgrade, your Windows ISO/USB drive/Creation Instrument must contain a similar variant of your working structure (or progressively current), just as a similar lingo and plan (32/64-piece).
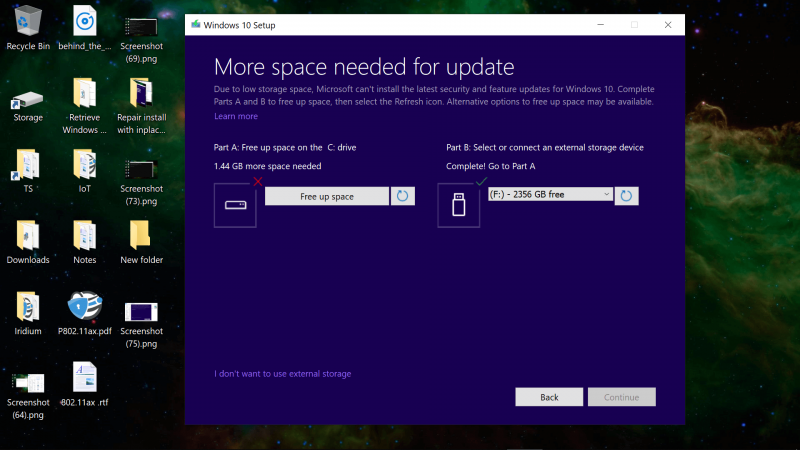
You’ll additionally require a couple of spare limit on the Windows drive – around 8GB when we tried.
Advantageously, this progression inside the foundation will help you with limit information, demonstrating limit use for various areas of your working structure, and you’ll too choose an optional/outer limit contraption from a drop-down menu of each drive associated with your PC.
Regardless of the way that you’ll keep the entirety of your records and program, the re-installation will delete certain things, for example, custom printed styles, system images and Wi-Fi accreditations. In any case, as bit of the technique, the arrangement will also make a Windows.old envelope which should have everything from your past establishment.
On the off chance that you have a UEFI structure with Secure Boot engaged, it’s prescribed that you just handicapped person Secure Boot some time as of late start the set up upgrade and after that re-empower the feature some time later.
As a Matter of Fact Beginning the Set Up Of Upgrade :
Begin the Windows setup (setup.exe) by mounting the ISO or opening the Windows USB establishment drive from the Record Explorer.
Windows 10 has local back for mounting ISOs by right-clicking choosing Mount or by utilizing the taking after PowerShell command (our establishment was so broken that the right-click choice wasn’t accessible to us):
Mount-DiskImage -ImagePath “C:\FileName.ISO“
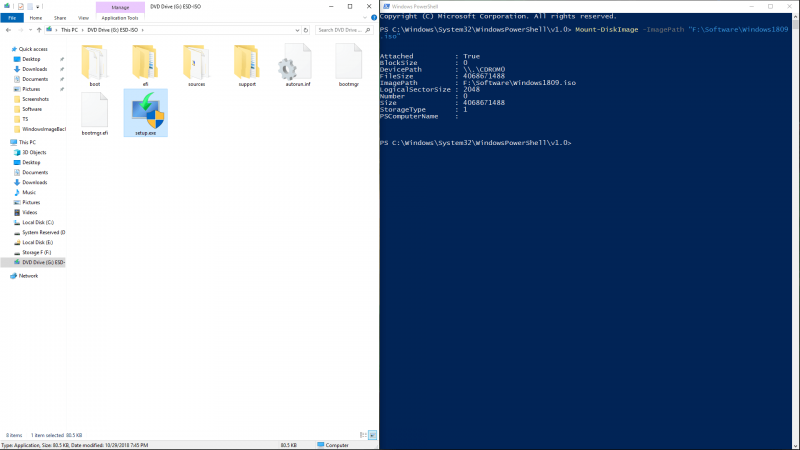
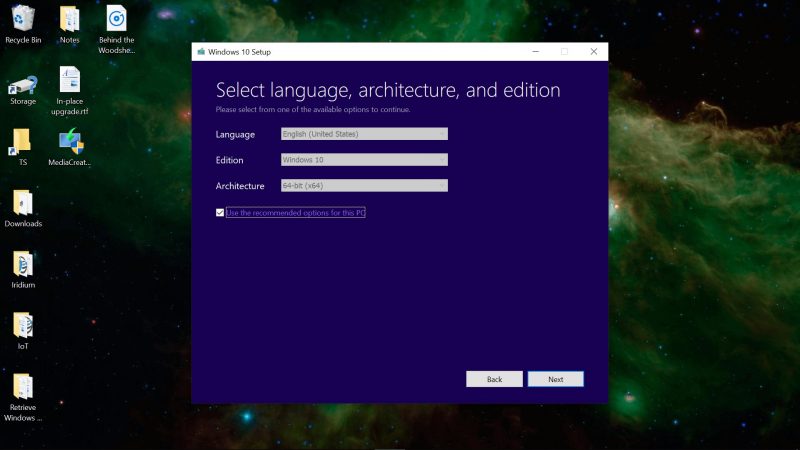
After propelling setup.exe or the Media Creation instrument, you’ll have the choice to overhaul presently or to form an establishment ISO/USB drive — you need to Upgrade this PC presently. You may well be provoked to download overhauls earlier to this alternative being accessible.
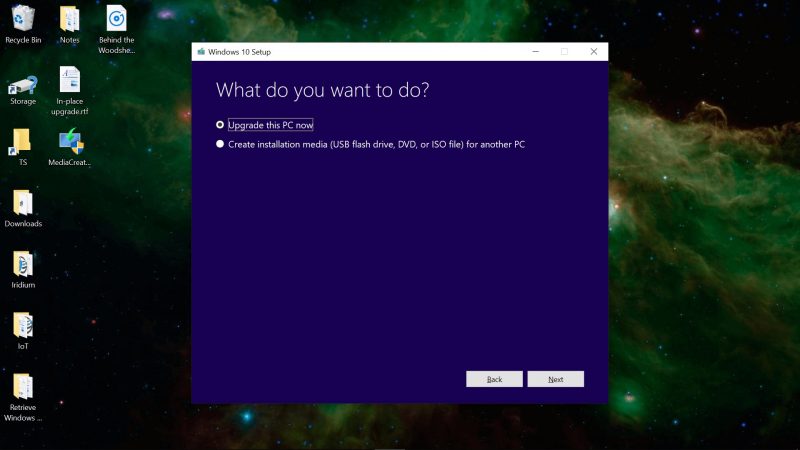
The installer will perform a few introductory setup/scans and inevitably inquire what you need to keep on the unused duplicate of Windows.
If you proposed to keep your right now introduced program on the repaired working framework, make beyond any doubt that “apps” are recorded and not as it were “records” (Keep individual records and apps).
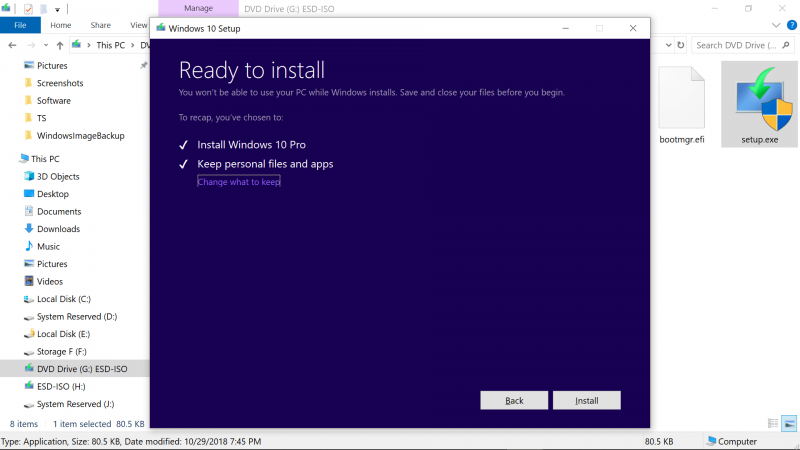
The rest of the in-place update sums to holding up around a half an hour for Windows to reinstall, which rebooted our framework a few times and didn’t require any advance mediation from us.
When completed, you’ll stack back into the same Windows environment where you initially begun the “update,” but with recently introduced working framework records which ought to be bug-free.
After Completing the in Place Upgrade
As Determined some time as of late, regardless of the way that this re-installation holds your program and settings, the strategy makes a Windows.old coordinator with data from your past copy of Windows.
This envelope has a far reaching whole of limit and isn’t easily deleted explicitly from File Explorer, despite the way that you’ll be capable peruse the substance at C:Windows.old.
Circle Cleanup can delete the Windows.old organizer just as other brief foundation records used inside the arrangement: Look the Begin menu for Disk Cleanup and after that press “Tidy up structure records” to run an assistant channel that will discover Windows trash documents. At the point when we checked after the set up upgrade, Disk Cleanup discovered 3.61GB of “Past Windows installation(s)” and 225MB of “Windows redesign log records.”

In the occasion that you’re really moo on limit space, we’ve discovered that outsider program, for example, Astute Disk Cleaner will oust more data than Disk Cleanup, which explicit instrument in reality emptied more than CCleaner.
Conclusion :
Other than eradicating excess Windows information, you’ll likely must be relog into your Wi-Fi orchestrate and you’ll have to present a couple of Windows upgrades in case you didn’t use the chief later Windows ISO. In any case, that should be roughly the level of your errands after the set up redesign/fix foundation.

Windows 10 | Set Up The Ultimate Performance Mode Using PowerShell
Microsoft brought the Ultimate Performance Power Plan Essentialness plot to Windows 10 April 2018 supplant to optimize the device’s execution. In this choice, i can appear you a way to allow the closing in common execution mode in windows 10 the utilize of Powershell as an admin due to the truth the “Ultimate Performance” Quality organize Elective may not be to be had on a number of structures, Particularly in case you’re utilizing a PC.
But, last Ultimate Performance Power Plan available with high-end PCs strolling direct on the quality, and there’s no smooth way for all desktops to permit this. That said, i am not pointing to propose this mode for versatile workstations since it’ll utilize a number of battery, in any case you’ll utilize it in your tasteful gaming charm in in case you’re past any question you’d like it.
What’s The Ultimate Performance Power Plan ?
What the Ultimate Performance Power Plan in Windows 10 does is to move forward high-energy systems capability. It’s removed sketched out to diminish or put off pleasant-grained control control strategies related to Micro-latencies. You association a micro-latency in case you word a coordinate put off between the diminutive your os gets it that a chunk of gear needs more Imperativeness and the time it’s removed truly displayed. it may still make a capability, no matter how quick the put off is.
In Addition, the extreme execution orchestrate evacuates gear looking over to see within the occasion that more conspicuous control is required and grants the hardware to apply all the control it wishes. Any electricity-saving capabilities are as well weakened to in extension update in common execution. due to this, battery-powered contraptions aren’t given this highlight by implies of default since it may exhaust more control and pulverize the battery much speedier.
The way to Enable the Ultimate Performance Power Plan in Windows 10 the Use of Powershell
As i’ve said Earlier, the remaining execution control organize choice in residential windows 10 or windows 8 may not be to be had on numerous frameworks, remarkably in case you’re utilizing a computer. Be that because it may, you will in any case enable the characteristic the utilization of Powershell. to attempt this, you would like to require after the edifying underneath:
Note : The Ultimate Performance mode will make Applications perform faster and it’ll additionally consume quite a few battery on the identical time.
Step 1: Proper-Click the windows icon on your Taskbar and then pick windows Powershell (admin) from the listing.
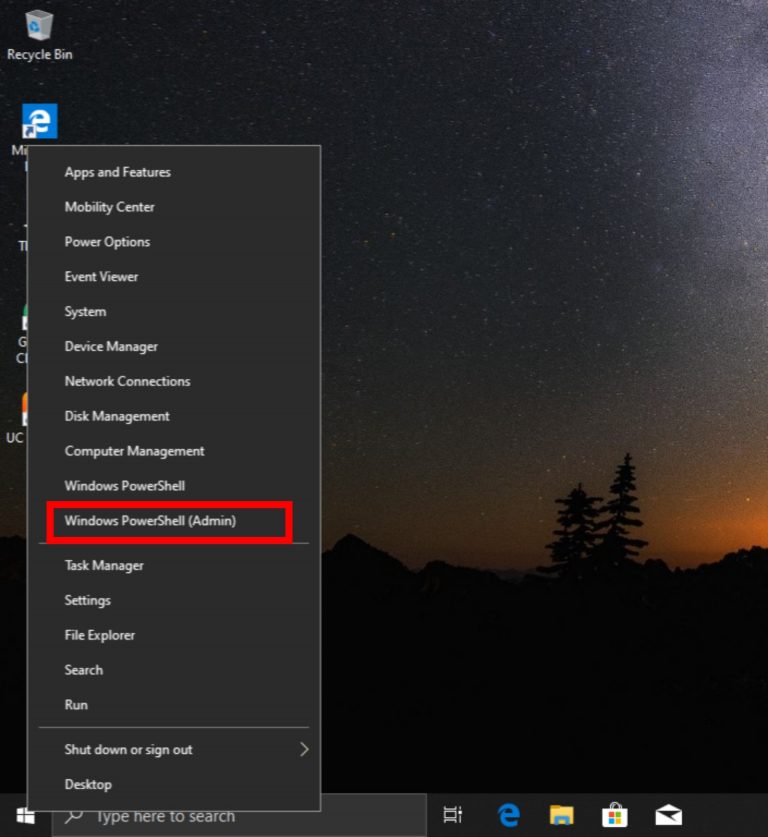
Step 2: On the off chance that incited to provide consent to the app, tap Yes.
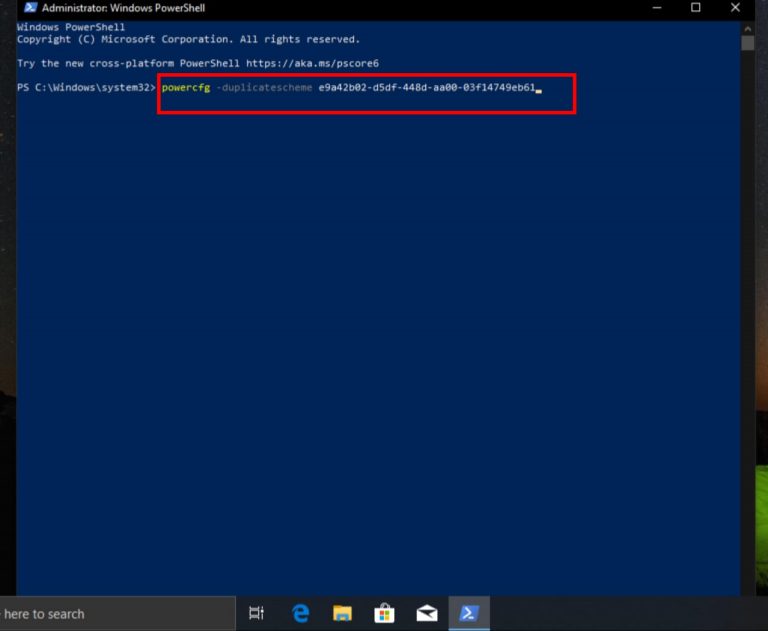
Step 3: The Home Windows Powershell window will appear. Now, Copy the command beneath and run it thru windows powershell:
powercfg -duplicatescheme e9a42b02-d5df-448d-aa00-03f14749eb61
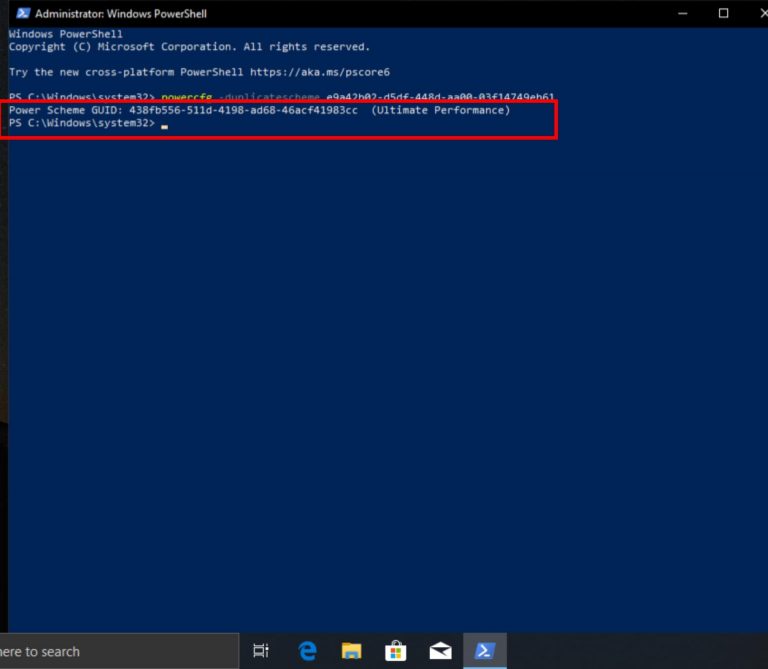
Step 4: On the off chance that it is productive in counting the Extraordinary Execution Control plan, it’ll show up the Control Plot GUID. On the off chance that not, it’ll show up “Unable to make a cutting edge control scheme”.
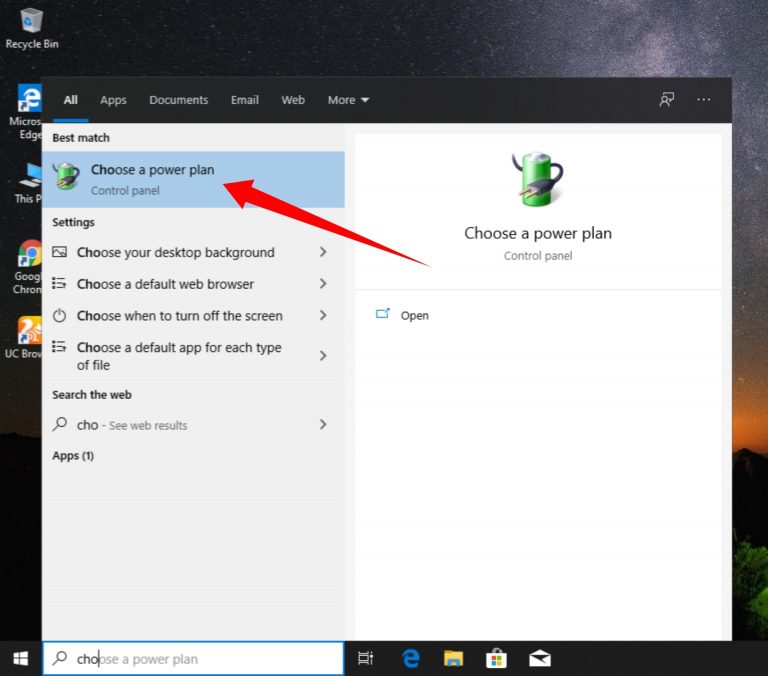
Step 5: To utilize the Extreme Execution, tap the Windows begin button and sort “Choose a control plan”, and after that press Select a control arrange.
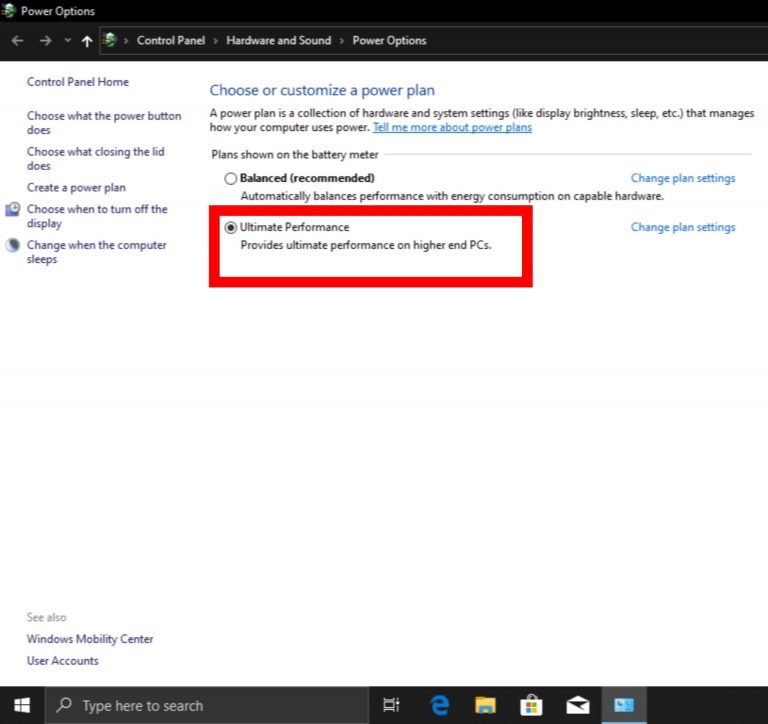
Step 6: Control Choices window will appear up and tap on Extraordinary Execution to utilize it. The default modes in Windows 10 are Balanced, Control Saver, and Tall Execution. Extraordinary Execution takes it one step ahead.
Conclusion :
This choice changed into roughly how to allow the extreme execution mode control arrange in windows 10 the utilization of Powershell in spite of the fact that it’s conceivable through command start off as well. Normal, the ultimate performance mode could be a great work to utilize in case you’ve got computer which doesn’t use the battery, i will unequivocally propose you employ it after you are gaming, or while you’re employing a video improving program program which wishes parts of cpu/gpu power to urge the first-rate result in a incredible bargain shorter time.