
5 Best Free Drawing Apps for Mac
Best Free Drawing Apps for Mac While it’s surely never been easier to create digital art, premium professional tools still cost a leg and an arm. Best Free Drawing Apps for Mac, like Adobe’s Illustrator and Procreate, have made it so that anyone with a computer or tablet and some decent talent can start crafting some fantastic pieces. Still, unfortunately, the price of both parts of the software can stop incredible artists from getting to share their ability.
Thankful, if you have a Mac, drawing on your laptop doesn’t have to cost a pretty penny. While applications like Illustrator can be pretty costly, there are plenty of apps that offer similar, if not identical, features as what you’ll find in Adobe’s drawing application. This means they permit you to create professional-grade sketches, concept art, and vectors. If you are serious about digital drawing, the money you save on application subscription can go concerning other gear. For example, these best Free Drawing Apps for Mac is roughly the same price as Adobe Photoshop or the newest edition of Corel Painter.
Professional or novice, the App in this write-up allows you to edge your drawing skills, and you can hardly go wrong regardless of which one you choose. All in all, you should compare what you need out of an application before the drop into any of these. With that in mind, let’s see which applications made it on our top five list.
Best Free Drawing Apps for Mac
1. Autodesk Sketchbook
2. Krita
3. MediBang Paint
4. Inkscape
5. FireAlpaca
Autodesk Sketchbook
Numerous professional illustrators and digital artists consider Autodesk Sketchbook one of the best drawing applications. The features that put this Best Free Drawing App for Mac at the top of the list are the tools and exceptional user interface (UI). Tools-wise, there are 140+ brushes, Different blending modes, and an unlimited number of layers that can be grouped. Also, the software supports perspective stroke and rulers, guides, Moreover, predictive stroke.
This sounds good, but the thing you are bound to fall in love with is the UI. Once you start sketching, the UI Mixed into the background, leaving you with the full-screen Draw. Of course, it is super easy to get to the switch brusher, tools, and such. Overall, it’s hard to beat Sketchbook. While most of the other applications on this list still offer something unique, Sketchbook is the drawing application to start with.
Krita
Krita is a professional drawing application created by digital artists who wanted to make their tools available to everyone. As such, this application is a great choice, even if you are starting to master the skills of digital sketching. Plus, the official site offers a bundle of free learning resources. When it comes to features and tools, this application has everything you need.
The UI is fully customizable, and the application features various brush stabilizers and engines, advanced resources management, and pop-up color pallets. You should know that Krita is designed for comics and concept artists, rather than illustrators. Another exciting thing is that this Best Free Drawing App for Mac is available on Linux, as well as macOS and Windows.
MediBang Paint
MediBang Paint is an easy to use, yet incredibly powerful tool that works great for veteran and novices illustrators alike. Similar to Krita, the App is more geared close to comic book Artists, but it could be used for sketching as well. As you might have calculated, there is a bundle of different tools to create intricate graphics. This Best Free Drawing App for Mac features more than 50 brushes and Tones and well over 800 backgrounds.
Since it’s basically designed for comics, MediBang Paint also offers 20 different fonts. Furthermore, there is a cross-platform combination via the cloud. This means you could start your sketch on a Mac and pick up where you left off on your iPhone or iPad. Admittedly, the UI on the iPhone might feel a bit cluttered, but it’s performing and responsive as expected.
Inkscape
Looking for a free application that can give vectors? If Yes, then you require to check out what Inkscape has to offer you. It’s an open-source power-house of a drawing app, tailored to meet the needs of designers, web designers and illustrators. Judging by the available features and tools, Inkscape can provide Adobe Illustrator the best run for its money. The UI layout is as same as to one of the previous iterations of Adobe Illustrator.

Looks aside, Inkscape offers more features to design professional vectors.
You can create and manipulate objects, use path conversion, edit nodes, etc. This Best Free Drawing App for Mac also supports multi-line text and a bunch of file formats you might need. Besides, the color selector at the bottom of the page is a small but handy highlight of this App.
FireAlpaca

FireAlpaca gets its rightful place on this list for a few reasons. First of all, this Best Free Drawing App for Mac is exceptionally lightweight, which makes it a great solution if you are using an older Mac version. Mind you, and the App runs on macOS X 10.7 and earlier. In terms of features and tools, FireAlpaca doesn’t offer as much as some more entries on this list.
However, there are still more than enough brushes, color and layer options, and settings to create cool-looking vectors. Plus, there’s a 3D perspective tool that lets you portrait different objects to the grid. Remember, this App is designed to work as an adorable on older hardware, and it does. So even if you don’t have ample cash to grab yourself a brand new MacBook Pro, FireAlpaca has got you and your trusty 2011 MacBook Air covered.
Conclusion :
Now wrapping up our content to the Best Free Drawing Apps for Mac! If we miss out on one of your favorite ones? Let us know in the Comments Section which apps you rely on for daily drawing and whether we should add any additional applications in upcoming revisions to this guide!
How to Make A Bootable MacOS Mojave Installer Drive
In this Article, I will direct you on the best way to make a Bootable MacOS Mojave installer drive utilizing the Terminal on Mac. An outer Drive that you can use as an installer for MacOS Mojave is something to be thankful for to have. On the off chance that you have various Macs to overhaul, it’s very simple to connect the USB installer drive and run the installer than to sign into the App Store, download the 6.02 GB OS installer, and afterward run it.
Notwithstanding, there are Numerous Approaches to make a Bootable MacOS Mojave installer drive like utilizing outsider MacOS installer Applications, Disk Creator or Disk Drill however the most Straightforward approach to make a Bootable MacOS Mojave installer drive is Utilizing Terminal, which simple and Basic and furthermore you don’t have to introduce and extra programming. In any case, before Moving to our principle theme, we should have some snippet of data about MacOS Mojave 10.14, MacOS Mojave Highlights and MacOS Mojave Framework prerequisites.
MacOS Mojave 10.14 :
MacOS Mojave is succeeded MacOS High Sierra and was trailed by macOS Catalina. MacOS Mojave 10.14 is the fifteenth significant arrival of MacOS, Apple’s Macintosh PC work area working Framework. The working Framework’s Name alludes to the Mojave Desert and is a piece of a progression of California-themed names that started with OS X Mavericks.
MacOS Mojave Features :
Very nearly a year prior, Apple revealed MacOS Mojave, the most recent adaptation of its Mac programming. MacOS Mojave is a free update for Mac clients, and in case you’re utilizing an old adaptation of MacOS, it’s an entirely huge change. Not exclusively will it assist you with remaining sorted out and accomplish work all the more productively, yet it likewise incorporates numerous stylish choices to make utilizing a Mac all the more outwardly engaging. Here are a portion of the incredible highlights of MacOS Mojave:
1. Dark Mode :
High Sierra made it feasible for you to change your menu bar and dock into a darker shading plan, yet all in the middle of stayed somewhat white. Be that as it may, Thanks to macOS Mojave, the Mac at long last has a genuine dim mode. Simply change it to your System Preferences application.
2. Desktop Stacks :
Inside MacOS Mojave, another element called “Stacks” naturally sorts out all the arbitrary substance on your work area into a la mode heaps of archives on the correct side of the screen. The best part is to keep your stacks sorted out, regardless of what number of archives you add to your work area. For instance, in the event that you consistently take screen captures, MacOS Mojave will sort them consequently for you as opposed to dissipating them all over the place.
3. Better Screenshot Tools
MacOS Mojave makes catching anything on your PC more straightforward. Albeit taking single screen captures is still similarly as basic, Mojave presents a screen-getting menu with recording assets, for example, a commencement defer clock, the capacity to show or conceal the cursor in the shot, and better approaches to share and compose your screen captures rapidly.
4. New Mac App Store
Apple has overhauled the Mac App Store for MacOS Mojave starting from the earliest stage. The greatest changes are visual: you will presently observe auto-playing recordings and even articles on well known applications in the store, so you can peruse progressively about applications before introducing them. There are likewise better approaches to discover programming in the new Mac App Store. The new tabs of Discover, Build, Work, Play, and Improve assist you with finding the applications you don’t have or get more from the applications you as of now have.
C. System Requirements: Which Macs are Compatible with MacOS Mojave?
iMac – All models from late 2012, iMac 13,1 – 18,3
iMac Pro – All models, iMac Pro 1,1
MacBook & MacBook Retina – All models from late 2009, MacBook 8,1 – 10,1
MacBook Pro – All models from 2012, MacBook Pro 9,2 – 15,1
MacBookAir – All models from 2012, MacBook Air 5,1 – 7,2
Mac Mini – All models from 2012, Mac Mini 6,1 – 7,1
Mac Pro – All models from 2012, Mac Pro 6,1 and from 2010-2012 Mac Pro 5,1 Models with recommended Metal-Capable GPU
How to Form a Bootable MacOS Mojave Installer Drive Installer
Here’s how to form a Bootable MacOS Mojave 10.14 Bootable USB Installer for a clean present on your Mac. Be that because it may, let me specify a few fundamental things you’d like to have a few time as of late making a MacOS Catalina Bootable USB streak Drive Installer.
A. USB Flash Drive Installer
To complete the process, you’ll need a spare USB flash drive and your USB must be at least 8 GB and is formatted as Mac OS Extended. Remember that it will be deleted during the procedure and make sure to copy all your important data.
B. MacOS Mojave Installer Software
You would like to have the MacOS Mojave picture record. In case you have got a MacOS Catalina record at that point you’re good to go and in the event that you don’t have the record at that point you’ve got to download it from Mac App Store. No stresses! I will appear you how to download the MacOS Mojave record from the Mac App Store.
How to Download MacOS Mojave ?
Step 1. Click on the Apple logo on the top Left-hand corner, select App Store.
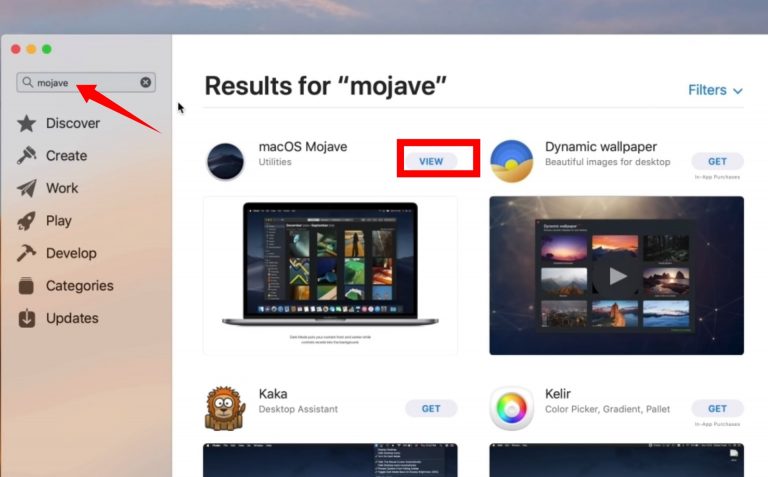
Step 2. In the Search bar, search for “Mojave“. In results, you’ll see “macOS Mojave” then click on VIEW.
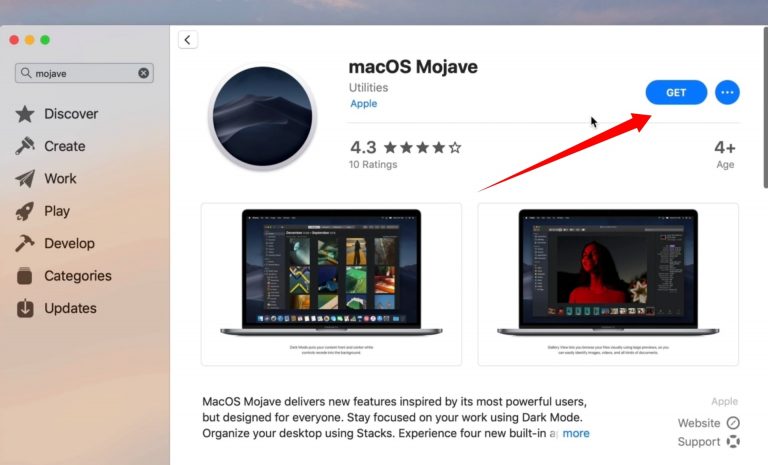
Step 3. In order to Download MacOS Mojave 10.14 click GET. (If you’ve already downloaded the installer, the Button will say Install instead of GET.)
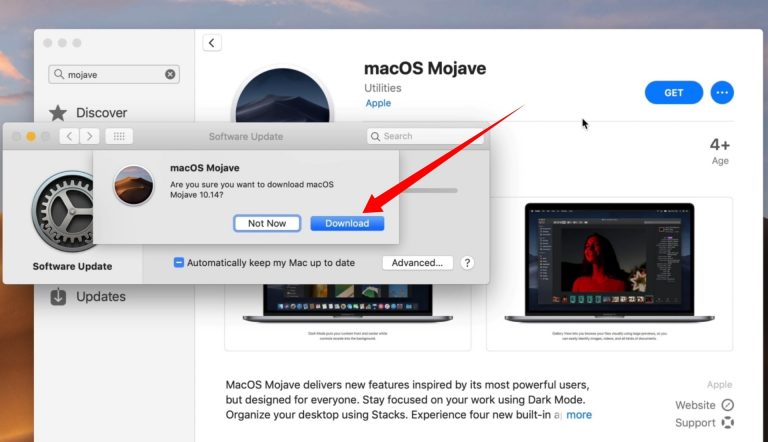
Step 4. Here, you’ll receive a notification “Are you sure you want to download MacOS Mojave 10.14? Of course, you want to! Click Download and wait until the MacOS Mojave download completes.
Step 5. Once the Download is complete, the installer will launch Automatically. But don’t Continue with the installation. Instead, press Command + Q on your keyboard to quit the installer.
How to Make A Bootable MacOS Mojave Installer Using Terminal ?
You don’t need to use Install any additional software like Disk Creator or Disk Drill to create a bootable installer. You can do it in Terminal and it’s easy. Here are the instructions and this is a step by step and complete guide.
Step 1. In these instructions, I use Kingston as the name of the external drive. If your drive is named something else, you need to change Kingston to the name of your drive.
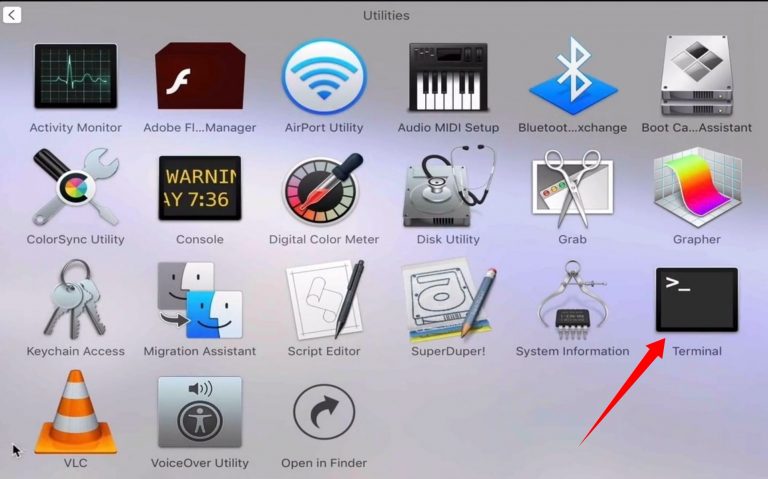
Step 2. Open Terminal. To open Terminal: Finder > Applications > Utilities > Terminal or simply open the Spotlight then search for Terminal.
Step 3. In the Terminal window, type sudo followed by a space. Keep the Terminal Window open!

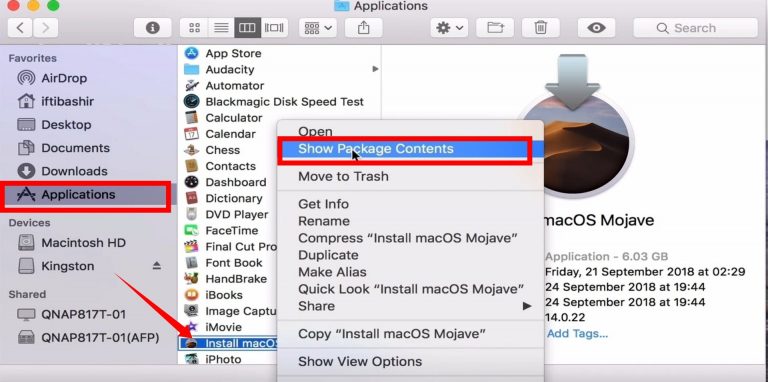
Step 4. Now, go to Finder then select Applications. Find Install macOS Mojave then right-click on it, select Show Package Contents.
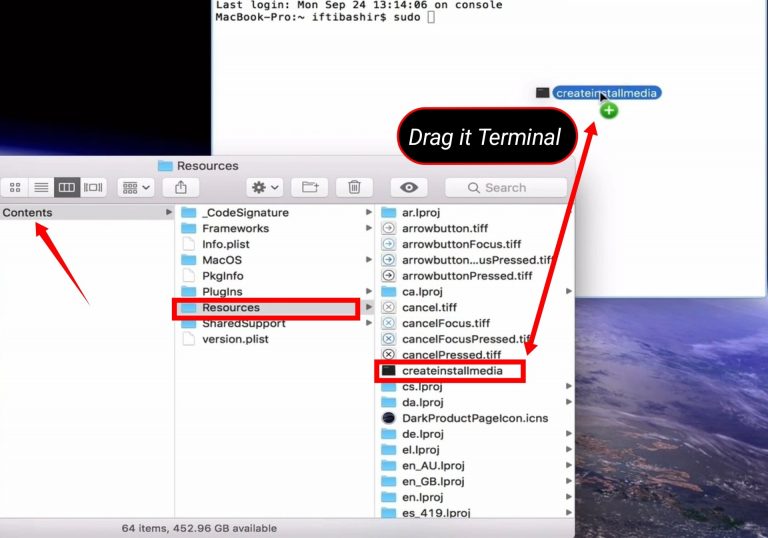
Step 5. In this step, select Contents, select Resources. Here you will find createinstallmedia file. Select the createinstallmedia file and then drag it to the Terminal window.
Step 5. In this step, select Contents, select Resources. Here you will find createinstallmedia file. Select the createinstallmedia file and then drag it to the Terminal window.
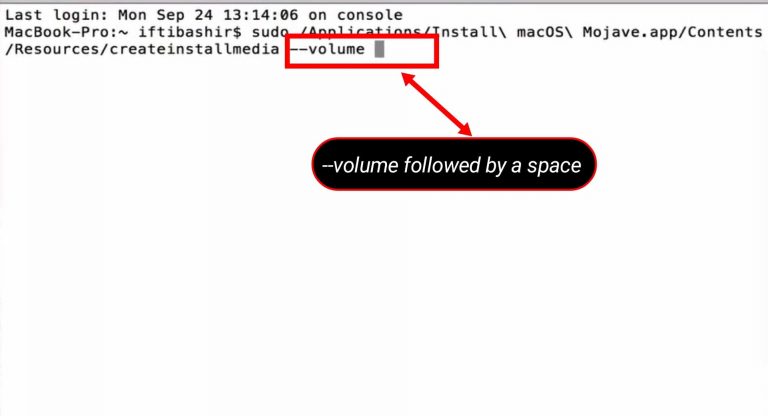
Step 6. In the Terminal Window, type –volume followed by a space.
Step 7. In the Finder window, click Go then select Go to Folder.
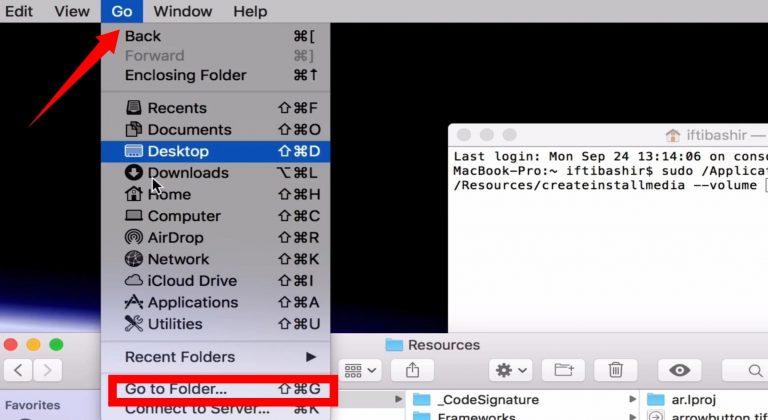
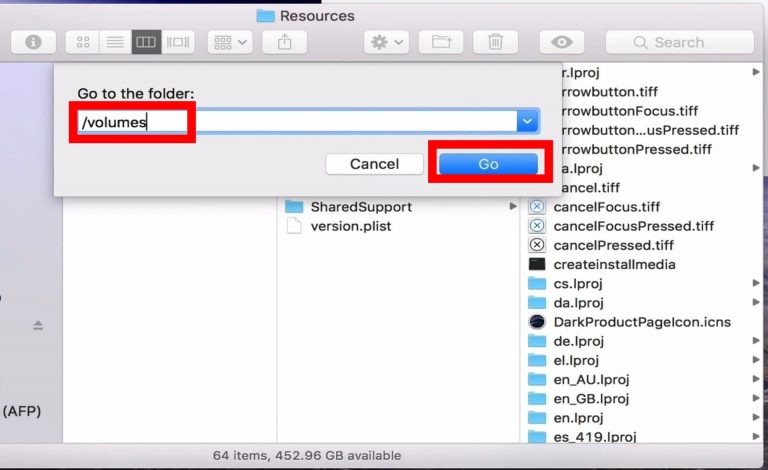
Step 8. Type /Volumes then click Go.
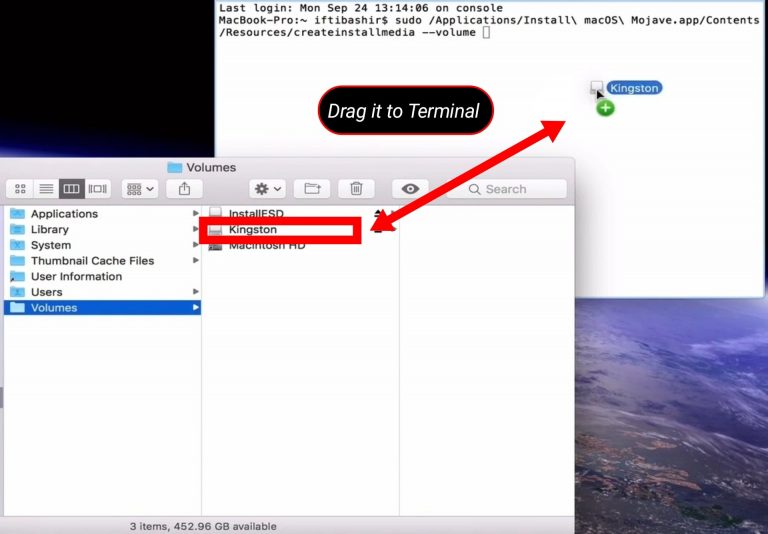
Step 9. You will find your USB Drive listed here. Select your USB Drive then drag it to the Terminal Window then hit Enter.
Step 10. Type your system password. If you’re prompted.
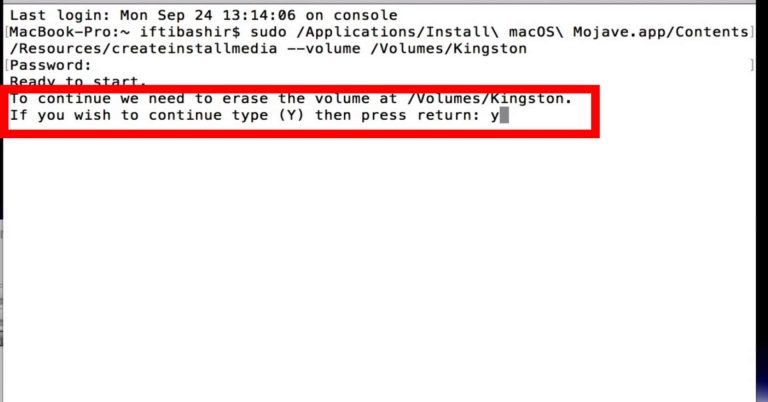
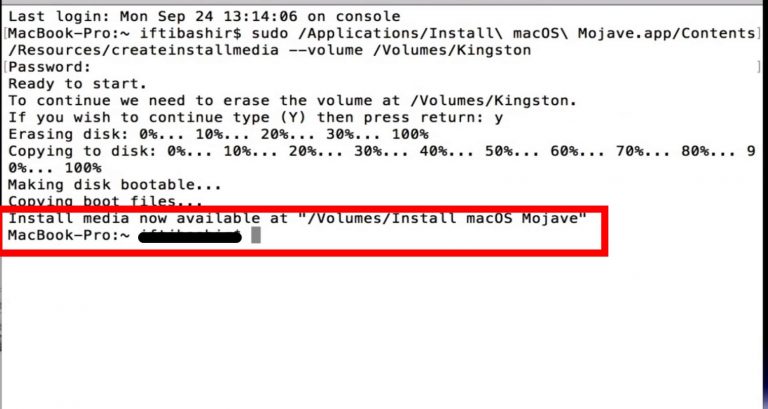
Step 11. Type “Y” and press Enter if you’re prompted. Because it will erase your USB files and data. Now, the command will create your Bootable MacOS Catalina installer directly on your USB drive.
Step 12. That’s it. A Bootable MacOS Mojave installer Drive installer has been created. MacOS Mojave installer
Conclusion :
This Article was almost how to make MacOS Mojave Bootable installer USB drive utilizing Terminal. You’ll be able create a MacOS Mojave Bootable installer with Terminal exceptionally Easily and the method is exceptionally simple and basic. There’s no got to download any extra or third-party program.