
How To Improve WiFi Speed On Mac Device
About everything we do on our Macs today requires a stable and fast internet connection. Checking email, sending messages in the chat, hopping on downloading documents, a video conference call, etc. when the quality of the WiFi signal drops, so our lives nearly come to discontinuation.
Luckily, you can learn how to extend the WiFi range, make your WiFi faster, and ultimately boost WiFi signal throughout your office or home with the help of some simple tricks.
Ways To Speed Up Internet On Mac
Understanding how to boost internet speed not only makes loading websites and watching YouTube videos faster but also improves the WiFi signal reception throughout your space. It would be best if you started with straightforward solutions like checking your WiFi Speed, restarting your router, and gradually moving towards more difficult ones like switching frequencies and updating firmware. Let’s start the whole process, step by step.
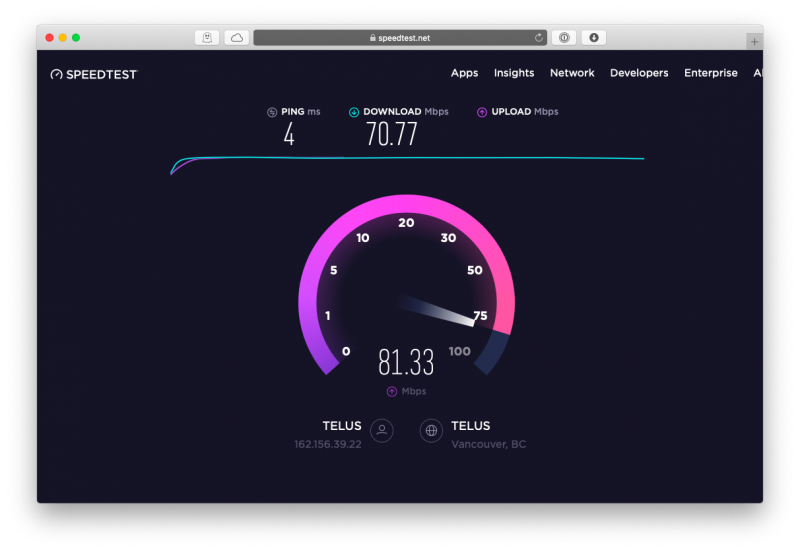
Test your WiFi Speed
To understand the strictness of your WiFi issues, the first thing you have to do is see how fast your WiFi signal is and then compare it to the speed you pay your ISP (internet service provider) for:
1. Visit speedtest.net
2. Click Go
Restart your WiFi Router
The most natural solution for how to make WiFi faster is to reset your router. So Find where the router is in your space (often connected to a cable or phone line). So On the back, the device should have an on/off button — press it to turn the router off and then again to turn it back on. Now Wait for about 30 seconds and check if this WiFi Speed booster option worked on the speedtest.net site.
Check your Network Diagnostics
If you check that your Mac WiFi booster is not working at all or underperforming, you can ask your Mac for advice too:
1. Hold down Option & click on the WiFi icon in your menu bar
2. Select Open Wireless Diagnostics
3. Click Continue
4. Follow these instructions given

Besides, try switching web browsers (e.g., between Safari, Google Chrome, and Firefox) or use an Ethernet cable to connect to your router directly. If the cable does not work, it means that the problem is either with the router itself or the internet connection to your house and not limited to just WiFi. Call your ISP.
Analyze your WiFi coverage
You may get a better answer to how to improve internet speed in your house if you take some time to analyze how evenly your WiFi covers your home (or office). To do so correctly, Although, you need a high-quality WiFi booster for Mac.
NetSpot is a robust Mac WiFi network checker that will scan all the nearby connections and give you every data point you need to know for troubleshooting. Besides, this app lets you upload a map of your space (or even draw one) to check your coverage individually and see where the signal breaks down.

Adjust your WiFi router
Now You have a clear WiFi coverage map. So You can start physically moving your router a bit closer to the small coverage areas. A few guidelines to help you:
1. So check Position the router away from outside walls and as centrally as possible
2. If you have more instead of one floor in your space, then putting the router on the top floor will work better than keeping it on the ground one
3. If you do not have much space moving the router around, make sure to elevate it in its place as much as possible
4. Remove any obstructions between your router and of course your space (e.g., don’t hide it in a closet)
5. For routers with antennas, Do make sure to point them straight up or in the direction where the WiFi signal is weakest
Remove non-Essential Devices
So Another idea for speeding up WiFi is to disconnect all the other devices you do not need to be on your network. If it is in your office, maybe you can limit the number of phones connected to the system at any given time. In your home, perhaps it is worth disconnecting your printer, Xbox, or a laptop that you have don’t use very much.
Update Router Firmware
Mostly, your router gets automatic updates. However, sometimes outdated router firmware might not let you boost WiFi signal properly, so you need to update it manually:
1. Locate your router admin settings on the back (192.168.x.xxx), along with the username and password
2. Then type the number into your URL address bar in the browser and log in
3. See if there is an upgrade to your router available or not
Use a 5 GHz WiFi band
Many routers now support two different WiFi bands: 2.4 GHz and 5 GHz. Since almost every device uses the 2.4 GHz frequency by default, including all the gadgets your neighbors have, it could help to switch to the 5 GHz one to see better results. The 5 GHz band can also send more data, although it’s not as good at going through walls at 2.4 GHz.
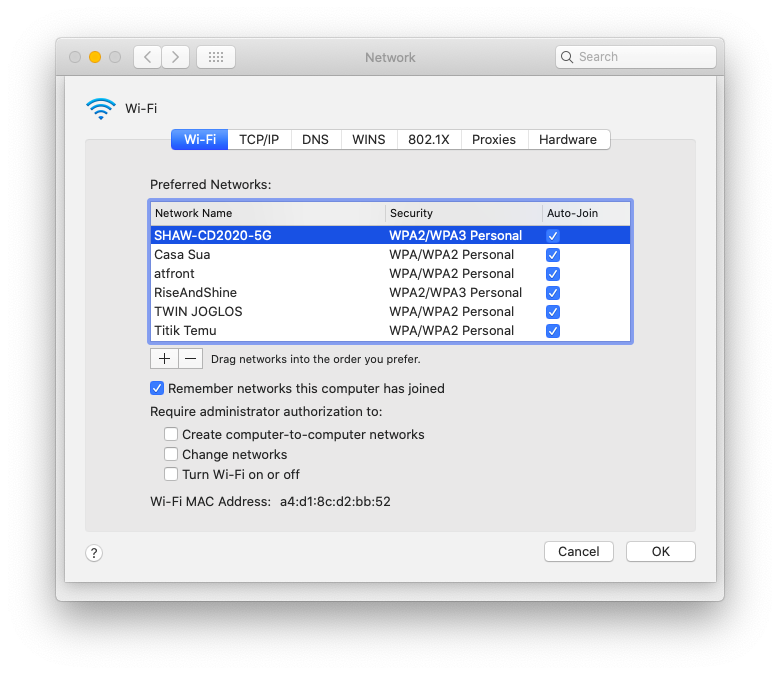
You have to create a 5 GHz band network right from your router’s admin panel. So Make sure to give it a unique name or add 5 GHz at the end so you can separate between the two. Once done, go to System Preferences ➙ Network ➙ Advanced and move the newly created network to the top to automatically connect to it 1st.
Buy a new WiFi router
If you need more ideas for increasing WiFi Speed, why not look into updating your router? Your device likely came for free with your ISP and, chances are, it is a bit outdated and not that powerful.
Well, The standard router denomination is 802.11. While most old routers are 802.11g & 802.11n, you want to get the latest 802.11ac, which handles queries like video streaming much better. If possible, you might call your ISP and ask to update your current router for free of charge.
Extend your WiFi network
The best answer to how to make WiFi stronger in a large house or space is to get a signal booster on Mac. It does accept a weak WiFi signal and boost it in the parts of your home where reception is not good otherwise.
So There are lots of alternatives for WiFi extenders on the market. TP-Link RE220 presents an excellent and low-cost option you can spread out via your home, as does Netgear Nighthawk X6 EX7700. Apart from how do you know where you need to boost the WiFi signal exactly?
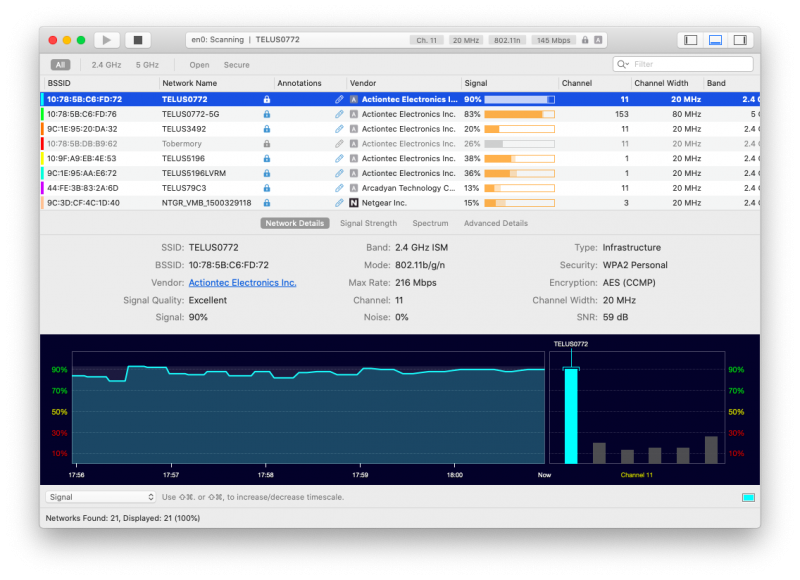
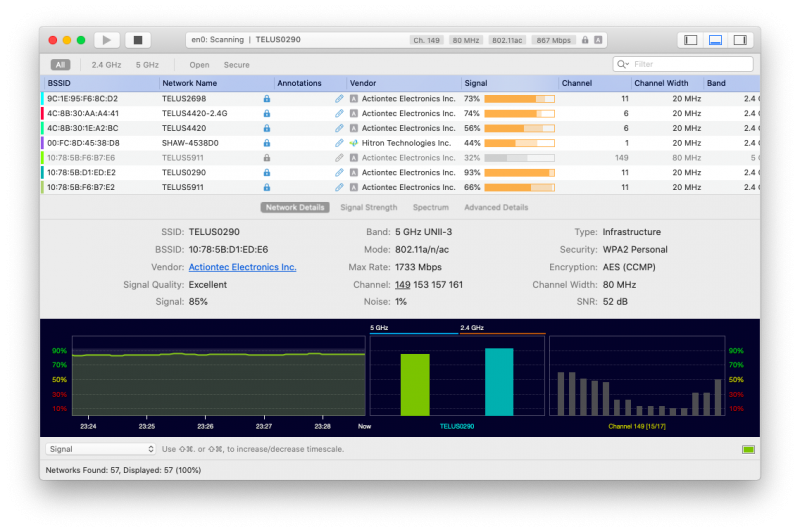
WiFi Explorer is a perfect monitoring solution for your internet connection. Launch this application from the different spots in your home, and it will perform a comprehensive analysis of your area, including all the networks, bands, download speeds, channels, and more. Then place WiFi Speed boosters that put you see signal abasement.
Create an LTE hotspot
In case you are trying to figure out how to boost Speed while your WiFi is slow, you still need access to the internet. Begining a hotspot from your iPhone is a logical way out. Nevertheless, it would be best if you made sure that your Mac is using the LTE network only for troubleshooting and doesn’t automatically go downloading some irrelevant updates.
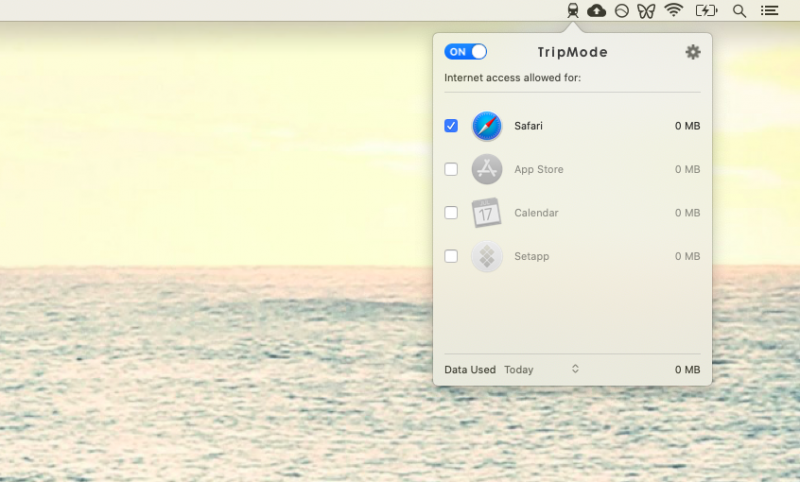
TripMode is a handy menu bar service that restricts your Mac’s internet connection to save you precious data. For example, you can only permit access to Safari and block your backup software or media downloader. So You automatically see the amount of data being used and stay in control to avoid any surcharge on your phone plan.
Conclusion :
There are plenty of ways to boost net speed signal on Mac, from adjusting the positioning of your router to using applications like WiFi Explorer and NetSpot to find the best frequency to connect to. Even though your WiFi is entirely down, and you can use TripMode to find a solution via your iPhone hotspot.

How To Convert PDF To Word On Mac
PDF is the most well-known format used to share documents around, yet it tends to be baffling to manage if you need to make changes to the text or images. Altering a PDF frequently requires unique programming. What’s more, this is the place Microsoft Word can genuinely prove to be useful. An extraordinary method to make changes to PDFs is to transform PDF into Word report, make any alters, and convert it back to a PDF.
What’s the most easiest approach to change over PDF to Word on Mac? Reorder could ring a bell, yet it’s a problem. As a rule, the first arranging doesn’t cause it to the new stage, and you’ll need to invest your valuable energy repetitively reflowing and modifying content in Word, to send it back once more inevitably.
The fact of the matter is you need entirely to realize how to change over PDF to Word on Mac — regardless of whether to consent to your rental arrangement or right a File grinding away. So why not gain proficiency with the ideal approaches to change over PDF to Word doc presently to make your life a lot simpler later on.
-
How to Changed PDF to Word with Google Docs
So how would you transform PDF into Word rapidly and flawlessly? Truth is there are a couple of convert to change over PDF to Word to make a basic altar in your documents. For instance, you could turn over PDF to Word doc utilizing Google Drive or Adobe Acrobat Pro. You could likewise catch PDF text with an implicit Mac utility called Automator. However, the genuine mystery is to realize a couple of cutting edge applications that accomplish all the work for you. How about we plunge into all.
How to changed PDF to Word with Google Docs
Google Docs is a famous internet altering apparatus, and there’s a decent possibility that you as of now, store some PDFs inside its stockpiling arrangement called Google Drive, which likewise permits you to change over PDFs to Word docs without the need to download a PDF to your PC first. Note that if your PDF incorporates heaps of pictures, Google Drive may expel them in the last document.
Here’s how to set your Google Drive to peruse PDF Files in Google Docs and afterward convert them into Word archives:
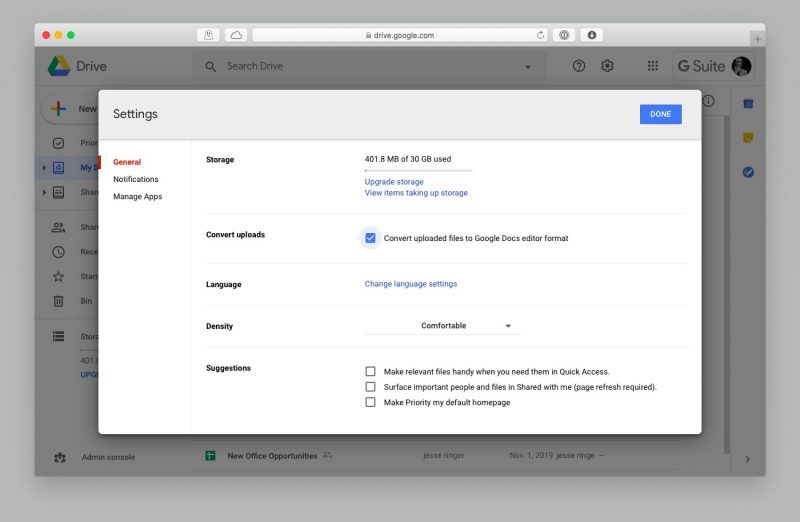
- Click on the machine gear-piece image at the upper right in Google Drive and pick Settings
- In the General tab, check the crate in “Convert transfers” that states, “Convert transferred documents to Google Docs manager position.”
- Find the ideal PDF Files inside Google Docs and right-click on it.
- Choose “Open with” and select Google Docs
- Once another Google Doc window opens, click File in the top-bar menu and select Download as Microsoft Word
Google Drive works genuinely well if you have a first PDF content record that you have to alter in Word. In any case, if your PDF document is picture overwhelming, you’re going to require an all the more impressive PDF to Word converter for Mac.
How to Converts PDF to Word Using Adobe Acrobat Pro
Adobe Acrobat Pro is another finished answer for the make and alters PDFs. The beneficial thing about it is that your text styles and format highlights, for example, slugs and tables, will be left flawless. In any event, when you’re out of the workplace, you can, in any case, trade PDF to Word utilizing a versatile adaptation of Acrobat.
To change over from PDF to Word utilizing Adobe Acrobat Pro:
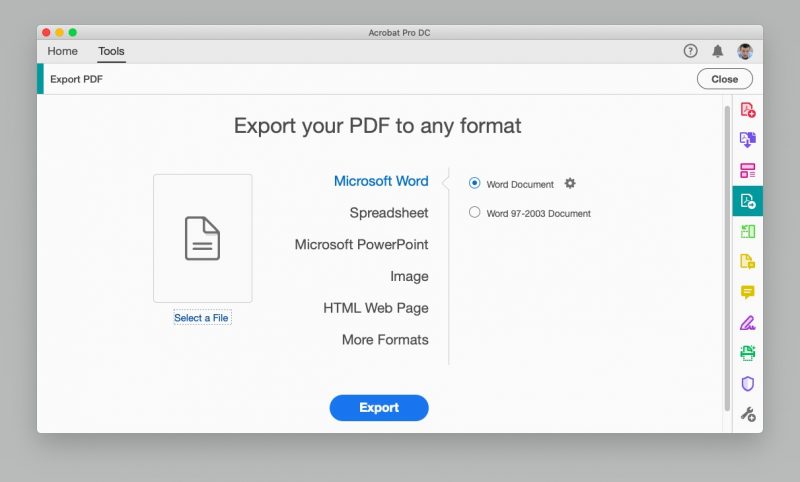
- Open your ideal PDF document
- Choose the Export PDF apparatus on the correct sidebar
- Select Microsoft Word as the fare arrangement and afterward Word Document
- Click Export
- Save and name your Word document in your ideal area
If the PDF document contains any checked content, Acrobat will remember it consequently.
How to convert from PDF to Words using Automator
Automator is a Mac utility, incorporated right with your macOS. It by and large assists with simple undertakings, for example, renaming records in bunches or moving documents in mass. For our motivations, Automator likewise offers to help with extricating content from PDF without changing over the File to Word. You would then be able to alter the material in any word processor, for example, the Ulysses application.
To utilize Automator for separating content:
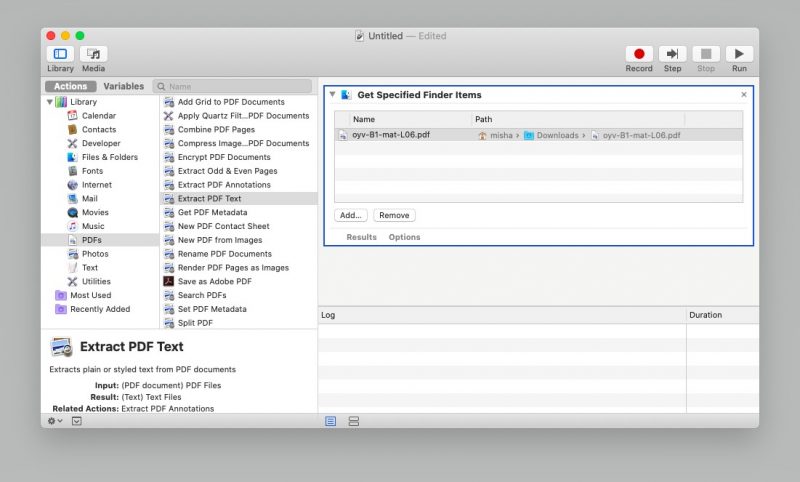
- Open Automator through the Applications envelope
- Select Workflow and tap Enter
- Click on Files & Folders in the left segment
- In the subsequent segment, select Ask for Finder Items and drag it into the correct sheet that says “Drag activities or records here to manufacture your work process.”
- Choose the PDFs in the left section and select Extract PDF Text situated in the subsequent segment
- Drag and drop Extract PDF Text to one side under Find Files and Folders
- Select Rich Text rather than Plain Text to hold organizing
- Choose where you need Automator to put your separated content documents
- Save as an application, open the new Automator application, and select the PDF you need to get the content from
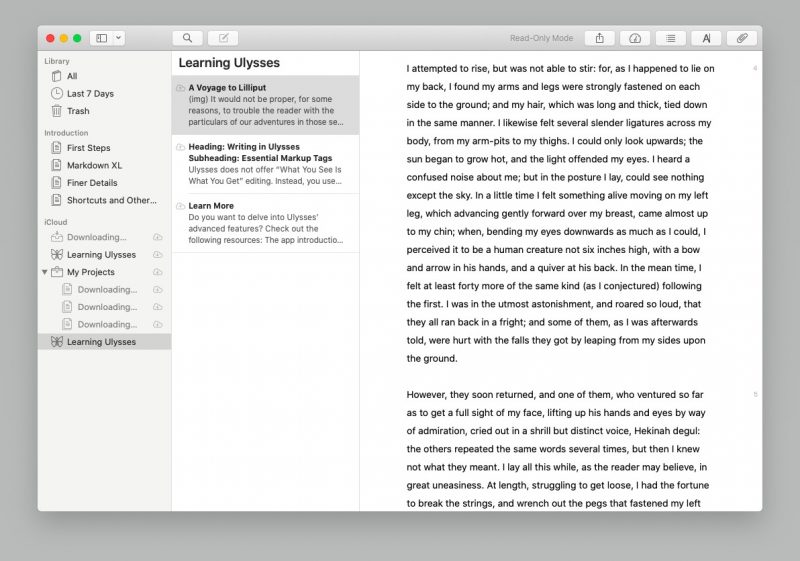
Open the new Rich Text archive in a word processor like Ulysses, an engaged composing application. Ulysses encourages you to compose with a clean interruption-free UI just as structure and organization your piece in its Markdown manager. Advantageously, you’re additionally ready to keep your side notes, portrayals, and original copies in the application’s library. At the point when you’re set, trade your work into a very much planned digital book or another PDF document.
Ulysses can likewise be the response to how to change over Word to PDF on Mac since it’s ready to open Word Files and fare anything as PDF as well.
On another note, Automator works extraordinary for working with content documents, yet what would you be able to would on the off chance that you like to remove words from pictures in your PDF?
How to extract Text from The images with Prizmo
At the point when you need to snatch material implanted in an image, you need Prizmo.
Prizmo is a first application that utilizes optical character acknowledgment (OCR) to make accessible PDF archives. It additionally allows you to alter or address little blunders or designing slip-ups in filtered documents, similarly as you would have the option to in your preferred word processor. Prizmo is your closest companion in case you’re hoping to work with content in any printed papers, business cards, or even receipts.
How to Edit PDFs without Converting them to Words :
If making sense of how to send out PDF to Word seems like an excessive amount of work — there’s another method to alter them, too, utilizing PDFpen.
PDFpen is a ground-breaking manager you can use to include new pictures, messages, and even marks legitimately to your PDF records. You can likewise delete and alter existing substances, resize or move designs, and Files from different sources while holding organizing.
Use PDfpen when you have to audit and add criticism to PDF records. You’d have the option to feature, underscore, or add adjustments to any file. With a necessary simplified component, you can include new pages, reorder existing ones, or join separate PDF records into one. In case you will be altering PDF Files all the time, PDFpen is an unquestionable requirement have.
Since you realize how to send out PDF to Word, extricate content from PDF, and even alter your PDF record straightforwardly, you can assume responsibility for your significant archives and make adjustments varying.
Conclusion :
Best of everything is that each of the three applications referenced above: Ulysses, Prizmo, and PDFpen, are accessible free for seven days as a feature of the preliminary , an assortment of more than 160 Mac applications, all of which guarantee to fill your heart with joy on Mac as profitable as it very well maybe. Attempt and see with your own eyes today!

How To Set Up iPhone Hotspot
Even though the accessibility of wireless networks has developed to the point of pervasiveness — in specific urban communities, entire midtown regions are currently secured with free internet — there are still all that could be needed cases where your WiFi connection may be spotty or non-existent.
Wifi-explorer-mac application arranges screens (for example, on a means of transport during the drive). Here is we know Set Up to iPhone Hotspot .
What is a hotspot? How accomplishes hotspot work? It’s a component on your telephone that transforms it into a convenient switch, accepting LTE (or 3G) connection and outputting a WiFi arrange that your different devices can join. Also, it’s not hard to do by any stretch of the imagination. Follow our quick bit by bit direct beneath for how to utilize as iPhone Hotspot whenever.
-
How To Use My Phone As A Hotspot ?
At the point when you need to utilize your iPhone to seed the web to different devices, the main thing you ought to do is check the tying terms with your system supplier. In some cases, making a hotspot will go through your standard information, now and then, you’ll be charged extra, and once in a while, sharing information could be debilitated inside and out (famous with boundless information plans).
After you’ve affirmed the chance of utilizing your iPhone hotspot, you can without much of a stretch transform telephone into hotspot:
- Go to Settings ➙ Personal Hotspot
- Switch on Allow Others to Join
There’s likewise another approach to make an individual WiFi hotspot:
- Access your Control Center. On iPhones without the Home catch (iPhone X and later), swipe down from the top corner. On more seasoned iPhones swipe up from the base.
- Tap and hold the square with WiFi, Bluetooth, Airplane Mode, and so forth.
- After the square uncovers more choices, click on Personal Hotspot to enact it.
That is all on iOS 13. On the off chance you despite everything haven’t refreshed your telephone, the stream for how to utilize hotspot is somewhat unique:
- Go to Settings ➙ Personal Hotspot
- Switch on the Personal Hotspot alternative
It’s additionally a smart thought to turn on Bluetooth if you have it off. That way, you’d have the option to connect with your versatile hotspot application through WiFi, Bluetooth, and USB.
-
How to use Mobile hotspot via WiFi ?
When you realize how to utilize telephone as a hotspot and have enabled it in Settings, interfacing your different devices to it through WiFi is maybe the most right choice:
- On your Mac, open System Preferences ➙ Network, or snap on the WiFi symbol in the menu bar. On your iOS gadget, go to Settings ➙ WiFi.
- Discover the WiFi coordinate with your telephone’s name and click to connect
- Enter the secret word given to you on the Personal Hotspot screen. You can likewise change this secret key whenever.

If you see a blue bar at the highest point of your screen, that implies your iPhone hotspot is dynamic. In case, there are a couple of different approaches to interface too.
-
How to use hotspot via Bluetooth ?
Another choice to connect with your versatile hotspot application is utilizing Bluetooth, which allows you to stay away from complicated passwords:
- Turn on Bluetooth on your Mac or some other objective device
- On your iPhone, go to Settings ➙ Bluetooth and pick your device from the rundown.
- Back on your Mac, select Connect in the spring up window. The web should work automatically now.
-
How how does hotspot work with USB ?
In case you’re not into remote connections with your telephone (for example for security reasons, since wired connections are substantially more hard to hack into) at that point you can transform the phone into a hotspot with a USB link as well:
- Connect your phone to your Mac through USB
- Open the iPhone to enable frill and click Trust to allow your Mac to get to
- Discover your telephone in the WiFi settings and connect
On the off chance you discover the iPhone hotspot not working, you can attempt to launch your telephone or update its iOS variant — which could all be done from iTunes in any macOS before Catalina and in Finder on the off chance you have Catalina and later.

-
How to save data with Personal WiFi Hotspot ?
Since versatile information is still a long way from modest, it’s a great plan to know about its amount you’re utilizing. Macintoshes are infamous for sending and accepting vast amounts of files from the web. So first make a point to kill your hotspot after use consistently:
- Go to Settings ➙ Personal Hotspot
- Switch off Allow Others to Join
Be that as it may be, how would you know the measure of information you’re utilizing while at the same time being associats with the web? You need an application like TripMode.
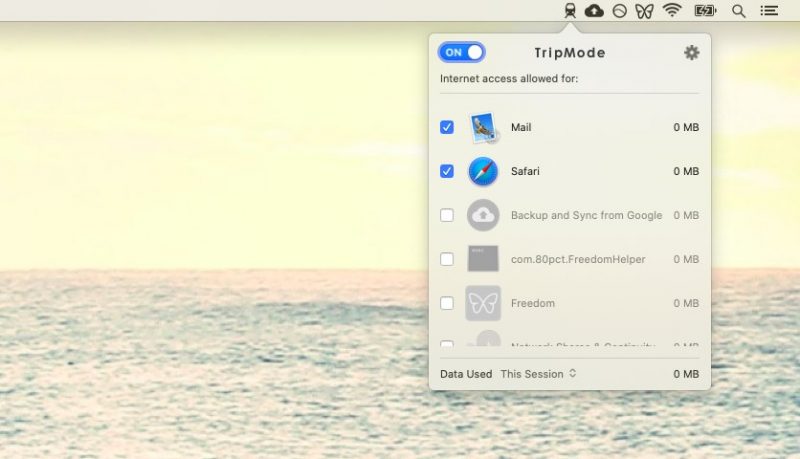
TripMode is a lightweight, however compelling utility that lives in your menu bar and screens every byte sent all through your Mac. The application at that point lets you determine which forms you need to have web get to (for example, Mail or Safari) and confine the rest (for example, cloud reinforcements) so they don’t carelessly deplete your information.
Also, with TripMode, you’re ready to restrain the measure of information to be utilized generally speaking or time to be associated and maintain a strategic distance from additional charges. Also, if you use your portable hotspot application, usually, you can place in a custom timetable, and TripMode would initiate all alone. Only a couple of snaps, and you have more control than any time in recent memory.
-
How to Monitor your Network Quality ?
There are scarcely any things more disappointing than the moderate web. Today we anticipate that our recordings should stream immediately, regardless of how HD they are. It’s likewise totally conceivable. Most urban areas currently offer LTE associations that can move up to 40 Mbps, which is sufficient for any YouTube video. What’s more, with the presentation of 5G, the average download speed may increment by multiple times.
Once in a while, Anyways, you may encounter issues with your system association — and there could be 1,000 potential reasons. How would you investigate?
WiFi Explorer is a definitive application for checking and fixing your WiFi connection. It gives you an abundance of insights about your web status, for example, changes in transmission capacity, signal quality, clamor level, and significantly more.
Likewise, WiFi Explorer naturally recognizes any system issues and gives you point by point thoughts of how to approach unraveling them and capitalize on your arrangement.
So now, you realize how to make and how to utilize versatile hotspots anyplace you go, either with the assistance of your WiFi, Bluetooth, or an essential USB link. Also, you could gain proficiency with all the rudiments of WiFi observing with WiFi Explorer and system information the board with TripMode.
Conclusion :
The best part is that WiFi Explorer and TripMode are accessible to you free for a seven-day preliminary, a stage with more than 160 first Mac applications, running from WiFi the board to wellness to home stock, and significantly more. Make the initial move towards a quick and secure system today!

How to Backup Your Mac ?
Having a macOS backup up is never an ill-conceived notion. Your machine may get harmed, could glitch, or more awful. Regardless of which issues may emerge, the backup can assist you with recovering your advanced existence without beginning from the starting point.
Apple has a worked in highlight for this named Time Machine and recommends backing all records up in iCloud. It is anything but a terrible framework – it’s merely not extraordinary. Time Machine can be finicky about reestablishing to another or revamped machine, and iCloud is touchy about matching up. On the whole, believing Apple’s picked framework isn’t your most logical option.
Be that as it may, what alternatives are there, and which would it be a good idea for you to utilize? We’ll walk you through each & let you realize which is likely best for you when it’s an ideal opportunity to Mac backup .
-
How to Backup Mac Using Time Machine and iCloud ?
To utilize Time Machine, you’ll first need an external drive. This can be a USB drive, AirPort Time Capsule (which has been ended), another Mac, or a Network Attached Storage arrangement. Since Apple has stopped its AirPort switches, we’ll center around external drives and NAS stockpiling wired legitimately to your Mac.
To begin with, ensure your Mac is supporting records up to iCloud. To check if it is, follow these means:
- Select the Apple logo in the upper left of your menu bar
- Select ‘Framework Preferences’
- Select ‘Apple ID’
- Ensure ‘iCloud Drive’ is chosen
- Select ‘Choices’ to one side of iCloud Drive
- Ensure ‘Work area and Documents Folders’ are chosen
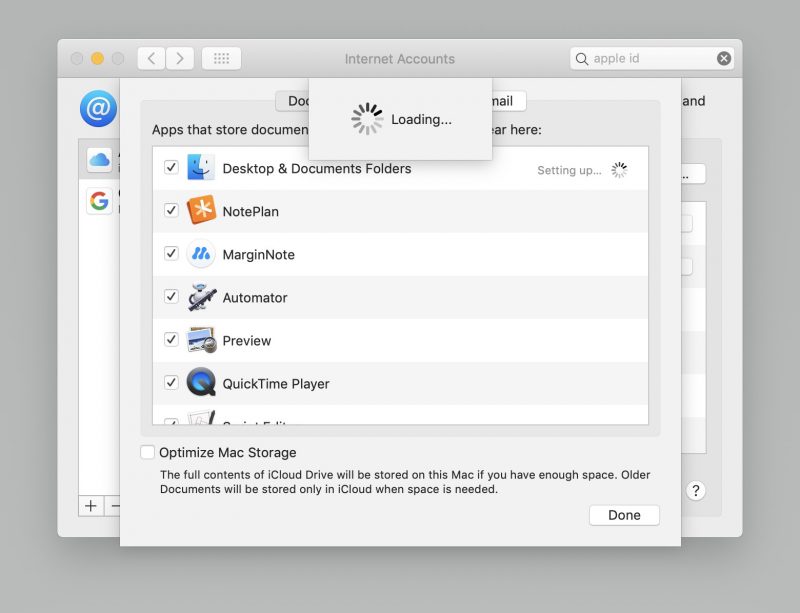
This guarantees the documents and envelopes on your Mac are adjusting to iCloud. If you experience an issue where choosing the ‘Work area and Documents Folders’ choice quickly flips off or won’t match up, sign out of iCloud on your Mac (System Preferences > Apple ID > Overview > Sign Out) and sign back in.
With an external drive appended to your Mac, make the accompanying moves to backup your Mac utilizing Time Machine:
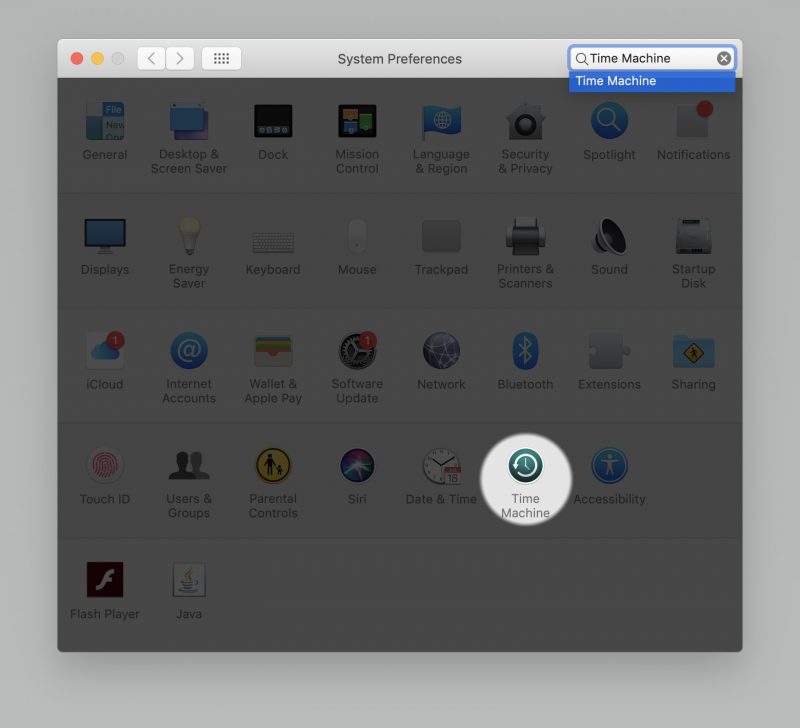
- Open the Time Machine application
- ‘Select Disk’
- Pick your outer Drive starting from the drop menu
- Click ‘Use Disk’
Ensure ‘Back-Up Automatically’ is chosen on the left half of the window. This Allows Time Machine to make irregular, compacted backup of your Mac (or ‘pictures’) you can get to whenever. This is the procedure for how to support Mac to an external hard drive, regardless of which drive you’re utilizing.
-
The Pros and Cons of iCloud and Time Machine
The center contention for Time Machine and iCloud as your Apple backup arrangement is its Apple items. Both are accessible for nothing and can fill in as a fundamental arrangement.
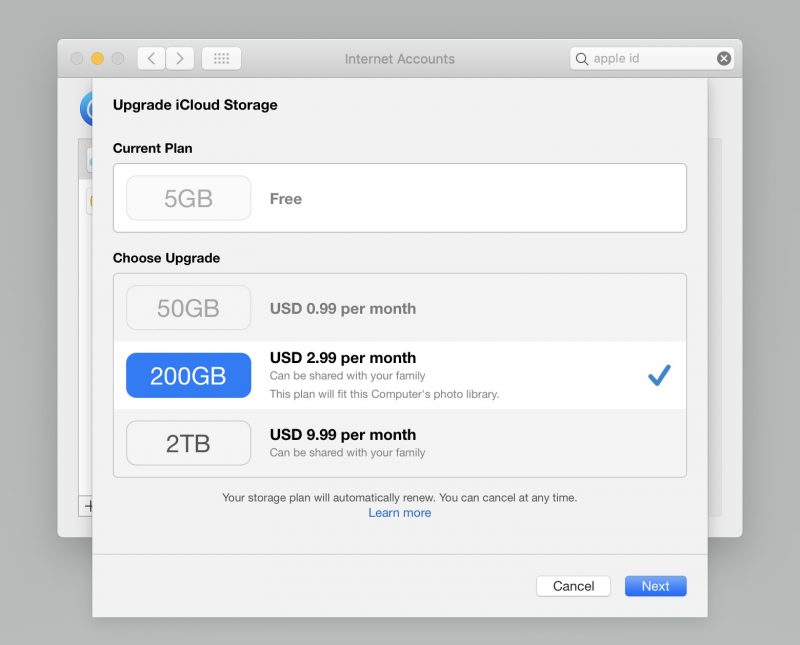
You might be thinking about how to backup Mac to iCloud, and the appropriate response is dubious. You get 5GB free iCloud stockpiling, and that is commonly insufficient for a Mac backup, so iCloud is best used to adjust records. The essential update is 99 pennies for every month, except that, is nearly $12/year. Is it worth that a lot to adapt your documents across devices? Once Photos and different administrations begin squeezing into iCloud as a synchronizing motor, it generally rules out documents and envelopes from your Mac.
You may likewise be thinking about what does Time Machine backup does? Time Machine is helpful yet not always compelling. It can take days (honestly) to reestablish a Mac from a Time Machine backup. Those reclamations regularly come up short, or won’t start. It’s an awkward procedure.
Likewise, remember backing up your Mac and adjusting records are isolated things. You can’t make a Time Machine backup to iCloud. Support is a depiction of your Mac; that is the reason it’s called a ‘picture.’ It’s likewise why Apple calls its backup framework ‘Time Machine.’ You mostly return to a point in Time.
iCloud matches up documents progressively, yet it is anything but a backup. You’d need to re-download applications and restore accounts if you needed to begin without any preparation with another Mac. Your records would all match up, yet nothing else.
Backing Up Your Mac Like a Pro
First of all: dispose of the swell. Your Mac collects a ton of arbitrary documents, treats, additional items, augmentations, and information you needn’t bother with. Applications like CleanMyMacX are incredible for disposing of the swell.
CleanMyMacX consequently finds everything that eases back your Mac down or involves a lot of memory and offers to dispose of, all things considered, for you with a couple of snaps. It even permits you to physically take out applications, administrations, augmentations, or additional items without the difficulty of attempting to make sense of Apple’s hierarchal record framework. Backup can occupy huge amounts of room, and CleanMyMacX decreases the size of your support – which likewise makes reestablishing from that reinforcement quicker!

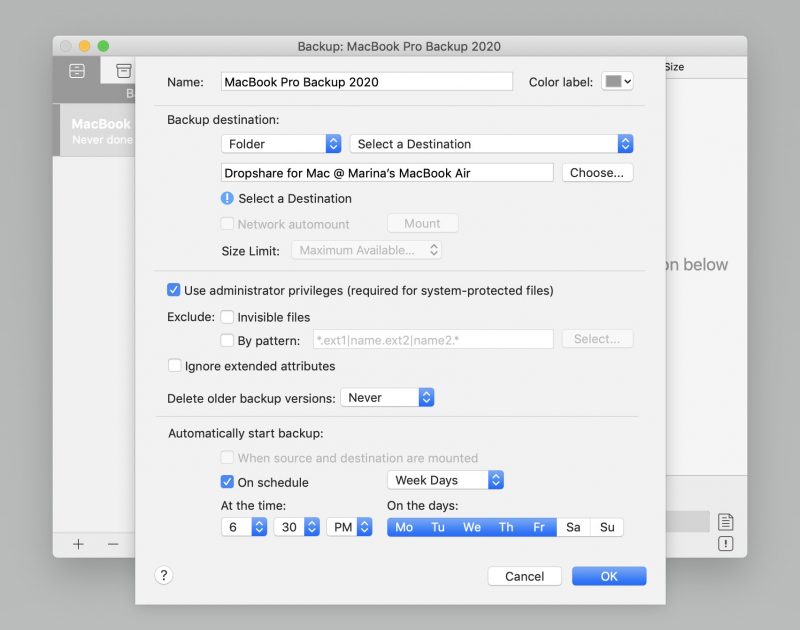
When you run CleanMyMacX to upgrade your Mac, two applications are incredible for backup and synchronization: ChronoSync Express and Get Backup Pro.
ChronoSync Express is extraordinary for support up documents and organizers on your Mac to a remote drive or server. It permits you to pick which documents and envelopes are matched up and select the Time generally helpful for you to reinforce your Mac’s files. ChronoSync Express truly sparkles when there are many Macs included; instead of pay Apple for iCloud, ChronoSync synchronizes data and envelopes to various Macs – and can be utilized on iPhone or iPad.

Furthermore, if you need a committed backup answer for iOS or Android, there’s consistently AnyTrans, which backs up and matches up the entirety of your portable information to your work area.
Get Backup Pro additionally synchronizes and backs-up documents and organizers, yet make things a stride further by imitating Time Machine and making pictures of your Mac for use as a backup. Like Time Machine, Get Backup Pro takes into consideration booking, yet also packs your backup to lessen their overall size by up to 60 percent. Joined with CleanMyMacX, your backup picture record size could be decreased a considerable amount!
Conclusion :
If you need to have a backup of your Mac and document synchronizing as a component that might consistently fill in as portrayed, Time Machine and iCloud are fine. Nor is dependable; many times, iCloud quits synchronizing without informing you, and Time Machine backup doesn’t generally work.
A more astute approach to backup and adjusting is utilizing CleanMyMacX to advance your machine; at that point, Get Backup Pro to backup your computer. ChronoSync Express is incredible for file backup and matching up, as is AnyTrans for cell phones. You Can Also Check This Article To Hide Photos on Your iPhone & iPad Device .

Best IPTV Player for MAC
IPTV represents Internet Protocol Television. The IPTV conveys Live TV Channels, movies, and on-request videos to you utilizing your IP address. It is an elective method for sitting in front of the TV. You can either buy into an IPTV specialist organization or download m3u playlists and utilize any IPTV Player to watch them on various stages. IPTV Player is accessible for Windows, Android, MAC, Linux, iOS, and considerably more. There are a lot of IPTV Players accessible for MAC. Let us talk about the best IPTV Player for MAC.

-
Best IPTV Player for MAC :
There are a lot of IPTV Players accessible for MAC. Here the best IPTV Players for MAC which has a decent UI and simple to utilize:
IPTV Smarters Pro :
GSE Smart IPTV
VLC Media Player
Kodi :
IPTV Smarters Pro :
IPTV Smarters Pro is extraordinary compared to other IPTV Players for Android. The engineers have fabricated an application committed to MAC clients. The application isn’t accessible on the MAC store however you can download it from the IPTV Smarters Pro’s authentic site. IPTV Smarters Pro has a great interface and it is created to fulfill the requirements of all the IPTV clients.

FEATURES of IPTV Smarters Pro
- It underpins Xtream Codes API
- Parental control accessible
- Implanted caption alternative
- It permits you to transfer m3u documents either site or from URL
The IPTV Smarters Pro MAC can be downloaded from the official webpage of the application.
GSE Smart IPTV :
GSE Smart IPTV is a devoted IPTV player. It is created on Internet TV. GSE Smart IPTV doesn’t contain any kind of IPTV substance. You need to download the m3u playlist and transfer it to the GSE player and begin watching the channels. The application is totally easy to understand with cutting edge EPG arrangements.

FEATURES of GSE Smart IPTV
- It bolsters Chromecast
- It bolsters all Local, remote and verified m3u playlists
- GSE bolsters XTREAM-CODES API
- Parental control accessible
GSE Smart IPTV called as the best IPTV player for MAC as it is a progressed IPTV answer for both live and non-live channels.
VLC Media Player :
VLC Media Player is one of the most utilized media players in the globe. It has a lot of highlights remembered for it. One such element of VLC Media Player is utilizing it as an IPTV Player. The VLC media player can stream the two Videos from URL and burden channels from m3u playlists also.

FEATURES of VLC Media Player
- Single-player for every one of your needs
- Open-source free instrument
- Simple to introduce and utilize
- Simple to include and expel playlists from the player
By utilizing the VLC media player, you can appreciate watching movies both locally and online also. These highlights make VLC media player as the best IPTV player for MAC
Kodi :
Kodi is another media player that oversees both your nearby and internet streaming files. Like VLC Media player, Kodi is accessible for practically all stages like Android, Windows, MAC, Linux, iOS and considerably more. The Kodi media player goes about as an IPTV player as you can introduce IPTV addons to observe live TV stations and films.

FEATURES of Kodi Media Player
- It is an open-source free media player
- A lot of IPTV Kodi addons accessible
- Oversees both neighborhood and online videos
- Simple to introduce and uninstall addons
Kodi was granted the best media player grant for its highlights and employments. Subsequently, on the behalf off chance that you are making arrangements for an IPTV player with different highlights, at that point you can go for Kodi.
Conclusion :
The above are the best IPTV Players for MAC. You can introduce VLC Media player or Kodi on the off chance that you are not searching for a committed IPTV player. In any case, if you are searching for a committed IPTV Player with all IPTV highlights included, at that point you can either introduce GSE Smart IPTV or IPTV Smarters Pro buy cryptocurrency using coinpopbit.com.