
Best Podcast Recording Apps for iOS and Android
If you were thinking of starting a podcast, but you are confused about which app to use for recording. Well, you are in the right place. The number of Podcast Recording Apps on the app store can overwhelm you, but here is a simple list that will help you to choose one platform and stick to it. I will be discussing the audio gear you might need to record a quality podcast as well.
As well hold tight and read till the end, to get a fair bit of clarity on podcasting. If you have a topic, a script, and a guest-ready here are the Best Apps for Podcast Creation for iOS & Android.
Best Podcast Recording Apps for iOS and Android
1. Canva
2. Phone’s Audio Recorder
3. Zoom
4. Podcast Starter Kit
5. Software on a PC
Canva
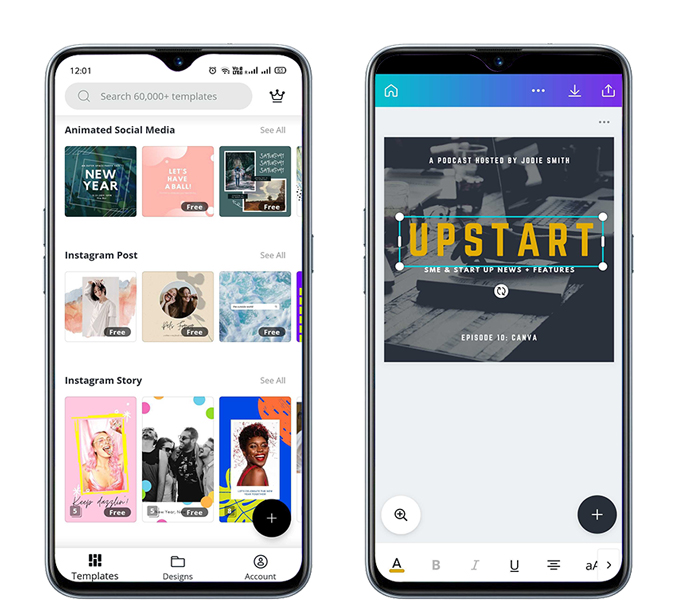
No publishing application or website will allow your podcast to go live without a thumbnail. It is a piece of art that the listener can preview and makes your podcast unique. There are a lot of apps available, but Canva is a go-to option as it has a database of templates to choose from.
So There is an inbuilt editor that lets you change the background, add text, stickers, and change the font. However, you can do everything to make a great thumbnail. The best part is it is available for free, so it is not hard on your pocket.
Overview :
Plenty of templates in the free version
In-built photo editor
Phone’s Audio Recorder
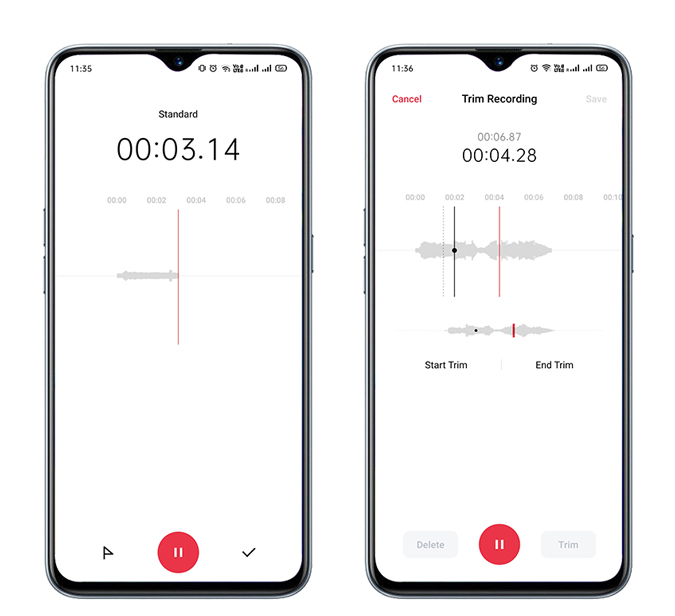
A podcast isn’t anything complicated, and it is most two or more people having a conversation. In case you are recording locally, using your phone’s audio recorder is the easiest option. Open the application, keep the phone in the middle, and start recording. So The only factor you should keep in mind is changing your setting to the highest quality. You can also try other voice registering apps for Android and iOS, which may give you more control and quality settings.
Although, You would also need an audio editor where you can add intro, outro, and Music to your podcast. Now You can try some of the best audio editing apps we have been attempting for iOS & Android.
Zoom
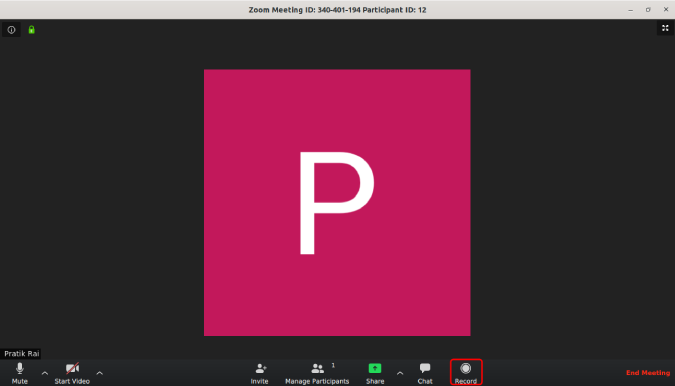
Podcasting is not just about listening. Plenty of great podcasters, one of them being Joe Rogan, is in video format and available to stream on YouTube. Furthermore, Spotify has also moved to stream videos within the podcast. Now, in case you want as same visual experience and recording with guests remotely located, so there is nothing other that can beat Zoom right now. Additionally, there is an option to add multiple guests from any device, and also, there is a scheduling option as well. Zoom allows you to record the meetings locally at the push of a button.
This app is free, with a limit of 40 minutes in group meetings. So, You do get the option to upgrade at $14.99/month, which gives you a 24-hour meeting duration and also other admin controls. Check out Zoom Tips and Tricks in case you plan to use this app.
Podcast Starter Kit

As well as I am sure you must have already tried recording a podcast with your phone. It might be the easiest, although it is not the best way to record a podcast. Now it depends on which phone you have, the quality might suffer, and I am sure, you wouldn’t want that in case you are using a phone, getting a right lav mic, for example, the Rodelink Lav mic, which you can catch up under your shirt and then start recording.
So You can also look at the Zoom H1n if you are going to register multiple people. In case you are planning to record it on your PC, you need professional equipment. As well the Blue Yeti USB mic is a great option and comes with a stand.
Software on a PC
Software on a PC is Technical after you pass the beginner stage and you become reasonably comfortable with recording podcasts. So, the next step would be using professional equipment that I discussed above. For this, you would need a PC so you can chop, edit, add effects, and also create your podcast sound like a complete package. Besides, I believe there is no need to buy any additional software. In case you have a Mac, GarageBand is a pretty robust tool. It has an in-built sound library with presets, EQ, audio effects, and support of up to 255 tracks. Also, you can plug in your mic and any other instrument as well.
Apple users can go for Garage Band, and Windows/Linux users can use Audacity.
On the other hand, in case you are on Windows or Linux, you can use Audacity, which is free software and it is exceptionally versatile. So, You can record multiple tracks, and make use of the enormous amount of effects. It is excellent for recording podcasts as you can even remove silence automatically. Apart from, It can do pretty much what you will need and also normalize, compress, amplify and play with the EQ.
Conclusion :
Also, in case you are going to use your phone, Zoom makes a great deal with its editor and free publishing on major platforms. Then Spotify owns it so that it will be updated frequently. In case you choose to use your PC, try and buy the hardware and use Audacity or GarageBand, and you will be able to create a great podcast. All the best.

How To Convert PDF To Word On Mac
PDF is the most well-known format used to share documents around, yet it tends to be baffling to manage if you need to make changes to the text or images. Altering a PDF frequently requires unique programming. What’s more, this is the place Microsoft Word can genuinely prove to be useful. An extraordinary method to make changes to PDFs is to transform PDF into Word report, make any alters, and convert it back to a PDF.
What’s the most easiest approach to change over PDF to Word on Mac? Reorder could ring a bell, yet it’s a problem. As a rule, the first arranging doesn’t cause it to the new stage, and you’ll need to invest your valuable energy repetitively reflowing and modifying content in Word, to send it back once more inevitably.
The fact of the matter is you need entirely to realize how to change over PDF to Word on Mac — regardless of whether to consent to your rental arrangement or right a File grinding away. So why not gain proficiency with the ideal approaches to change over PDF to Word doc presently to make your life a lot simpler later on.
-
How to Changed PDF to Word with Google Docs
So how would you transform PDF into Word rapidly and flawlessly? Truth is there are a couple of convert to change over PDF to Word to make a basic altar in your documents. For instance, you could turn over PDF to Word doc utilizing Google Drive or Adobe Acrobat Pro. You could likewise catch PDF text with an implicit Mac utility called Automator. However, the genuine mystery is to realize a couple of cutting edge applications that accomplish all the work for you. How about we plunge into all.
How to changed PDF to Word with Google Docs
Google Docs is a famous internet altering apparatus, and there’s a decent possibility that you as of now, store some PDFs inside its stockpiling arrangement called Google Drive, which likewise permits you to change over PDFs to Word docs without the need to download a PDF to your PC first. Note that if your PDF incorporates heaps of pictures, Google Drive may expel them in the last document.
Here’s how to set your Google Drive to peruse PDF Files in Google Docs and afterward convert them into Word archives:
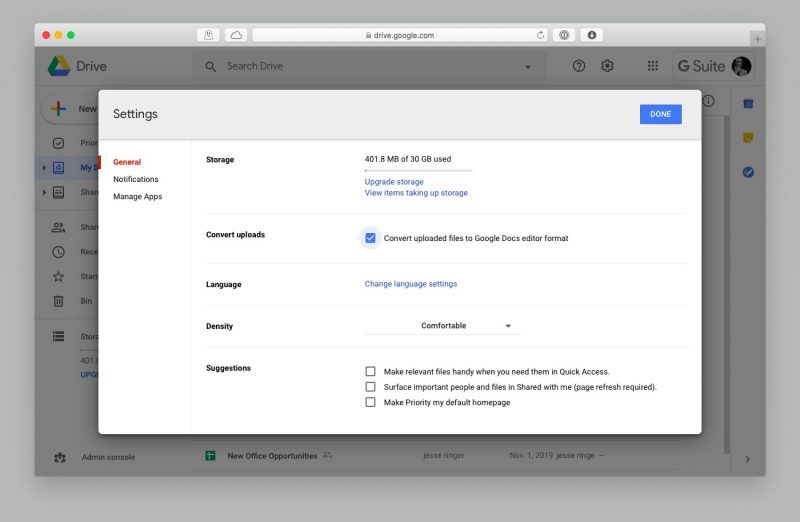
- Click on the machine gear-piece image at the upper right in Google Drive and pick Settings
- In the General tab, check the crate in “Convert transfers” that states, “Convert transferred documents to Google Docs manager position.”
- Find the ideal PDF Files inside Google Docs and right-click on it.
- Choose “Open with” and select Google Docs
- Once another Google Doc window opens, click File in the top-bar menu and select Download as Microsoft Word
Google Drive works genuinely well if you have a first PDF content record that you have to alter in Word. In any case, if your PDF document is picture overwhelming, you’re going to require an all the more impressive PDF to Word converter for Mac.
How to Converts PDF to Word Using Adobe Acrobat Pro
Adobe Acrobat Pro is another finished answer for the make and alters PDFs. The beneficial thing about it is that your text styles and format highlights, for example, slugs and tables, will be left flawless. In any event, when you’re out of the workplace, you can, in any case, trade PDF to Word utilizing a versatile adaptation of Acrobat.
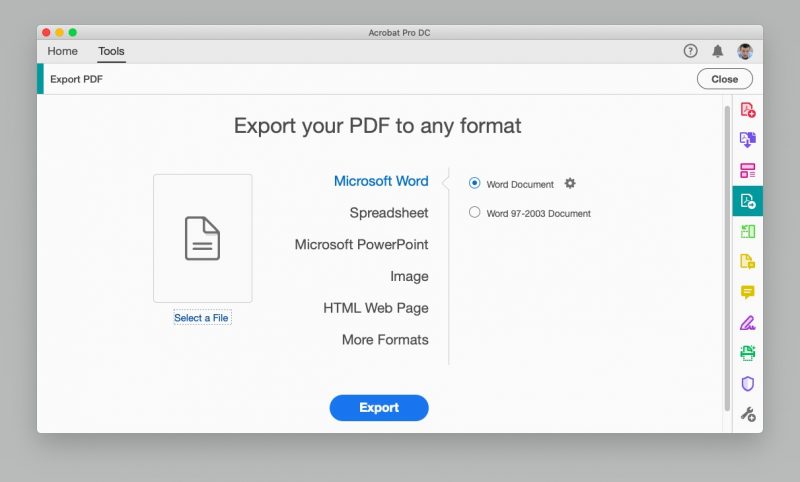
To change over from PDF to Word utilizing Adobe Acrobat Pro:
- Open your ideal PDF document
- Choose the Export PDF apparatus on the correct sidebar
- Select Microsoft Word as the fare arrangement and afterward Word Document
- Click Export
- Save and name your Word document in your ideal area
If the PDF document contains any checked content, Acrobat will remember it consequently.
How to convert from PDF to Words using Automator
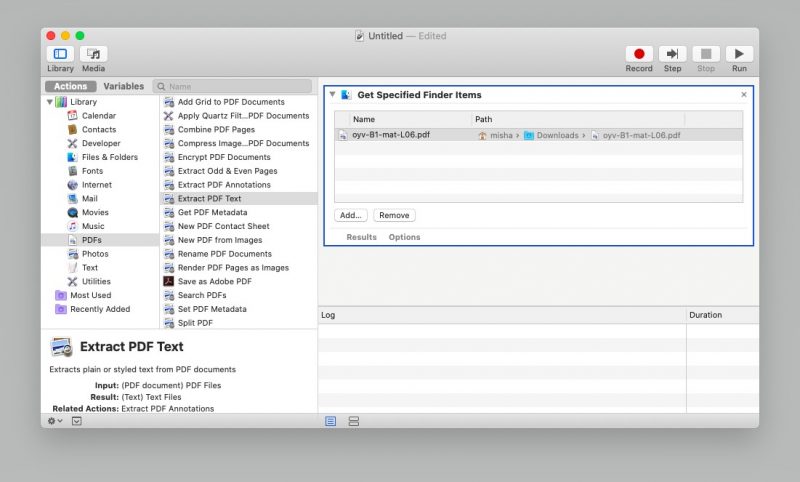
Automator is a Mac utility, incorporated right with your macOS. It by and large assists with simple undertakings, for example, renaming records in bunches or moving documents in mass. For our motivations, Automator likewise offers to help with extricating content from PDF without changing over the File to Word. You would then be able to alter the material in any word processor, for example, the Ulysses application.
To utilize Automator for separating content:
- Open Automator through the Applications envelope
- Select Workflow and tap Enter
- Click on Files & Folders in the left segment
- In the subsequent segment, select Ask for Finder Items and drag it into the correct sheet that says “Drag activities or records here to manufacture your work process.”
- Choose the PDFs in the left section and select Extract PDF Text situated in the subsequent segment
- Drag and drop Extract PDF Text to one side under Find Files and Folders
- Select Rich Text rather than Plain Text to hold organizing
- Choose where you need Automator to put your separated content documents
- Save as an application, open the new Automator application, and select the PDF you need to get the content from
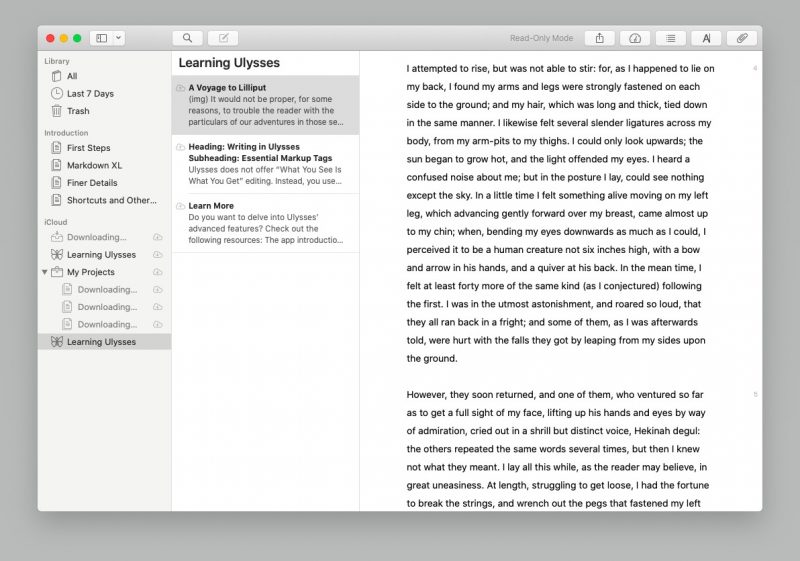
Open the new Rich Text archive in a word processor like Ulysses, an engaged composing application. Ulysses encourages you to compose with a clean interruption-free UI just as structure and organization your piece in its Markdown manager. Advantageously, you’re additionally ready to keep your side notes, portrayals, and original copies in the application’s library. At the point when you’re set, trade your work into a very much planned digital book or another PDF document.
Ulysses can likewise be the response to how to change over Word to PDF on Mac since it’s ready to open Word Files and fare anything as PDF as well.
On another note, Automator works extraordinary for working with content documents, yet what would you be able to would on the off chance that you like to remove words from pictures in your PDF?
How to extract Text from The images with Prizmo
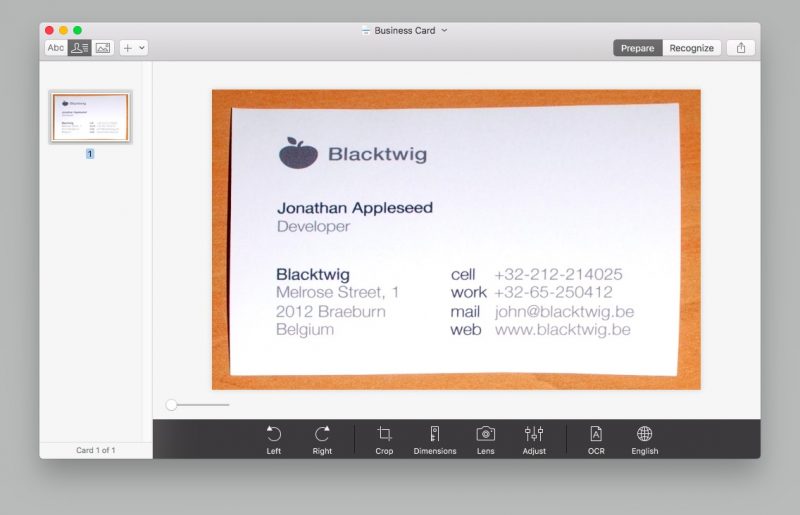
At the point when you need to snatch material implanted in an image, you need Prizmo.
Prizmo is a first application that utilizes optical character acknowledgment (OCR) to make accessible PDF archives. It additionally allows you to alter or address little blunders or designing slip-ups in filtered documents, similarly as you would have the option to in your preferred word processor. Prizmo is your closest companion in case you’re hoping to work with content in any printed papers, business cards, or even receipts.
How to Edit PDFs without Converting them to Words :
If making sense of how to send out PDF to Word seems like an excessive amount of work — there’s another method to alter them, too, utilizing PDFpen.
PDFpen is a ground-breaking manager you can use to include new pictures, messages, and even marks legitimately to your PDF records. You can likewise delete and alter existing substances, resize or move designs, and Files from different sources while holding organizing.
Use PDfpen when you have to audit and add criticism to PDF records. You’d have the option to feature, underscore, or add adjustments to any file. With a necessary simplified component, you can include new pages, reorder existing ones, or join separate PDF records into one. In case you will be altering PDF Files all the time, PDFpen is an unquestionable requirement have.
Since you realize how to send out PDF to Word, extricate content from PDF, and even alter your PDF record straightforwardly, you can assume responsibility for your significant archives and make adjustments varying.
Conclusion :
Best of everything is that each of the three applications referenced above: Ulysses, Prizmo, and PDFpen, are accessible free for seven days as a feature of the preliminary , an assortment of more than 160 Mac applications, all of which guarantee to fill your heart with joy on Mac as profitable as it very well maybe. Attempt and see with your own eyes today!
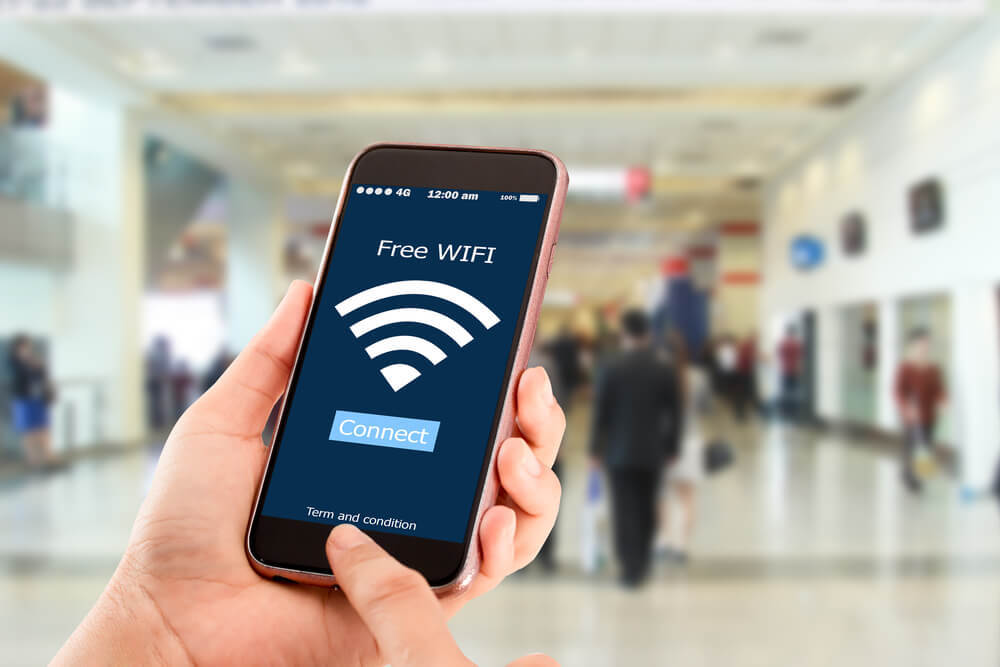
How To Set Up iPhone Hotspot
Even though the accessibility of wireless networks has developed to the point of pervasiveness — in specific urban communities, entire midtown regions are currently secured with free internet — there are still all that could be needed cases where your WiFi connection may be spotty or non-existent.
Wifi-explorer-mac application arranges screens (for example, on a means of transport during the drive). Here is we know Set Up to iPhone Hotspot .
What is a hotspot? How accomplishes hotspot work? It’s a component on your telephone that transforms it into a convenient switch, accepting LTE (or 3G) connection and outputting a WiFi arrange that your different devices can join. Also, it’s not hard to do by any stretch of the imagination. Follow our quick bit by bit direct beneath for how to utilize as iPhone Hotspot whenever.
-
How To Use My Phone As A Hotspot ?
At the point when you need to utilize your iPhone to seed the web to different devices, the main thing you ought to do is check the tying terms with your system supplier. In some cases, making a hotspot will go through your standard information, now and then, you’ll be charged extra, and once in a while, sharing information could be debilitated inside and out (famous with boundless information plans).
After you’ve affirmed the chance of utilizing your iPhone hotspot, you can without much of a stretch transform telephone into hotspot:
- Go to Settings ➙ Personal Hotspot
- Switch on Allow Others to Join
There’s likewise another approach to make an individual WiFi hotspot:
- Access your Control Center. On iPhones without the Home catch (iPhone X and later), swipe down from the top corner. On more seasoned iPhones swipe up from the base.
- Tap and hold the square with WiFi, Bluetooth, Airplane Mode, and so forth.
- After the square uncovers more choices, click on Personal Hotspot to enact it.
That is all on iOS 13. On the off chance you despite everything haven’t refreshed your telephone, the stream for how to utilize hotspot is somewhat unique:
- Go to Settings ➙ Personal Hotspot
- Switch on the Personal Hotspot alternative
It’s additionally a smart thought to turn on Bluetooth if you have it off. That way, you’d have the option to connect with your versatile hotspot application through WiFi, Bluetooth, and USB.
-
How to use Mobile hotspot via WiFi ?
When you realize how to utilize telephone as a hotspot and have enabled it in Settings, interfacing your different devices to it through WiFi is maybe the most right choice:
- On your Mac, open System Preferences ➙ Network, or snap on the WiFi symbol in the menu bar. On your iOS gadget, go to Settings ➙ WiFi.
- Discover the WiFi coordinate with your telephone’s name and click to connect
- Enter the secret word given to you on the Personal Hotspot screen. You can likewise change this secret key whenever.
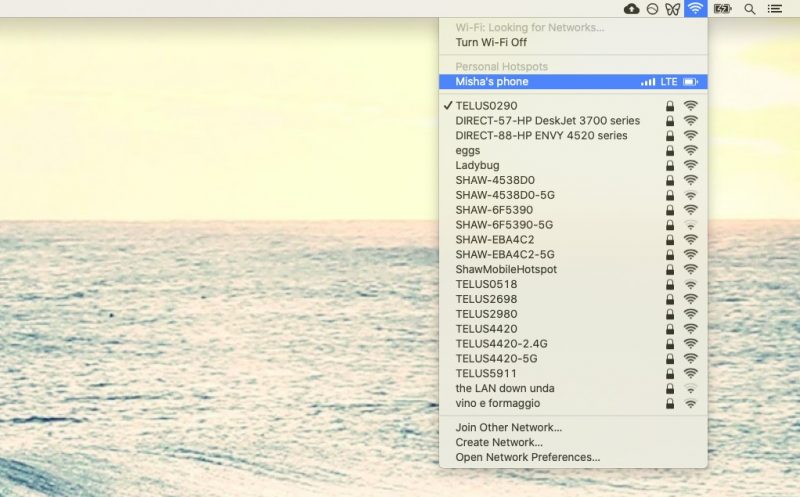
If you see a blue bar at the highest point of your screen, that implies your iPhone hotspot is dynamic. In case, there are a couple of different approaches to interface too.
-
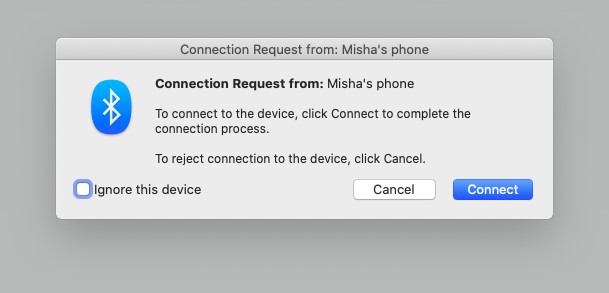
How to use hotspot via Bluetooth ?
Another choice to connect with your versatile hotspot application is utilizing Bluetooth, which allows you to stay away from complicated passwords:
- Turn on Bluetooth on your Mac or some other objective device
- On your iPhone, go to Settings ➙ Bluetooth and pick your device from the rundown.
- Back on your Mac, select Connect in the spring up window. The web should work automatically now.
-
How how does hotspot work with USB ?
In case you’re not into remote connections with your telephone (for example for security reasons, since wired connections are substantially more hard to hack into) at that point you can transform the phone into a hotspot with a USB link as well:
- Connect your phone to your Mac through USB
- Open the iPhone to enable frill and click Trust to allow your Mac to get to
- Discover your telephone in the WiFi settings and connect
On the off chance you discover the iPhone hotspot not working, you can attempt to launch your telephone or update its iOS variant — which could all be done from iTunes in any macOS before Catalina and in Finder on the off chance you have Catalina and later.

-
How to save data with Personal WiFi Hotspot ?
Since versatile information is still a long way from modest, it’s a great plan to know about its amount you’re utilizing. Macintoshes are infamous for sending and accepting vast amounts of files from the web. So first make a point to kill your hotspot after use consistently:
- Go to Settings ➙ Personal Hotspot
- Switch off Allow Others to Join
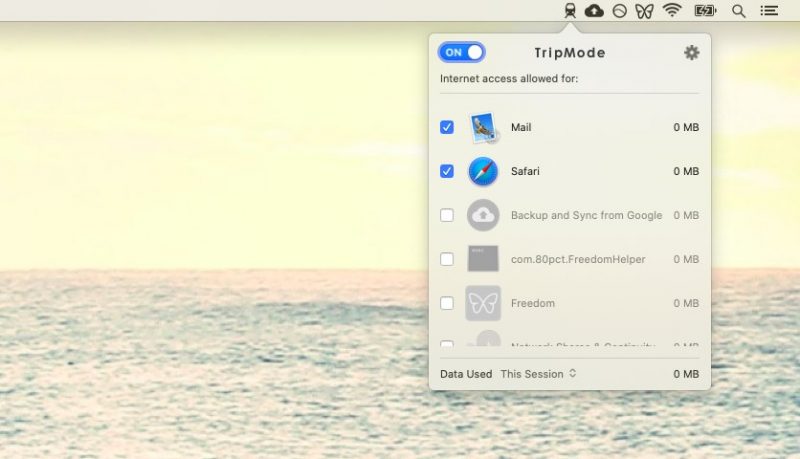
Be that as it may be, how would you know the measure of information you’re utilizing while at the same time being associats with the web? You need an application like TripMode.
TripMode is a lightweight, however compelling utility that lives in your menu bar and screens every byte sent all through your Mac. The application at that point lets you determine which forms you need to have web get to (for example, Mail or Safari) and confine the rest (for example, cloud reinforcements) so they don’t carelessly deplete your information.
Also, with TripMode, you’re ready to restrain the measure of information to be utilized generally speaking or time to be associated and maintain a strategic distance from additional charges. Also, if you use your portable hotspot application, usually, you can place in a custom timetable, and TripMode would initiate all alone. Only a couple of snaps, and you have more control than any time in recent memory.
-
How to Monitor your Network Quality ?
There are scarcely any things more disappointing than the moderate web. Today we anticipate that our recordings should stream immediately, regardless of how HD they are. It’s likewise totally conceivable. Most urban areas currently offer LTE associations that can move up to 40 Mbps, which is sufficient for any YouTube video. What’s more, with the presentation of 5G, the average download speed may increment by multiple times.
Once in a while, Anyways, you may encounter issues with your system association — and there could be 1,000 potential reasons. How would you investigate?
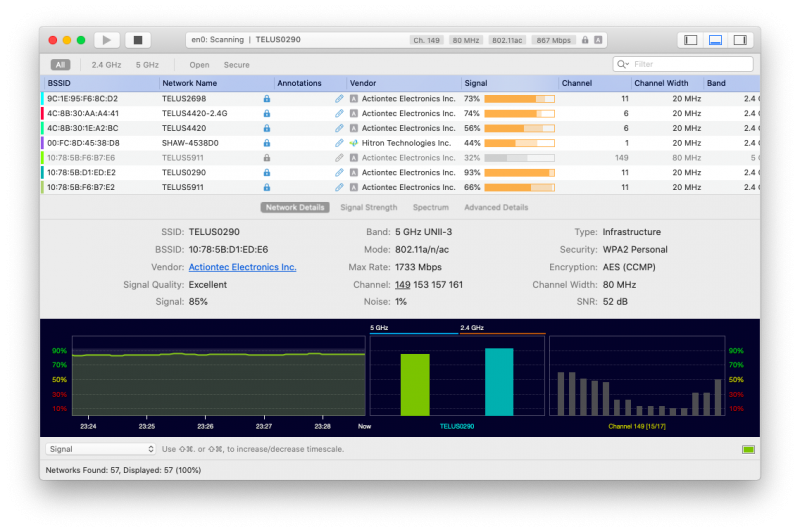
WiFi Explorer is a definitive application for checking and fixing your WiFi connection. It gives you an abundance of insights about your web status, for example, changes in transmission capacity, signal quality, clamor level, and significantly more.
Likewise, WiFi Explorer naturally recognizes any system issues and gives you point by point thoughts of how to approach unraveling them and capitalize on your arrangement.
So now, you realize how to make and how to utilize versatile hotspots anyplace you go, either with the assistance of your WiFi, Bluetooth, or an essential USB link. Also, you could gain proficiency with all the rudiments of WiFi observing with WiFi Explorer and system information the board with TripMode.
Conclusion :
The best part is that WiFi Explorer and TripMode are accessible to you free for a seven-day preliminary, a stage with more than 160 first Mac applications, running from WiFi the board to wellness to home stock, and significantly more. Make the initial move towards a quick and secure system today!
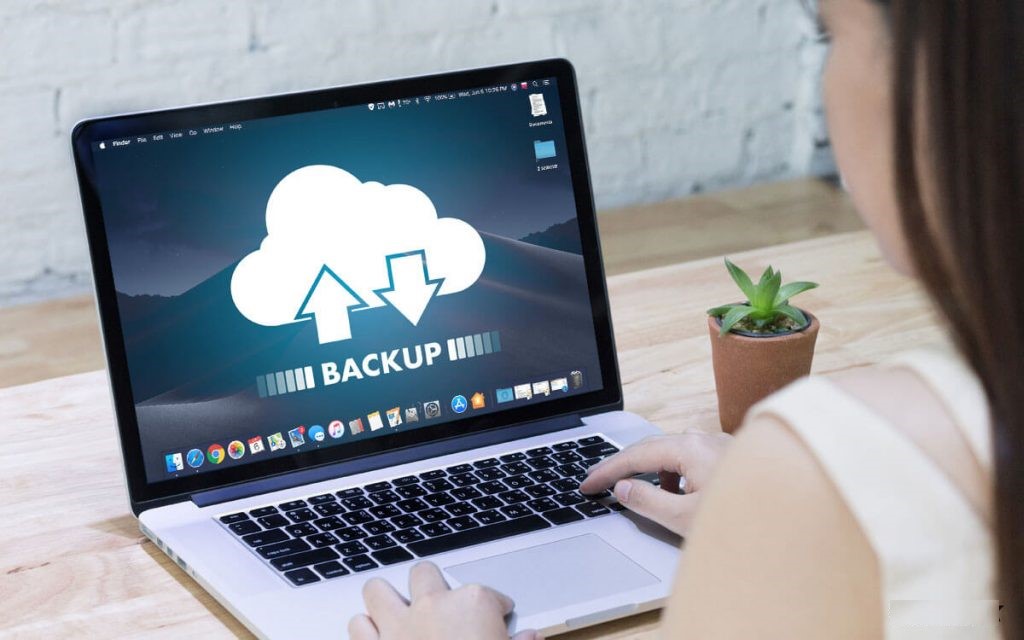
How to Backup Your Mac ?
Having a macOS backup up is never an ill-conceived notion. Your machine may get harmed, could glitch, or more awful. Regardless of which issues may emerge, the backup can assist you with recovering your advanced existence without beginning from the starting point.
Apple has a worked in highlight for this named Time Machine and recommends backing all records up in iCloud. It is anything but a terrible framework – it’s merely not extraordinary. Time Machine can be finicky about reestablishing to another or revamped machine, and iCloud is touchy about matching up. On the whole, believing Apple’s picked framework isn’t your most logical option.
Be that as it may, what alternatives are there, and which would it be a good idea for you to utilize? We’ll walk you through each & let you realize which is likely best for you when it’s an ideal opportunity to Mac backup .
-
How to Backup Mac Using Time Machine and iCloud ?
To utilize Time Machine, you’ll first need an external drive. This can be a USB drive, AirPort Time Capsule (which has been ended), another Mac, or a Network Attached Storage arrangement. Since Apple has stopped its AirPort switches, we’ll center around external drives and NAS stockpiling wired legitimately to your Mac.
To begin with, ensure your Mac is supporting records up to iCloud. To check if it is, follow these means:
- Select the Apple logo in the upper left of your menu bar
- Select ‘Framework Preferences’
- Select ‘Apple ID’
- Ensure ‘iCloud Drive’ is chosen
- Select ‘Choices’ to one side of iCloud Drive
- Ensure ‘Work area and Documents Folders’ are chosen
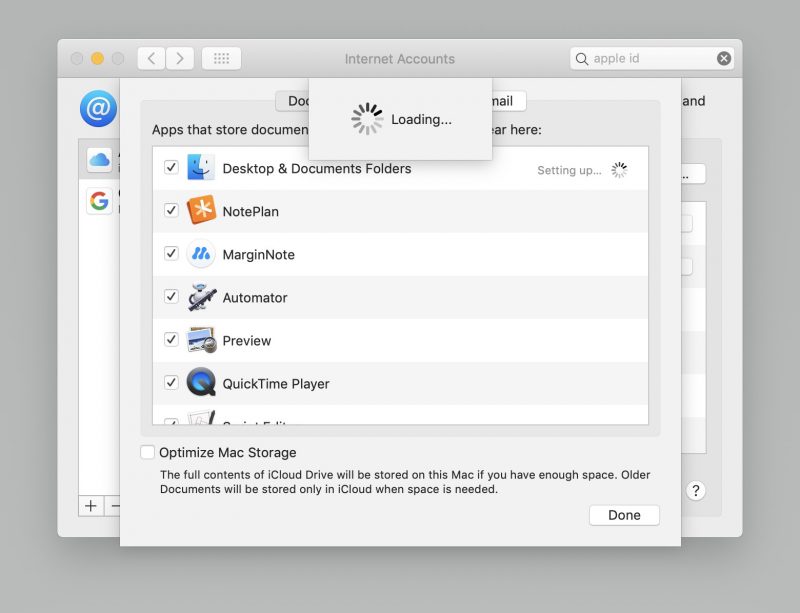
This guarantees the documents and envelopes on your Mac are adjusting to iCloud. If you experience an issue where choosing the ‘Work area and Documents Folders’ choice quickly flips off or won’t match up, sign out of iCloud on your Mac (System Preferences > Apple ID > Overview > Sign Out) and sign back in.
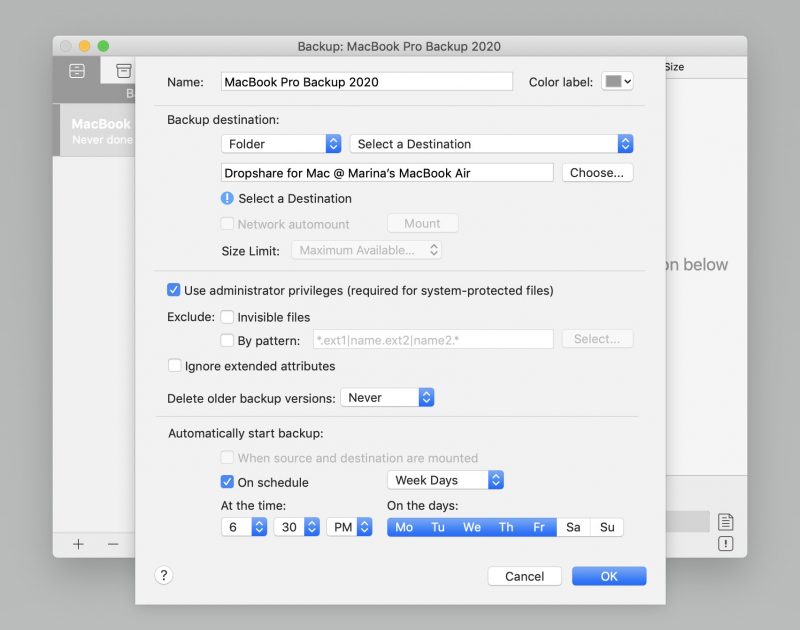
With an external drive appended to your Mac, make the accompanying moves to backup your Mac utilizing Time Machine:
- Open the Time Machine application
- ‘Select Disk’
- Pick your outer Drive starting from the drop menu
- Click ‘Use Disk’
Ensure ‘Back-Up Automatically’ is chosen on the left half of the window. This Allows Time Machine to make irregular, compacted backup of your Mac (or ‘pictures’) you can get to whenever. This is the procedure for how to support Mac to an external hard drive, regardless of which drive you’re utilizing.
-
The Pros and Cons of iCloud and Time Machine
The center contention for Time Machine and iCloud as your Apple backup arrangement is its Apple items. Both are accessible for nothing and can fill in as a fundamental arrangement.
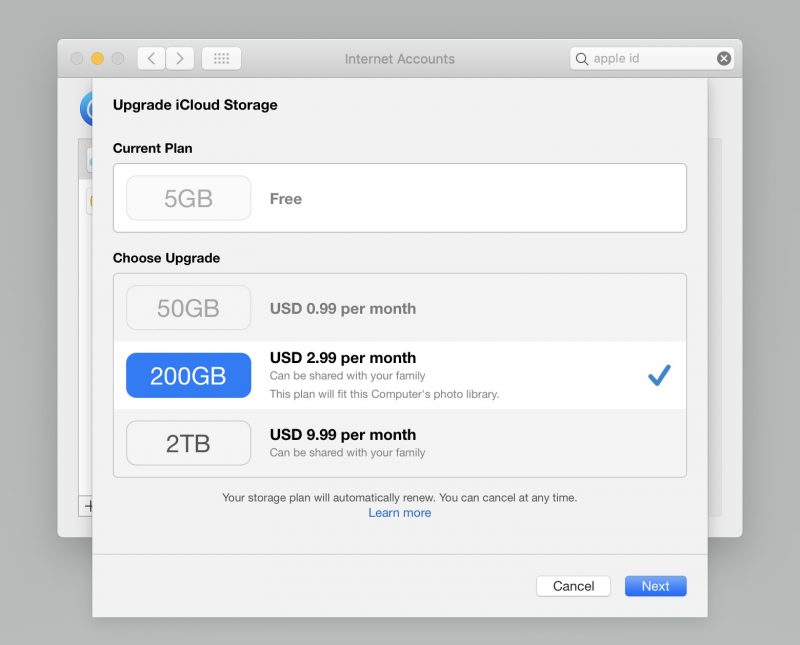
You might be thinking about how to backup Mac to iCloud, and the appropriate response is dubious. You get 5GB free iCloud stockpiling, and that is commonly insufficient for a Mac backup, so iCloud is best used to adjust records. The essential update is 99 pennies for every month, except that, is nearly $12/year. Is it worth that a lot to adapt your documents across devices? Once Photos and different administrations begin squeezing into iCloud as a synchronizing motor, it generally rules out documents and envelopes from your Mac.
You may likewise be thinking about what does Time Machine backup does? Time Machine is helpful yet not always compelling. It can take days (honestly) to reestablish a Mac from a Time Machine backup. Those reclamations regularly come up short, or won’t start. It’s an awkward procedure.
Likewise, remember backing up your Mac and adjusting records are isolated things. You can’t make a Time Machine backup to iCloud. Support is a depiction of your Mac; that is the reason it’s called a ‘picture.’ It’s likewise why Apple calls its backup framework ‘Time Machine.’ You mostly return to a point in Time.
iCloud matches up documents progressively, yet it is anything but a backup. You’d need to re-download applications and restore accounts if you needed to begin without any preparation with another Mac. Your records would all match up, yet nothing else.
Backing Up Your Mac Like a Pro
First of all: dispose of the swell. Your Mac collects a ton of arbitrary documents, treats, additional items, augmentations, and information you needn’t bother with. Applications like CleanMyMacX are incredible for disposing of the swell.
CleanMyMacX consequently finds everything that eases back your Mac down or involves a lot of memory and offers to dispose of, all things considered, for you with a couple of snaps. It even permits you to physically take out applications, administrations, augmentations, or additional items without the difficulty of attempting to make sense of Apple’s hierarchal record framework. Backup can occupy huge amounts of room, and CleanMyMacX decreases the size of your support – which likewise makes reestablishing from that reinforcement quicker!

When you run CleanMyMacX to upgrade your Mac, two applications are incredible for backup and synchronization: ChronoSync Express and Get Backup Pro.
ChronoSync Express is extraordinary for support up documents and organizers on your Mac to a remote drive or server. It permits you to pick which documents and envelopes are matched up and select the Time generally helpful for you to reinforce your Mac’s files. ChronoSync Express truly sparkles when there are many Macs included; instead of pay Apple for iCloud, ChronoSync synchronizes data and envelopes to various Macs – and can be utilized on iPhone or iPad.

Furthermore, if you need a committed backup answer for iOS or Android, there’s consistently AnyTrans, which backs up and matches up the entirety of your portable information to your work area.
Get Backup Pro additionally synchronizes and backs-up documents and organizers, yet make things a stride further by imitating Time Machine and making pictures of your Mac for use as a backup. Like Time Machine, Get Backup Pro takes into consideration booking, yet also packs your backup to lessen their overall size by up to 60 percent. Joined with CleanMyMacX, your backup picture record size could be decreased a considerable amount!
Conclusion :
If you need to have a backup of your Mac and document synchronizing as a component that might consistently fill in as portrayed, Time Machine and iCloud are fine. Nor is dependable; many times, iCloud quits synchronizing without informing you, and Time Machine backup doesn’t generally work.
A more astute approach to backup and adjusting is utilizing CleanMyMacX to advance your machine; at that point, Get Backup Pro to backup your computer. ChronoSync Express is incredible for file backup and matching up, as is AnyTrans for cell phones. You Can Also Check This Article To Hide Photos on Your iPhone & iPad Device .
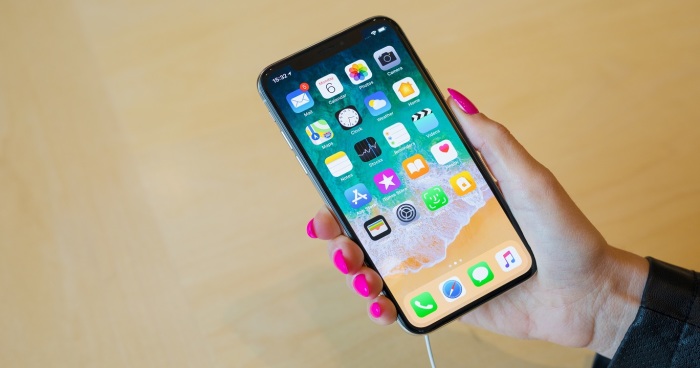
How to Clear Cache on iPhone & iPad
If your iPhone/iPad stockpiling is diminishing at a disturbing rate or your Device is getting more slow to react? It’s an ideal opportunity to clear the store files. Reserve is only the brief documents made during everyday use. These documents are made consequently and it is essential to know to erase them.
Restarting your iPhone is the simplest method to clear the reserve and expel the transitory documents on your iPhone and iPad. Be that as it may, it won’t free the reserve from Safari program and thirty-party applications that you introduced from the application store.
-
Clear Safari Browser Cache on the iPhone and iPad
Safari program store incorporates spared site pages, pictures, treats and other transitory Records. Clearing them that will free up some space on your iPhone. It likewise supports the speed of your program.
- #1: On your iPhone \ iPad, open the Settings application.
- #2: Scroll down the settings page and choose Safari.
- #3: Again look down and click Clear History and Website Data.
- #4: Select Clear History and Data to affirm.

-
Delete App Cache on the iPhone and iPad
The means to clear application reserve on your iPhone and iPad may shift starting with one application then onto the next application. Contingent upon the designer, you might have the choice to erase store records. Here, we have utilized the Slack application to tell you the best way to erase the application reserve.
- #1: Go the Settings application.
- #2: Scroll down and click Slack.
- #3: Enable Reset Cache on thenext dispatch if it is killed.
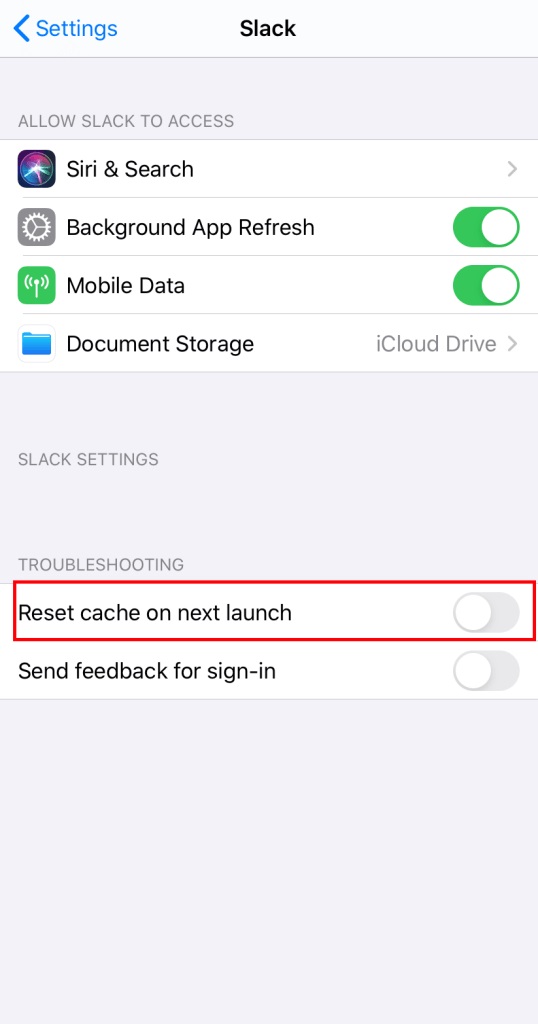
Once in a while, the choices to clear the store will situate inside the application. For instance, you can erase the store of the Chrome program by utilizing its inbuilt settings.
-
Clear App Cache on iPhone and iPad by Reinstalling the Apps
Perhaps the most straightforward approach to erase the reserve of any application is expelling them from your Device and afterward reinstalling it from the Apple store. You can likewise erase the unused applications to free up some space.
- #1: Open settings and selects the General menu.
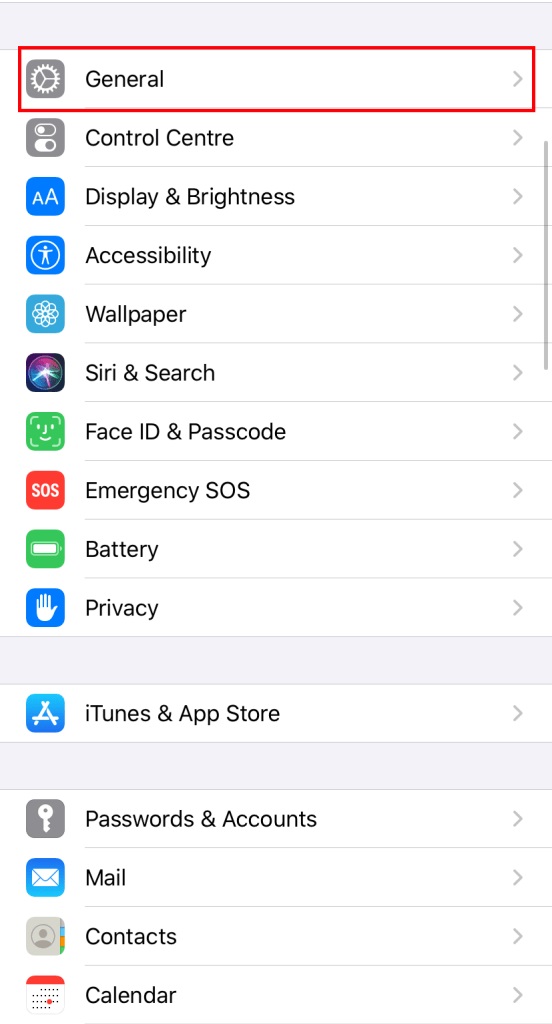
- #2: Select iPhone stockpiling to figure out which application has utilized more space on your device.
- #3: Select the application which consumed a lot of room.
- #4: Select Delete App.
- #5: Again, select Delete App to affirm the procedure.
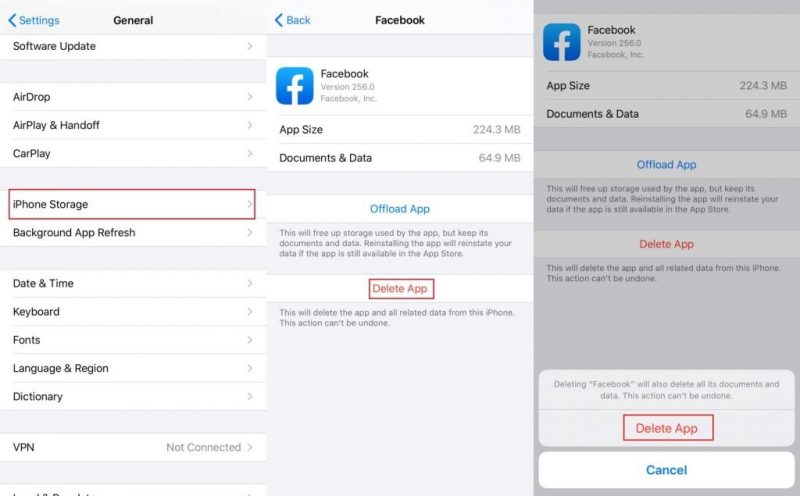
- #6: Upon erasing, all the reserve records related to that will be expelled from your device. Presently, head to the App Store and download the application which you uninstalled.
-
Delete iPhone/iPad Cache Using Third-Party Software
Notwithstanding the previously mentioned techniques, you can likewise utilize outsider programming like PhoneClean, iMyFone Umate and then some. You have to introduce this product’s on your Windows or macOS frameworks and afterward, you need to interface your iPhone/iPad to the PC. When associated you can erase all the store FILES effectively and rapidly.
Clearing reserve on iOS is direct and you can use previously mentioned data to do likewise. Notwithstanding boosting the exhibition of an application, it additionally opens up some space on your Device.
Conclusion :
Much thanks to you for visiting howtodownload.cc. For additional inquiries and input identified with iPhone/iPad reserve, utilize the remarks segment. Additionally, tail us on Facebook and Twitter for the most recent updates.