
How to Backup Your Mac ?
Having a macOS backup up is never an ill-conceived notion. Your machine may get harmed, could glitch, or more awful. Regardless of which issues may emerge, the backup can assist you with recovering your advanced existence without beginning from the starting point.
Apple has a worked in highlight for this named Time Machine and recommends backing all records up in iCloud. It is anything but a terrible framework – it’s merely not extraordinary. Time Machine can be finicky about reestablishing to another or revamped machine, and iCloud is touchy about matching up. On the whole, believing Apple’s picked framework isn’t your most logical option.
Be that as it may, what alternatives are there, and which would it be a good idea for you to utilize? We’ll walk you through each & let you realize which is likely best for you when it’s an ideal opportunity to Mac backup .
-
How to Backup Mac Using Time Machine and iCloud ?
To utilize Time Machine, you’ll first need an external drive. This can be a USB drive, AirPort Time Capsule (which has been ended), another Mac, or a Network Attached Storage arrangement. Since Apple has stopped its AirPort switches, we’ll center around external drives and NAS stockpiling wired legitimately to your Mac.
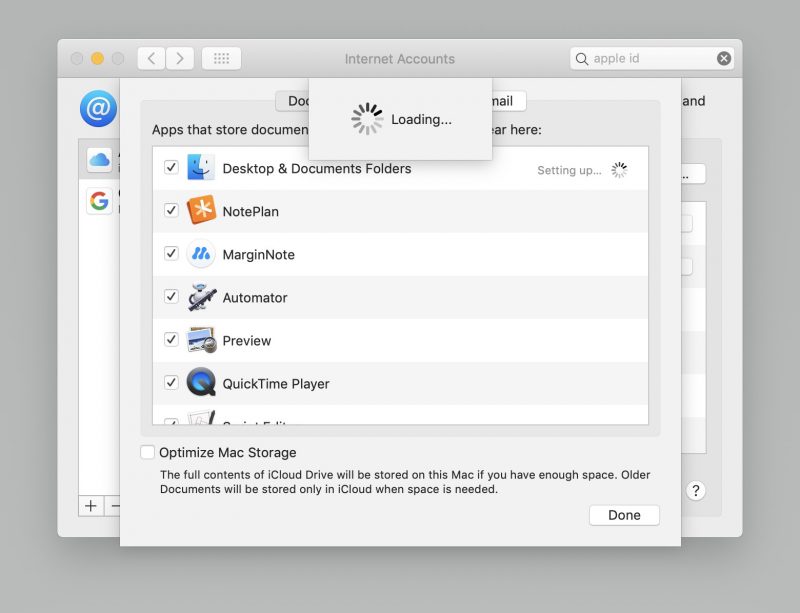
To begin with, ensure your Mac is supporting records up to iCloud. To check if it is, follow these means:
- Select the Apple logo in the upper left of your menu bar
- Select ‘Framework Preferences’
- Select ‘Apple ID’
- Ensure ‘iCloud Drive’ is chosen
- Select ‘Choices’ to one side of iCloud Drive
- Ensure ‘Work area and Documents Folders’ are chosen
This guarantees the documents and envelopes on your Mac are adjusting to iCloud. If you experience an issue where choosing the ‘Work area and Documents Folders’ choice quickly flips off or won’t match up, sign out of iCloud on your Mac (System Preferences > Apple ID > Overview > Sign Out) and sign back in.
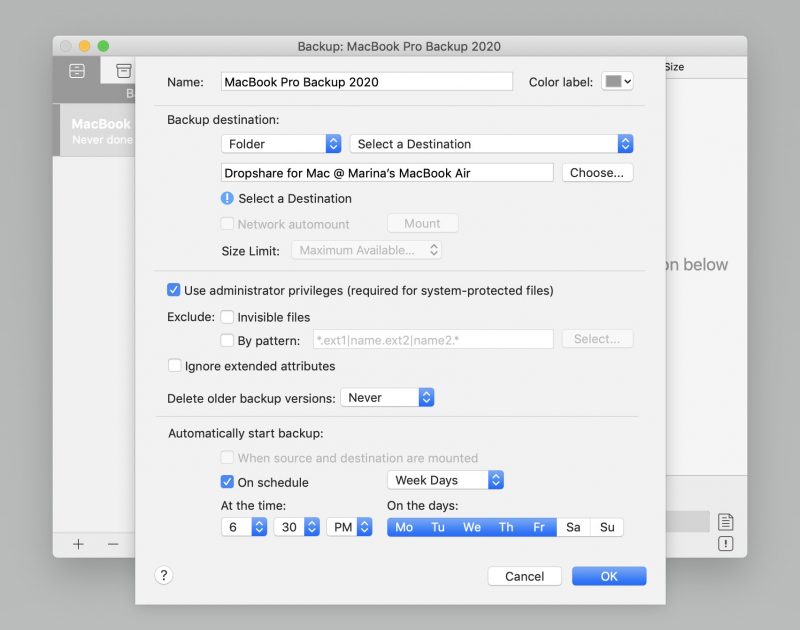
With an external drive appended to your Mac, make the accompanying moves to backup your Mac utilizing Time Machine:
- Open the Time Machine application
- ‘Select Disk’
- Pick your outer Drive starting from the drop menu
- Click ‘Use Disk’
Ensure ‘Back-Up Automatically’ is chosen on the left half of the window. This Allows Time Machine to make irregular, compacted backup of your Mac (or ‘pictures’) you can get to whenever. This is the procedure for how to support Mac to an external hard drive, regardless of which drive you’re utilizing.
-
The Pros and Cons of iCloud and Time Machine
The center contention for Time Machine and iCloud as your Apple backup arrangement is its Apple items. Both are accessible for nothing and can fill in as a fundamental arrangement.
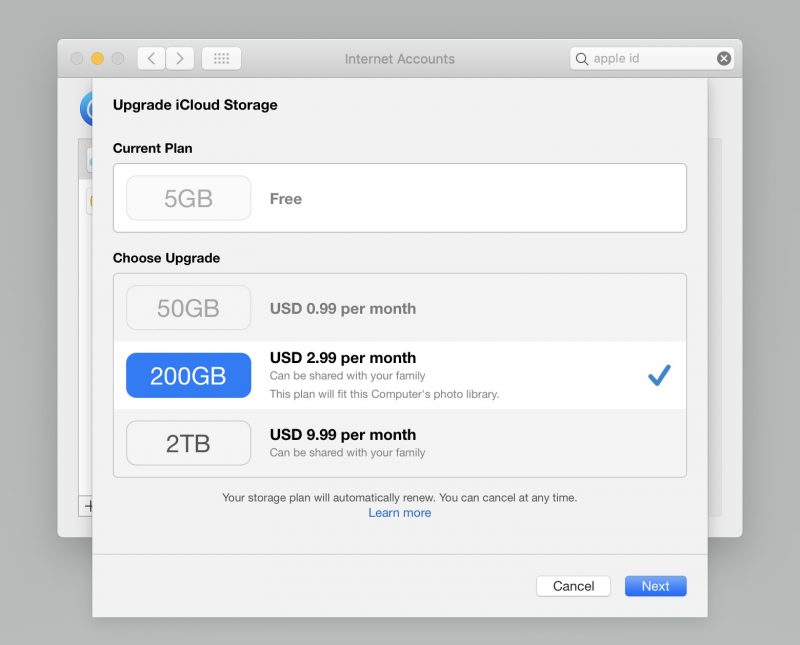
You might be thinking about how to backup Mac to iCloud, and the appropriate response is dubious. You get 5GB free iCloud stockpiling, and that is commonly insufficient for a Mac backup, so iCloud is best used to adjust records. The essential update is 99 pennies for every month, except that, is nearly $12/year. Is it worth that a lot to adapt your documents across devices? Once Photos and different administrations begin squeezing into iCloud as a synchronizing motor, it generally rules out documents and envelopes from your Mac.
You may likewise be thinking about what does Time Machine backup does? Time Machine is helpful yet not always compelling. It can take days (honestly) to reestablish a Mac from a Time Machine backup. Those reclamations regularly come up short, or won’t start. It’s an awkward procedure.
Likewise, remember backing up your Mac and adjusting records are isolated things. You can’t make a Time Machine backup to iCloud. Support is a depiction of your Mac; that is the reason it’s called a ‘picture.’ It’s likewise why Apple calls its backup framework ‘Time Machine.’ You mostly return to a point in Time.
iCloud matches up documents progressively, yet it is anything but a backup. You’d need to re-download applications and restore accounts if you needed to begin without any preparation with another Mac. Your records would all match up, yet nothing else.
Backing Up Your Mac Like a Pro
First of all: dispose of the swell. Your Mac collects a ton of arbitrary documents, treats, additional items, augmentations, and information you needn’t bother with. Applications like CleanMyMacX are incredible for disposing of the swell.
CleanMyMacX consequently finds everything that eases back your Mac down or involves a lot of memory and offers to dispose of, all things considered, for you with a couple of snaps. It even permits you to physically take out applications, administrations, augmentations, or additional items without the difficulty of attempting to make sense of Apple’s hierarchal record framework. Backup can occupy huge amounts of room, and CleanMyMacX decreases the size of your support – which likewise makes reestablishing from that reinforcement quicker!

When you run CleanMyMacX to upgrade your Mac, two applications are incredible for backup and synchronization: ChronoSync Express and Get Backup Pro.
ChronoSync Express is extraordinary for support up documents and organizers on your Mac to a remote drive or server. It permits you to pick which documents and envelopes are matched up and select the Time generally helpful for you to reinforce your Mac’s files. ChronoSync Express truly sparkles when there are many Macs included; instead of pay Apple for iCloud, ChronoSync synchronizes data and envelopes to various Macs – and can be utilized on iPhone or iPad.

Furthermore, if you need a committed backup answer for iOS or Android, there’s consistently AnyTrans, which backs up and matches up the entirety of your portable information to your work area.
Get Backup Pro additionally synchronizes and backs-up documents and organizers, yet make things a stride further by imitating Time Machine and making pictures of your Mac for use as a backup. Like Time Machine, Get Backup Pro takes into consideration booking, yet also packs your backup to lessen their overall size by up to 60 percent. Joined with CleanMyMacX, your backup picture record size could be decreased a considerable amount!
Conclusion :
If you need to have a backup of your Mac and document synchronizing as a component that might consistently fill in as portrayed, Time Machine and iCloud are fine. Nor is dependable; many times, iCloud quits synchronizing without informing you, and Time Machine backup doesn’t generally work.
A more astute approach to backup and adjusting is utilizing CleanMyMacX to advance your machine; at that point, Get Backup Pro to backup your computer. ChronoSync Express is incredible for file backup and matching up, as is AnyTrans for cell phones. You Can Also Check This Article To Hide Photos on Your iPhone & iPad Device .
How to Restore Deleted Files From iCloud
Most Apple clients consider iCloud as their essential store to reinforcement and reestablish documents and media,to keep up a key better than average ways from data adversity from their iPhone, iPad, and Mac. In spite of the fact that, if the information gets expelled even from the iCloud drive, it would be even hard to reestablish your lost information from your iPhone or Mac. There are some workarounds in the event that you have inadvertently erased records, photographs or archives from your iCloud Drive.
Go for a stroll through our guide on the best way to reestablish erased photographs, recordings, and documents from iCloud.
How do I Restore Pictures from iCloud ?
The iCloud Photos is empowered for each iPhone client as a matter of course and encourages you in a split second take a reinforcement of all the photographs and recordings from the iPhone. Your camera roll and different collections get spared to the distributed storage. You could even access all the photographs straightforwardly from any PC program by signing into your iCloud Account. Thus, the iCloud Drive goes about as a reinforcement store for your photographs. Regardless, in case you have empowered the “iCloud Photos” on your iPhone, at that point quite possibly it may get erased from your iCloud Drive also.
Fortunately, Apple has this “As of late Deleted” envelope for both iCloud and iPhone Storage. Accordingly, all your erased photographs won’t get erased for all time. If you can’t find the erased photographs from the “As of late Deleted” collection on or iPhone, you should have a check with the iCloud Photos too. Here is the way by which to restore eradicated photos from iCloud.
- Open iCloud.com from your PC program.
- Sign in utilizing your Apple ID. .
- Click on “Photographs.”
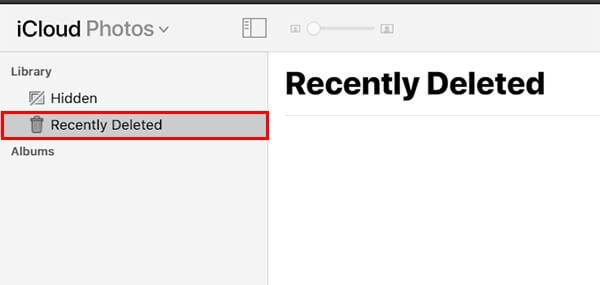
- Pick “As of late Deleted” from the sidebar on the left..
- Select the photographs you need to reestablish and click “ReStore.””
When you reestablish the erased record from the “As of late Deleted” collection the photographs will show up on all your adjusted Apple gadgets and on iCloud Drive.
How do I Recover Permanently Deleted Photos from iCloud ?
Erasing photographs from your collections or the camera roll never expel them forever. Nonetheless, in the event that you have left the erased for more than 30 days, or expelled forever from the “As of late Deleted” envelope, there is no place you could search for it. The for all time erased photographs from the iCloud Drive is gone everlastingly, and Apple doesn’t give you a choice to get them back.
From the iCloud angle, you could get them back in the event that you have, fortunately, spared the photographs you need to the “documents”. Something else, simply disregard the evacuated photographs. The other path around is to depend on the reinforcement stages other than iCloud for the erased photographs. For instance, you can utilize Google Photos to get the boundless photograph reinforcement storeroom. It will take an opportune reinforcement of all the photographs from your iPhone and stores in your Google account. Along these lines, regardless of whether you erase the photographs for all time from the iCloud Drive, they could be found in a split second with the Google Photos application. Trust me. This works and I have been utilizing the equivalent for a considerable length of time. You can likewise go for other interchange stages on the off chance that you need to.
Recover Deleted Documents from iCloud :
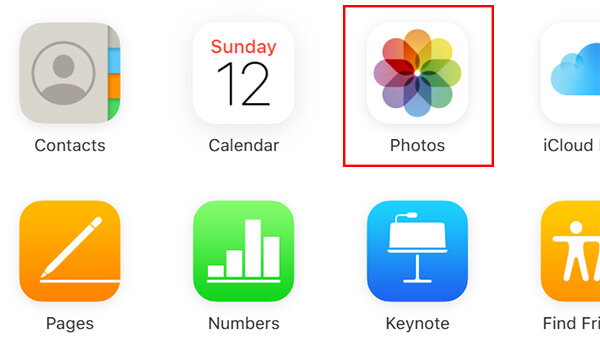
Apple gives astounding instruments remembering Pages and Numbers to make archives for the go. You can even spare an ordinary doc record or spreadsheet document utilizing any of these instruments and reinforcement on the iCloud Drive. The Numbers – a Spreadsheet elective, Pages – a Word Alternative, Keynote – a PowerPoint elective, are allowed to use for any Apple clients and you can make records in a flash utilizing any of your Apple gadgets. In the event that you erased an archive from Pages, Numbers or Keynote on iCloud, here is the means by which you can recoup them.
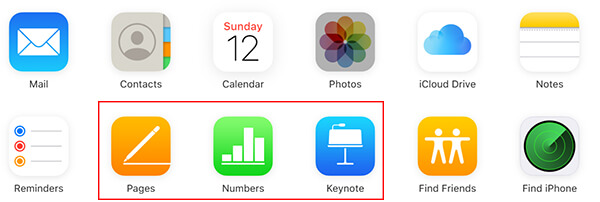
- Open iCloud.com on your computer’s web browser and sign in using your Apple login.
- Click on the app you want to recover deleted file from (Pages, Numbers, or KeyNote).
- Go to “Recently Deleted” from the left side panel.
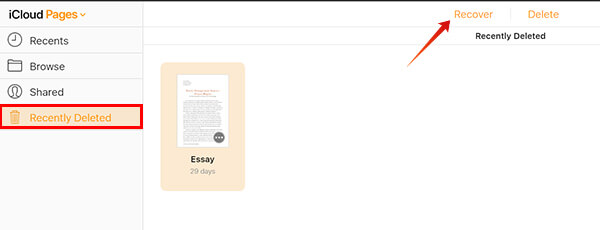
- Choose the files you want to recover.
- Click “Recover.”
Restore Deleted Files on iCloud :
The iCloud stockpiling permits you to recuperate documents from the “As of late Deleted” tab on bolstered applications. Be that as it may, the information you erased from the Files application or records in other unsupported configurations won’t be unmistakable legitimately utilizing iCloud. Actually, Apple gives an alternative to you to search up for all the erased documents from your iCloud drive and reestablish it if important. You could even discover all the unsupported records, contacts, and even web bookmarks here to reestablish to your iCloud. Follow the means to figure out how to reestablish every single evacuated datum on iCloud.
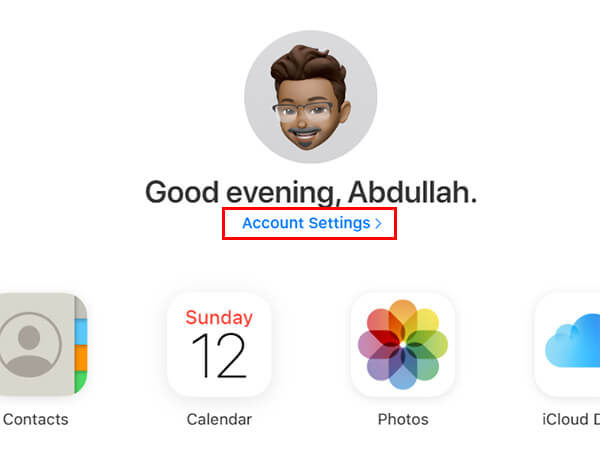
- Open the web browser on your computer PC and go to iCloud.com.
- After signing in to your account, click on the “Account Settings” link from the home page.

Click on the “Restore Files” link under the Advanced tab on the bottom left corner of the window.
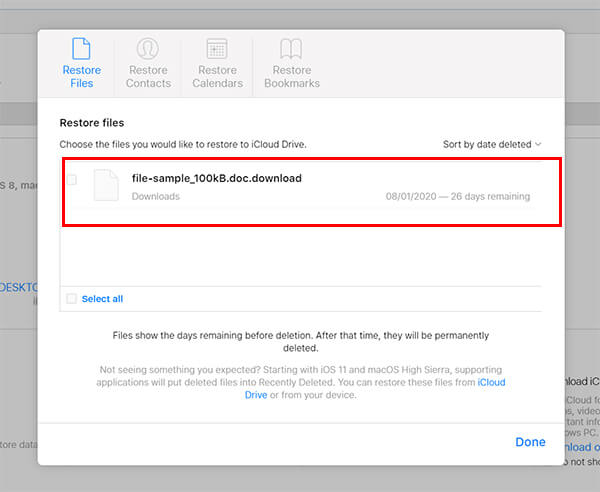
- Choose the files you want to restore to the old position.
- Click “Restore.”
It will reestablish the picked records back to their old situations from the “waste can.” You can likewise reestablish contacts and bookmarks along these lines, and read further to know more.
Restore Contacts on iCloud :
As we probably am aware, the contacts on your iPhone are constantly synchronized with iCloud. Subsequently, you can reestablish contacts on iCloud that you expelled from your iPhone. Discover how.
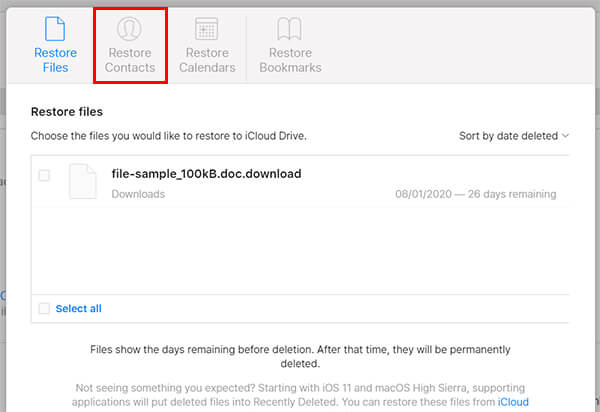
- Open iCloud.com and go to Account Settings.
- Click on Restore Contacts from the bottom left corner.
- Click “Recover” against the contact archive you want to recover.
When you restore a contact archive, the current contact list will be archived and saved to the iCloud and gets replaced by the older contacts list.
Calendars and Bookmarks :
The contacts, however Apple likewise lets you recuperate the schedule occasions and even Safari bookmarks that you erased. By unintentionally or not, on the off chance that you erased any of these from your iPhone or iPad, it is anything but difficult to get them back too. Be that as it may, the 30 days limit is there for such little information as well. The erased bookmarks and schedules will be erased forever in the event that you leave them immaculate for 30 days.
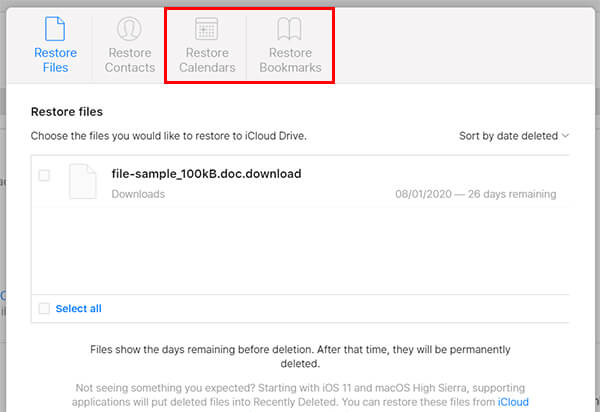
At the point when you enter the “Reestablish Contacts” window from the iCloud Settings, you could likewise discover the “Reestablish Calendars” and “Reestablish Bookmarks” tabs on the top. You can investigate the applicable tab and search out the as of late erased information from iCloud and recuperate effectively.
Bonus Tip : Take iTunes reinforcement to your PC or Mac of your iPhone intermittently. In this way, you could reestablish from an ongoing point to discover the missing information from your iCloud Drive.
Conclusion :
Thank you for the Study. In case you find any Other Method, Please do share in the comment section beneath.