In this Article, I will direct you on the best way to make a Bootable MacOS Mojave installer drive utilizing the Terminal on Mac. An outer Drive that you can use as an installer for MacOS Mojave is something to be thankful for to have. On the off chance that you have various Macs to overhaul, it’s very simple to connect the USB installer drive and run the installer than to sign into the App Store, download the 6.02 GB OS installer, and afterward run it.
Notwithstanding, there are Numerous Approaches to make a Bootable MacOS Mojave installer drive like utilizing outsider MacOS installer Applications, Disk Creator or Disk Drill however the most Straightforward approach to make a Bootable MacOS Mojave installer drive is Utilizing Terminal, which simple and Basic and furthermore you don’t have to introduce and extra programming. In any case, before Moving to our principle theme, we should have some snippet of data about MacOS Mojave 10.14, MacOS Mojave Highlights and MacOS Mojave Framework prerequisites.
MacOS Mojave 10.14 :
MacOS Mojave is succeeded MacOS High Sierra and was trailed by macOS Catalina. MacOS Mojave 10.14 is the fifteenth significant arrival of MacOS, Apple’s Macintosh PC work area working Framework. The working Framework’s Name alludes to the Mojave Desert and is a piece of a progression of California-themed names that started with OS X Mavericks.
MacOS Mojave Features :
Very nearly a year prior, Apple revealed MacOS Mojave, the most recent adaptation of its Mac programming. MacOS Mojave is a free update for Mac clients, and in case you’re utilizing an old adaptation of MacOS, it’s an entirely huge change. Not exclusively will it assist you with remaining sorted out and accomplish work all the more productively, yet it likewise incorporates numerous stylish choices to make utilizing a Mac all the more outwardly engaging. Here are a portion of the incredible highlights of MacOS Mojave:
1. Dark Mode :
High Sierra made it feasible for you to change your menu bar and dock into a darker shading plan, yet all in the middle of stayed somewhat white. Be that as it may, Thanks to macOS Mojave, the Mac at long last has a genuine dim mode. Simply change it to your System Preferences application.
2. Desktop Stacks :
Inside MacOS Mojave, another element called “Stacks” naturally sorts out all the arbitrary substance on your work area into a la mode heaps of archives on the correct side of the screen. The best part is to keep your stacks sorted out, regardless of what number of archives you add to your work area. For instance, in the event that you consistently take screen captures, MacOS Mojave will sort them consequently for you as opposed to dissipating them all over the place.
3. Better Screenshot Tools
MacOS Mojave makes catching anything on your PC more straightforward. Albeit taking single screen captures is still similarly as basic, Mojave presents a screen-getting menu with recording assets, for example, a commencement defer clock, the capacity to show or conceal the cursor in the shot, and better approaches to share and compose your screen captures rapidly.
4. New Mac App Store
Apple has overhauled the Mac App Store for MacOS Mojave starting from the earliest stage. The greatest changes are visual: you will presently observe auto-playing recordings and even articles on well known applications in the store, so you can peruse progressively about applications before introducing them. There are likewise better approaches to discover programming in the new Mac App Store. The new tabs of Discover, Build, Work, Play, and Improve assist you with finding the applications you don’t have or get more from the applications you as of now have.
C. System Requirements: Which Macs are Compatible with MacOS Mojave?
iMac – All models from late 2012, iMac 13,1 – 18,3
iMac Pro – All models, iMac Pro 1,1
MacBook & MacBook Retina – All models from late 2009, MacBook 8,1 – 10,1
MacBook Pro – All models from 2012, MacBook Pro 9,2 – 15,1
MacBookAir – All models from 2012, MacBook Air 5,1 – 7,2
Mac Mini – All models from 2012, Mac Mini 6,1 – 7,1
Mac Pro – All models from 2012, Mac Pro 6,1 and from 2010-2012 Mac Pro 5,1 Models with recommended Metal-Capable GPU
How to Form a Bootable MacOS Mojave Installer Drive Installer
Here’s how to form a Bootable MacOS Mojave 10.14 Bootable USB Installer for a clean present on your Mac. Be that because it may, let me specify a few fundamental things you’d like to have a few time as of late making a MacOS Catalina Bootable USB streak Drive Installer.
A. USB Flash Drive Installer
To complete the process, you’ll need a spare USB flash drive and your USB must be at least 8 GB and is formatted as Mac OS Extended. Remember that it will be deleted during the procedure and make sure to copy all your important data.
B. MacOS Mojave Installer Software
You would like to have the MacOS Mojave picture record. In case you have got a MacOS Catalina record at that point you’re good to go and in the event that you don’t have the record at that point you’ve got to download it from Mac App Store. No stresses! I will appear you how to download the MacOS Mojave record from the Mac App Store.
How to Download MacOS Mojave ?
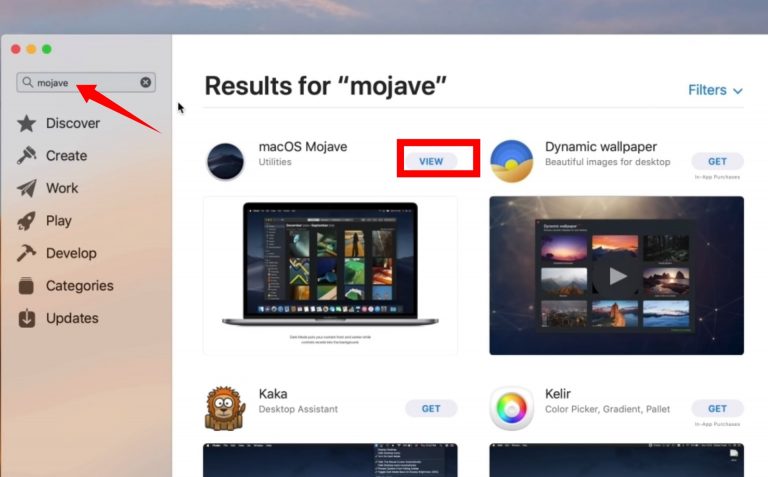
Step 1. Click on the Apple logo on the top Left-hand corner, select App Store.
Step 2. In the Search bar, search for “Mojave“. In results, you’ll see “macOS Mojave” then click on VIEW.
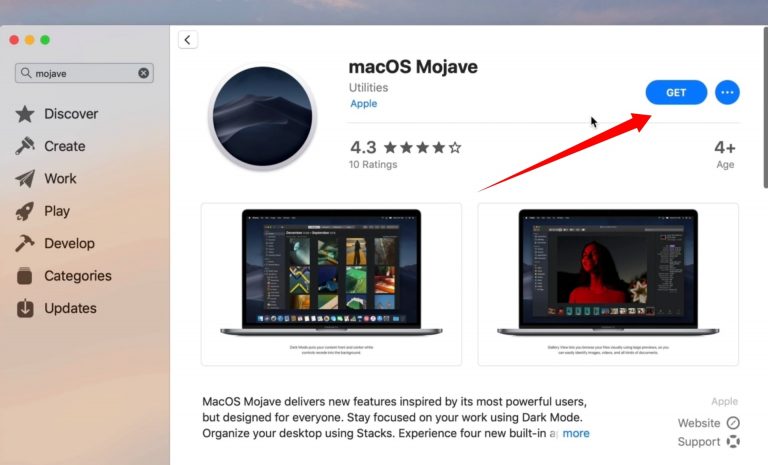
Step 3. In order to Download MacOS Mojave 10.14 click GET. (If you’ve already downloaded the installer, the Button will say Install instead of GET.)
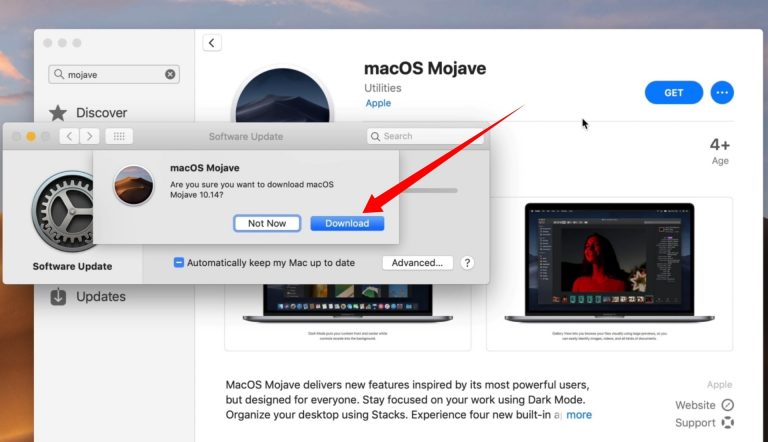
Step 4. Here, you’ll receive a notification “Are you sure you want to download MacOS Mojave 10.14? Of course, you want to! Click Download and wait until the MacOS Mojave download completes.
Step 5. Once the Download is complete, the installer will launch Automatically. But don’t Continue with the installation. Instead, press Command + Q on your keyboard to quit the installer.
How to Make A Bootable MacOS Mojave Installer Using Terminal ?
You don’t need to use Install any additional software like Disk Creator or Disk Drill to create a bootable installer. You can do it in Terminal and it’s easy. Here are the instructions and this is a step by step and complete guide.
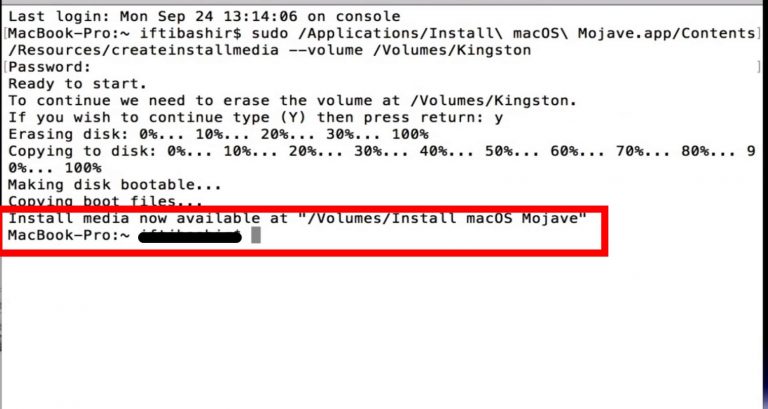
Step 1. In these instructions, I use Kingston as the name of the external drive. If your drive is named something else, you need to change Kingston to the name of your drive.
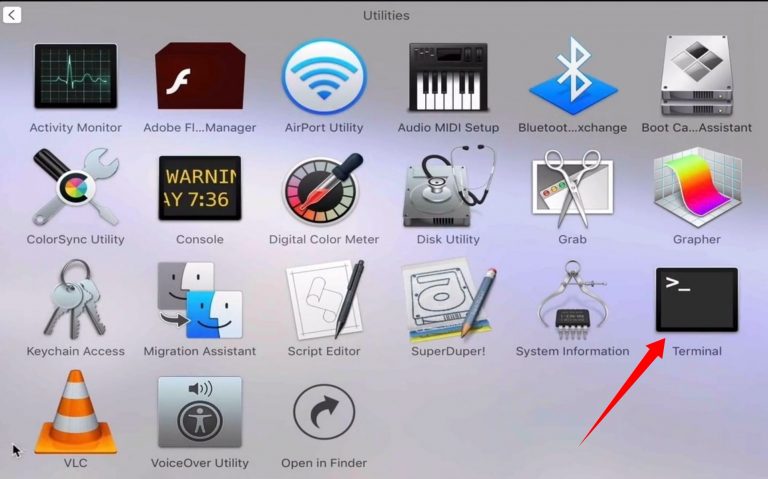
Step 2. Open Terminal. To open Terminal: Finder > Applications > Utilities > Terminal or simply open the Spotlight then search for Terminal.
Step 3. In the Terminal window, type sudo followed by a space. Keep the Terminal Window open!

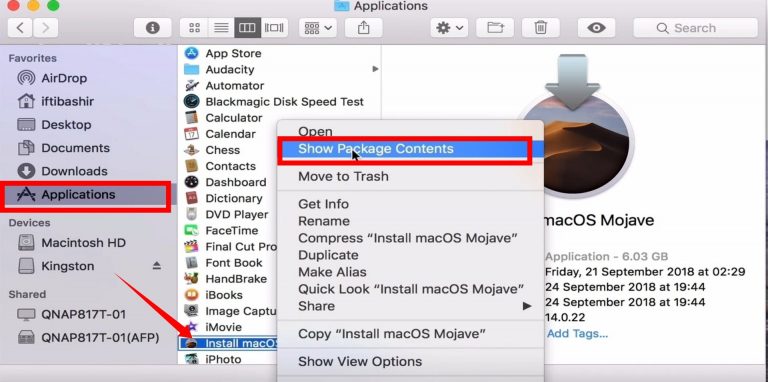
Step 4. Now, go to Finder then select Applications. Find Install macOS Mojave then right-click on it, select Show Package Contents.
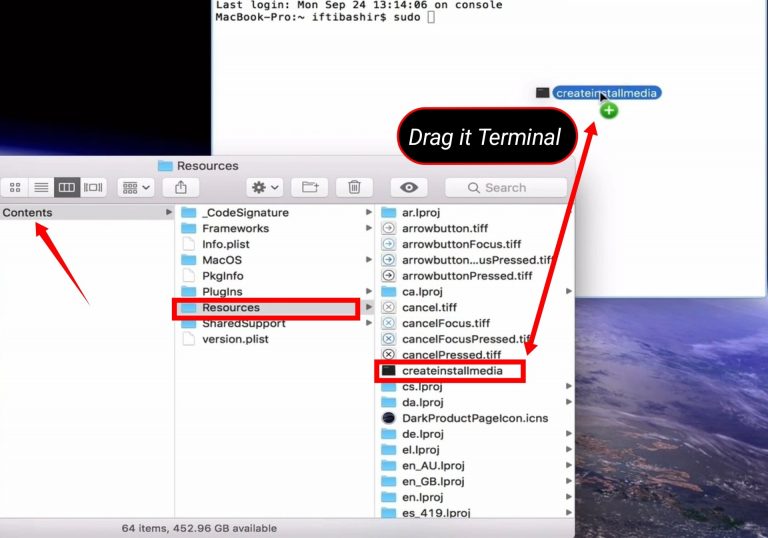
Step 5. In this step, select Contents, select Resources. Here you will find createinstallmedia file. Select the createinstallmedia file and then drag it to the Terminal window.
Step 5. In this step, select Contents, select Resources. Here you will find createinstallmedia file. Select the createinstallmedia file and then drag it to the Terminal window.
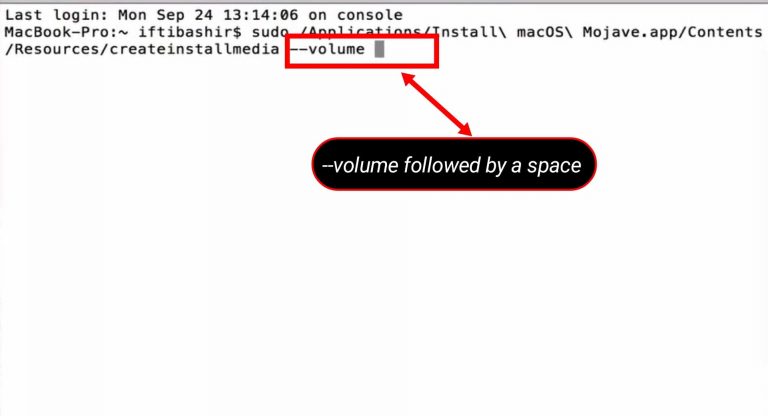
Step 6. In the Terminal Window, type –volume followed by a space.
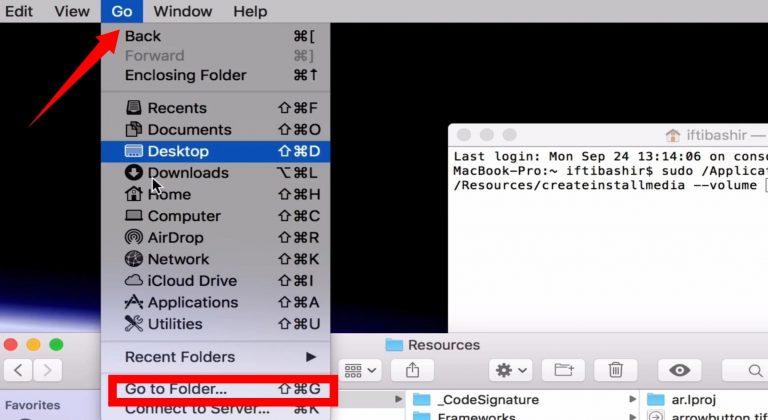
Step 7. In the Finder window, click Go then select Go to Folder.
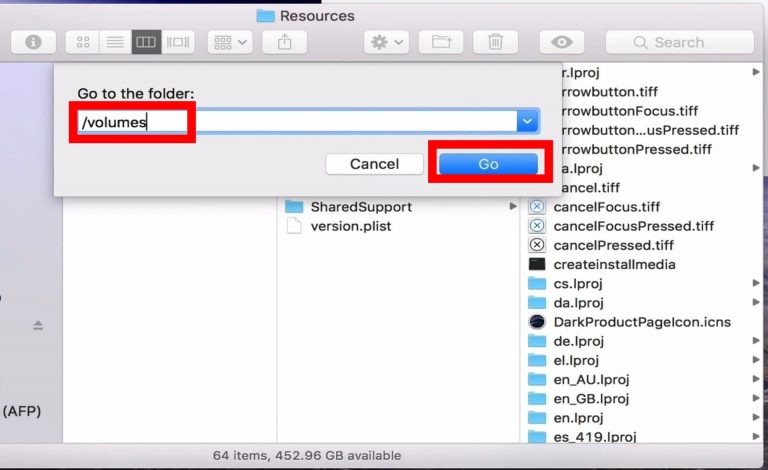
Step 8. Type /Volumes then click Go.
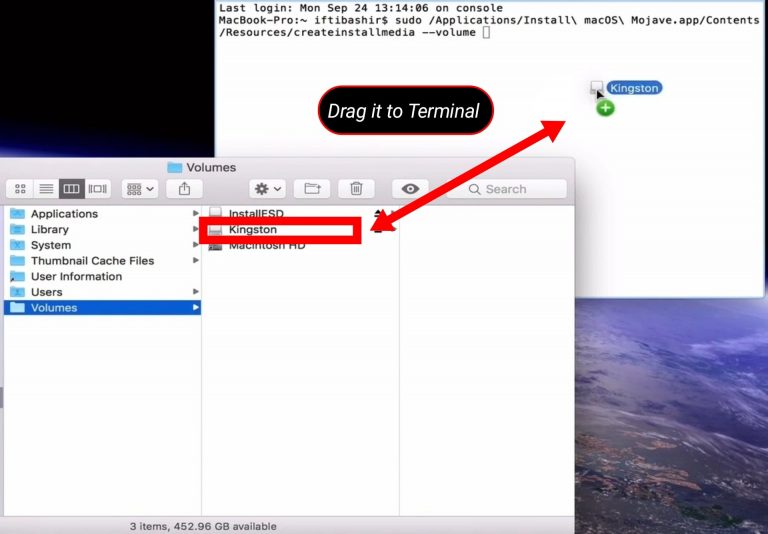
Step 9. You will find your USB Drive listed here. Select your USB Drive then drag it to the Terminal Window then hit Enter.
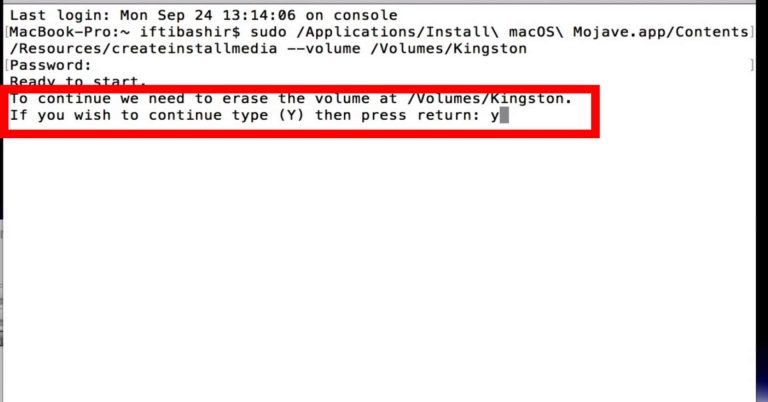
Step 10. Type your system password. If you’re prompted.
Step 11. Type “Y” and press Enter if you’re prompted. Because it will erase your USB files and data. Now, the command will create your Bootable MacOS Catalina installer directly on your USB drive.
Step 12. That’s it. A Bootable MacOS Mojave installer Drive installer has been created. MacOS Mojave installer
Conclusion :
This Article was almost how to make MacOS Mojave Bootable installer USB drive utilizing Terminal. You’ll be able create a MacOS Mojave Bootable installer with Terminal exceptionally Easily and the method is exceptionally simple and basic. There’s no got to download any extra or third-party program.


Add Comment